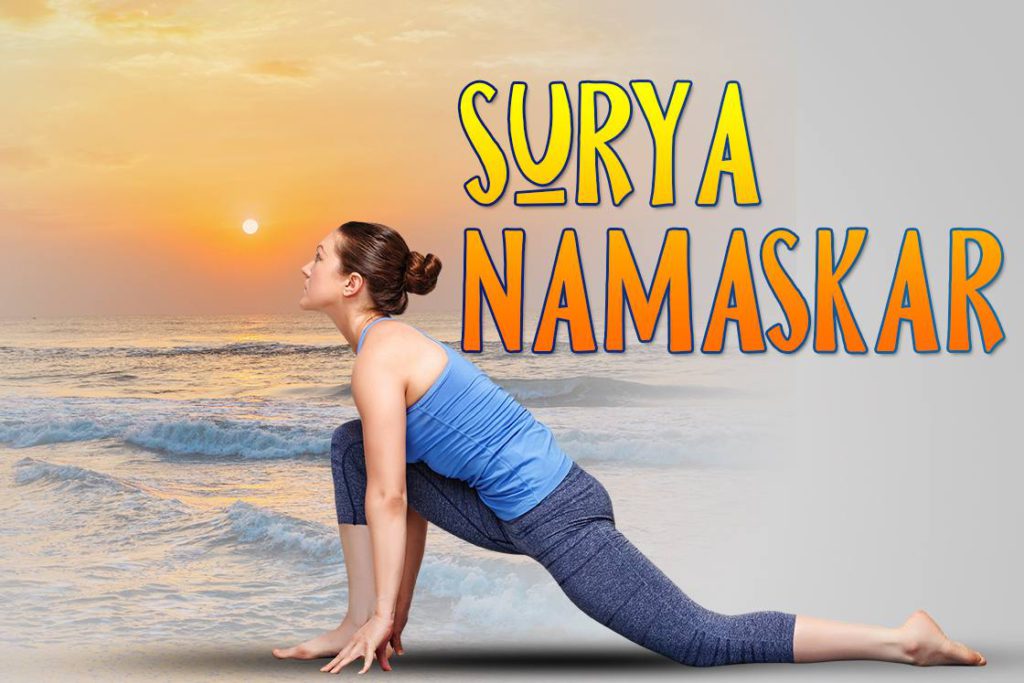
Surya Namaskar, commonly known as Sun Salutation, is a transformative sequence of 12 yoga poses that harmoniously blend physical postures, rhythmic breathing, and spiritual intent.
Rooted in Sanskrit, “Surya Namaskar” translates to “Sun Salutation,” symbolizing a heartfelt salute to the sun. Beyond its physical benefits, this practice holds profound significance in yoga, embodying a technique to honor the sun as the ultimate source of energy.
Beyond the yoga mat, Surya Namaskar mirrors the natural rhythms of our world, echoing the twenty-four hours of the day, twelve zodiac phases, and the biorhythms of the body.
In this guide, we will learn 12 steps of Surya Namaskar with its poses and health benefits. Continue reading to discover more..
Also read: Surya Namaskar Types in Different Yoga Styles (Hatha, Asthanga, Iyengar, etc.)
What Is the Meaning of Surya Namaskar?
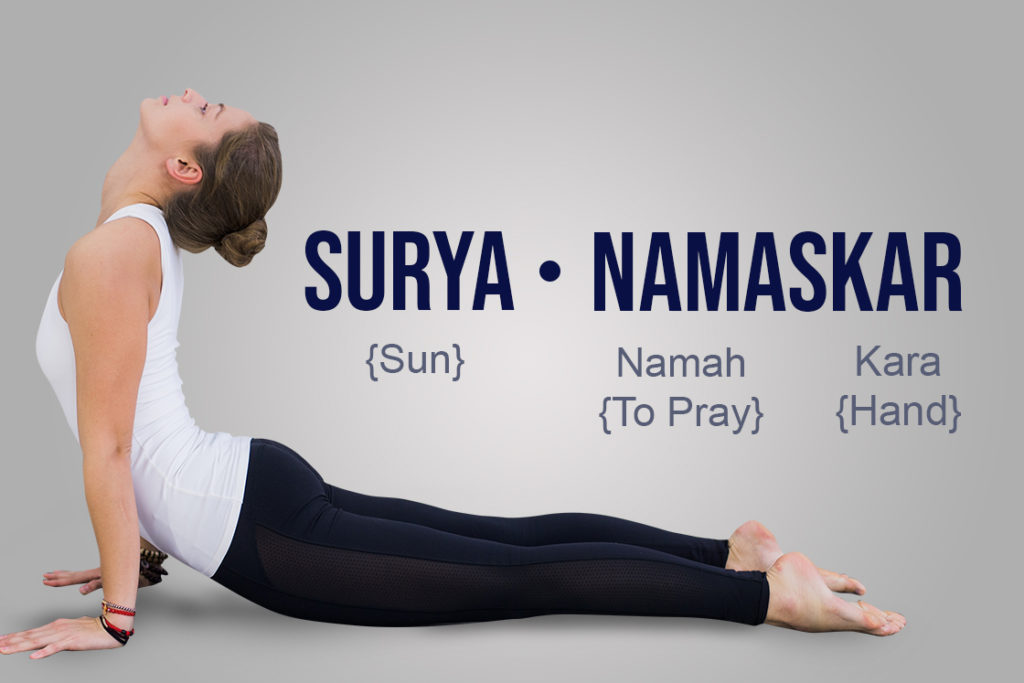
Surya Namaskar, originating from Sanskrit roots, translates to “Sun Salutation.” The term is a fusion of “Surya,” meaning “Sun,” and “Namaskar,” a combination of “Namah” (to pray) and “Kara” (hand).
Surya Namaskar yoga sequence involves a series of twelve poses, each a unique form of prostration (Namaskar), symbolizing a heartfelt prayer to the sun.
Namaskar in Surya Namaskar is a symbolic gesture, akin to Anjali Mudra, where the first pose (Prayer pose) becomes an offering to the Divine. In the context of Surya Namaskar, the practitioner’s 12 prostrations involve laying the body face-down, a unique form of salutation directed towards the divine presence, represented by the sun in our earthly realm. The act acknowledges the sun as the epitome of divinity in our mundane existence.
Surya Namaskar likely stems from the ancient Surya Narayana Pujas, rituals dating back 2,500 years. Interestingly, in the yoga practice, surya namaskar gained prominence in the 17th century, with Saint Samarth Ramdas being an early advocate.
Also read: Where did Surya Namaskar come from?
Surya Namaskar as a Spiritual Practice
Beyond the physicality of yoga, Surya Namaskar transforms into a profound spiritual practice, a Sadhana that intertwines the body, breath, and consciousness:
- Complete Devotion: Surya Namaskar is a gesture of complete devotion, where the practitioner, through a sequence of prostrations, expresses reverence and gratitude to the sun as the divine source of cosmic energy.
- Integration of Asanas, Pranayama, Chanting, and Meditation: The practice goes beyond mere physical postures. It integrates various elements such as asanas (poses), pranayama (breath control), and chanting of mantras creating a holistic Sadhana.
- Pingala Nadi Regulation: The Pingala Nadi, a pranic channel symbolizing the sun, finds its balance through the practice of Surya Namaskar. This regulation, in turn, harmonizes the energy levels of the practitioner.
- Alignment with Spiritual Energy Centers: Each movement in Surya Namaskar aligns with spiritual energy centers, creating a conduit for the practitioner to connect with higher states of consciousness.
As a spiritual endeavor, Surya Namaskar becomes a sacred journey, guiding practitioners toward inner balance, mindfulness, and a deeper connection with the universal energies.
Symbolic Representation of Surya Namaskar
Surya Namaskar’s symbolic representation transcends the yoga mat, echoing the celestial and earthly harmony:
- Twenty-four Hours of the Day: Surya Namaskar mirrors the cycle of a day, aligning the twelve poses with the twenty-four hours, offering a mindful salute to the sun throughout the day.
- Twelve Zodiac Phases of the Year: In its sequence, Surya Namaskar dances through twelve poses, synchronizing with the zodiac’s twelve phases, embodying a celestial rhythm in each movement.
- Biorhythms of the Body: The sequence resonates with the body’s internal biorhythms, creating a harmonious flow that extends beyond the physical postures to the very essence of our vitality.
- Homage to the Sun’s Sustaining Energy: Surya Namaskar becomes a sacred ritual, paying homage to the sun for its role in sustaining life on Earth and regulating the entire solar system.
This symbolic richness infuses each pose with a deeper meaning, making Surya Namaskar a holistic journey that transcends the boundaries of the yoga mat.
Surya namaskar for beginners: Tips before you start

By focusing on alignment, coordinating breath, and gradually progressing, you lay a strong foundation for a fulfilling yoga practice, making Surya Namaskar for beginners a truly enriching experience.
To ensure a harmonious and beneficial practice, consider the following tips:
- Alignment Focus: Ensure proper alignment in each pose to prevent strain and promote flexibility. Pay attention to feet, knees, and hand positioning for a balanced stance.
- Breath Coordination: Sync your breath with movements. Inhale during chest-opening poses, exhale during forward bends. Rhythmic breathing enhances energy flow.
- Mindful Posture: Stay mindful of posture. Engage core muscles, relax shoulders. This fosters injury prevention and strengthens the breath-movement connection.
- Gradual Progression: Start at a comfortable pace, gradually increasing intensity. Listen to your body, avoiding overexertion, especially if you’re new to yoga.
- General Guidelines:
- Practice Surya Namaskar on an empty stomach, preferably in the morning facing the sunrise or evening facing the sunset.
- Warm-up with gentle stretches before diving into the sequence to prepare the joints and muscles.
- If Surya Namaskar is your primary exercise, conclude with a relaxation pose like Shavasana to allow the body to absorb the benefits.
- Seek Guidance: If unsure about sun salutation poses or experiencing discomfort, consult a yoga instructor for personalized tips. Your practice is a personal journey; progress at your own pace.
Remember, Surya Namaskar is a personal journey, and each practitioner progresses at their own pace. By incorporating these tips, you can lay a strong foundation for a fulfilling and transformative yoga practice.
What Are the 12 Steps of Surya Namaskar?
Dive into the 12 steps of Surya Namaskar with Pranamasana flowing through Hasta Utthanasana, Padahastasana, Ashwa Sanchalanasana, Chaturanga Dandasana, Ashtanga Namaskar, Bhujangasana, Adho Mukha Svanasana, and concluding with Pranamasana.
In this sequence of 12 steps, each step is a new pose that brings together breath, movement, and a bit of spirituality.
Below is the break down of 12 poses of surya namaskar in the 12 steps in simple instructions, making it easy for you to enjoy this refreshing yoga practice.

- Step1 – Stand tall in Pranamasana (Prayer pose)
- Step2 – Inhale, stretch arms up & back in Hasta Utthanasana (Raised arms pose)
- Step3 – Exhale, bend forward into Hastapadasana (Standing forward bend)
- Step4 – Inhale, step back right leg back into Ashwa Sanchalanasana (Equestrian pose)
- Step5 – Hold the breath, Transition to Chaturanga Dandasana (four-limbed staff pose) by stepping both legs back
- Step6 – Exhale, drop your knees, chest, chin down in Ashtanga Namaskar (eight-limbed pose)
- Step7 – Inhale, raise the chest up into Bhujangasana (cobra pose)
- Step8 – Exhale, lift the hips and the tailbone up in Adho Mukha Svanasana (downward-facing dog pose)
- Step9 – Inhale, step forward right foot in Ashwa Sanchalanasana (Equestrian pose)
- Step10 – Exhale, step forward left foot and come in Hastapadasana (Standing forward bend)
- Step11 – Inhale, stretch arms up & back in Hasta Utthanasana (Raised arms pose)
- Step12 – Exhale, stand tall in Pranamasana (Prayer pose).
12 Poses of Surya Namaskar with Steps, Benefits, and Precautions
1. Pranamasana (Prayer pose)
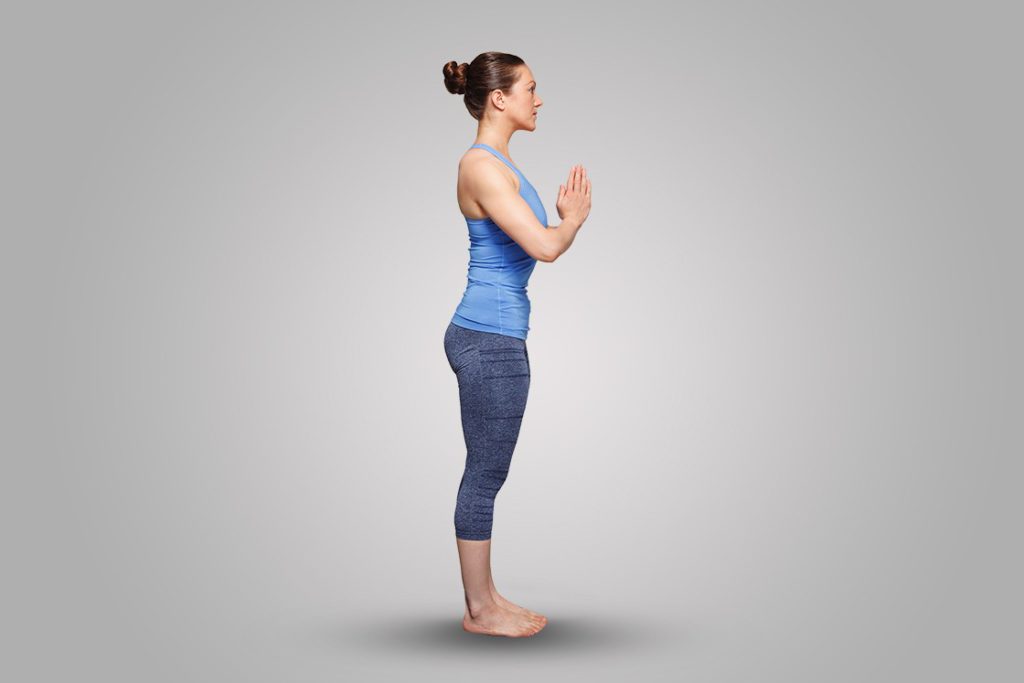
- Begin in a standing position with feet together and arms alongside your body.
- Gently bend your elbows, bringing your palms together in a Namaste gesture in front of your chest.
- Close your eyes, allowing your entire body to relax, and maintain normal breathing.
- Direct your focus towards the chest, emphasizing the Anahata Chakra, and chant “Om Mitraya Namaha“.
Benefits of Pranamasana (Prayer Pose)
- Centering Start: Pranamasana serves as a grounding pose, helping you center your focus and establish a mindful beginning to your practice.
- Emotional Alignment: The pose contributes to emotional balance, fostering a sense of calm and inner harmony.
- Heart Opening: The pose involves bringing the palms together at the heart center, promoting a gentle opening of the chest and activation of the Anahata Chakra.
- Mind-Body Connection: By closing the eyes and focusing on the chest, Pranamasana enhances the mind-body connection, encouraging a deeper sense of presence.
Precautions for Pranamasana (Prayer Pose)
- Gentle Start: Initiate the pose gently to prevent any strain. Avoid sudden or forceful movements before transitioning to the next pose.
- Body Awareness: Pay attention to your body alignment. Keep the spine straight without overextending or rounding. Eyes remain closed and mentally extend a warm greeting to the Sun, acknowledging it as the ultimate source of life.
- Wrist Comfort: If you experience discomfort in the wrists or shoulders, be cautious while bringing the palms together. Adjust the position to avoid strain.
- Stability: Ensure stable footing, distributing your weight evenly on both feet. Avoid locking the knees for better balance and support.
2. Hasta Utthanasana (Raised arms pose)
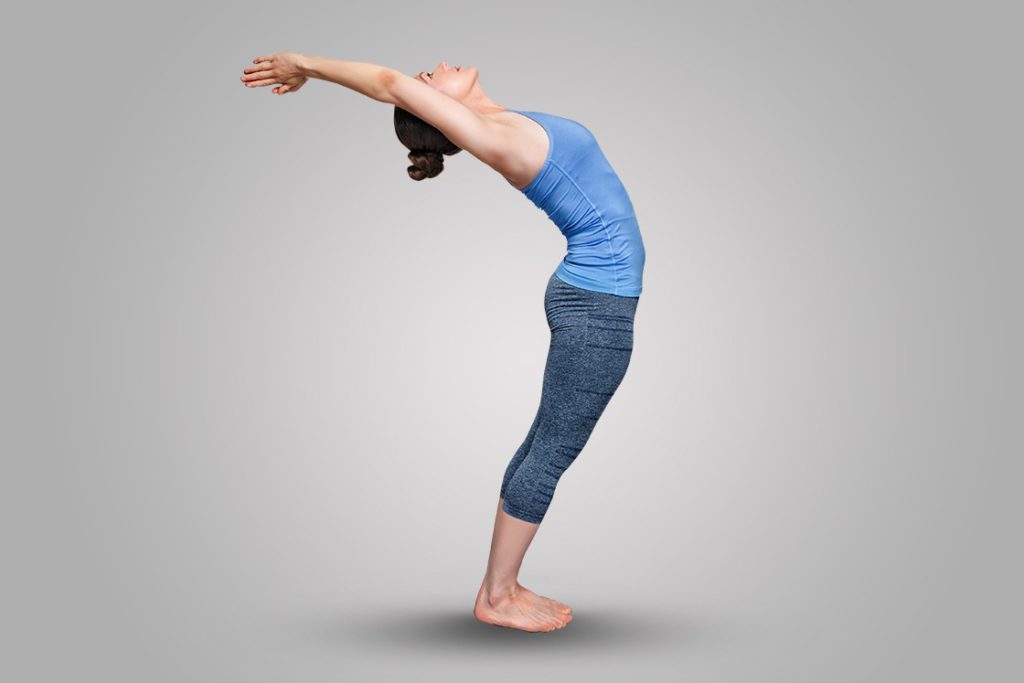
- Following a deep exhale in prayer pose, inhale as you separate your hands, lifting and extending your arms overhead.
- Direct your gaze upward, gently arching your back, and pushing your pelvis forward.
- Maintain a shoulder-width distance between your arms.
- Experience the stretch in your abdomen and the expansion of your lungs.
- Engage in chanting “Om Ravaye Namaha” during the practice of Hasta Utthanasana for a harmonious connection
Benefits of Hasta Utthanasana (Raised Arms Pose)
- Energizing Stretch: Hasta Utthanasana provides a revitalizing stretch to the arms, abdomen, neck, and back muscles, invigorating the entire upper body.
- Chakra Stimulation: This pose stimulates the Vishuddhi chakra, promoting a sense of balance and positively influencing the thyroid and parathyroid glands, essential for hormonal regulation.
- Digestive Support: Engaging in Hasta Utthanasana aids in improving digestion, fostering a healthy and efficient digestive system.
- Relief from Tension: The pose helps alleviate backaches and fatigue, offering relief from mild anxiety and promoting a sense of relaxation and well-being.
Precautions for Hasta Utthanasana (Raised Arms Pose)
- Moderation in Backbend: Approach the backward bend in Hasta Utthanasana with moderation. Avoid over-arching the back to prevent strain.
- Shoulder Awareness: Be mindful of your shoulders. If you have any existing shoulder issues, gently raise your arms to a comfortable position without causing discomfort.
- Breath Awareness: Maintain awareness of your breath. Avoid holding your breath and ensure a steady and controlled breathing pattern throughout the pose.
- Adaptation for Health Conditions: If you have any pre-existing health conditions, particularly related to the spine or shoulders, consider adapting the pose under the guidance of a qualified instructor.
3. Padahastasana (Standing forward bend)
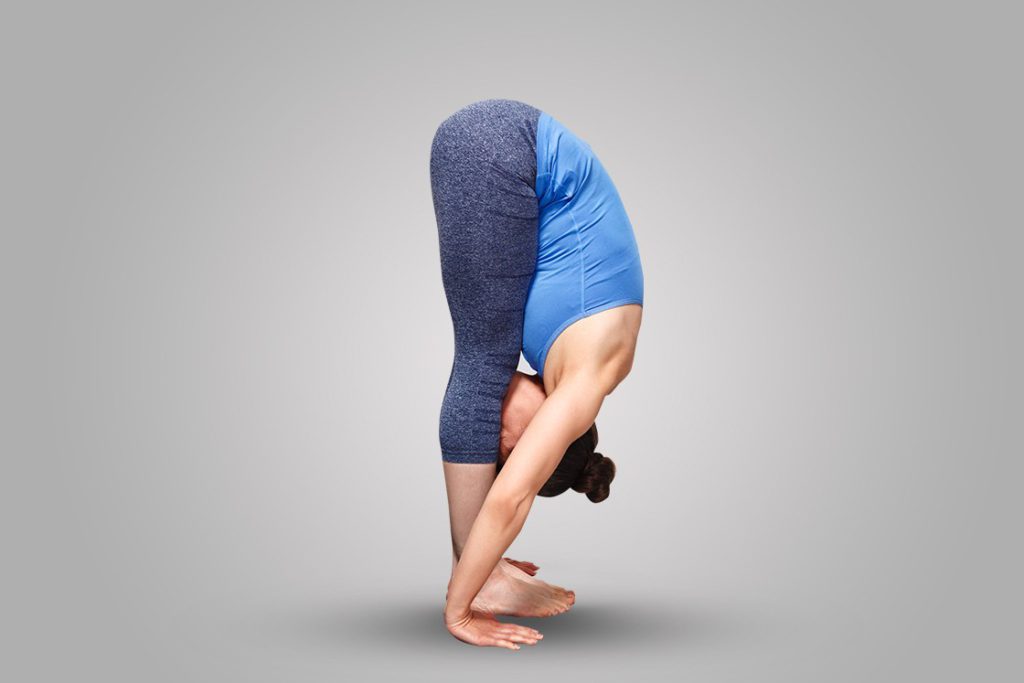
- Gentle exhale and begin folding forward from the hips, placing your palms on the floor on either side of your feet.
- Aim to bring your head as close as possible to your knees, promoting a deep stretch in the back and hamstrings.
- Allow the chest to rest against the thighs, maintaining a gentle forward bend position.
- Enhance the practice by chanting Surya Namaskar mantra “Om Suryaya Namaha,” synchronizing breath and movement for a harmonious experience.
Benefits of Padahastasana (Standing forward bend)
- Spinal Flexibility: Padahastasana enhances spinal flexibility, fostering a supple and resilient spine.
- Muscle Stretch: The pose provides a deep stretch to the muscles in the back, hamstrings, and calves, promoting improved flexibility.
- Circulatory Boost: By bringing the head close to the knees, Padahastasana encourages blood circulation to the brain, invigorating the nervous system.
- Digestive Support: The forward bend compresses the abdominal organs, aiding digestion and promoting a healthy digestive system.
- Stress Relief: Padahastasana offers relief from stress and tension, creating a calming effect on the mind and soothing the nervous system.
Precautions for Padahastasana (Standing forward bend)
- Gradual Descent: Approach the forward bend gradually, especially if you’re new to the practice. Avoid sudden movements to prevent strain.
- Bend with Ease: While bending forward, maintain a gentle and controlled descent, ensuring you feel a stretch without pushing your body beyond its comfortable limit.
- Knee Awareness: Be mindful of your knees. If you have knee concerns, consider slightly bending your knees to ease tension on the joint.
- Back Sensitivity: If you have existing issues with your back, perform Padahastasana with care. Hinge from the hips, keeping your back straight, and avoid rounding the spine excessively.
4. Ashwa Sanchalanasana (Equestrian pose)
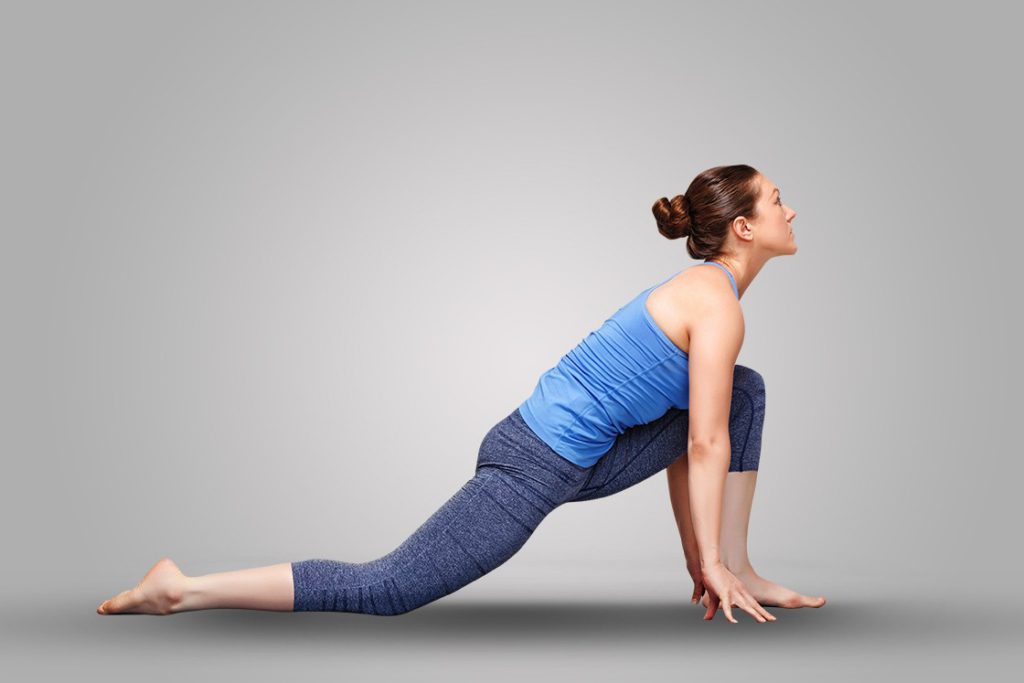
- Inhale deeply, stepping the right leg back. Extend it as far back as comfortable, placing the right knee on the floor with toes tucked in.
- Bend the left knee, placing the foot on the floor and aligning it with the left hip. Ensure the left knee is directly above the left ankle.
- Press your palms or fingertips firmly beside the left foot on the floor, creating a stable foundation.
- Arch your back and tilt your head backward, lifting your chin to gaze upward. Maintain a gentle stretch in the front of the body.
- Chant mantra “Om Bhanave Namaha” to enhance the spiritual connection and focus during this pose.
Benefits of Ashwa Sanchalanasana (Equestrian pose)
- Leg and Spine Strengthening: This pose strengthens the legs and spine, enhancing overall stability and posture.
- Improved Lung Capacity: Ashwa Sanchalanasana increases lung capacity and enhances the respiratory system, promoting better oxygenation.
- Energetic Activation: The pose activates the Ajna Chakra, fostering mental clarity and enhancing brain capacity.
- Relief from Ailments: Regular practice can alleviate issues like constipation, indigestion, and sciatica, promoting digestive and nervous system health.
Precautions for Ashwa Sanchalanasana (Equestrian Pose)
- Knee Alignment: Ensure proper alignment of the left knee above the left ankle to prevent strain on the knee joint.
- Back Arching: Avoid excessive arching of the back. Maintain a moderate arch to protect the spine and prevent overextension.
- Head Tilt: While tilting the head backward, do so gently to avoid strain on the neck. Keep the movement within a comfortable range.
- Body Weight Distribution: Be mindful of distributing body weight evenly. Ensure balance among both hands, the left foot, right knee, and toes of the right foot.
- Individual Health Conditions: Individuals with specific health conditions, such as knee or spinal issues, should approach this pose with caution.
5. Chaturanga Dandasana (Four-limb pose)
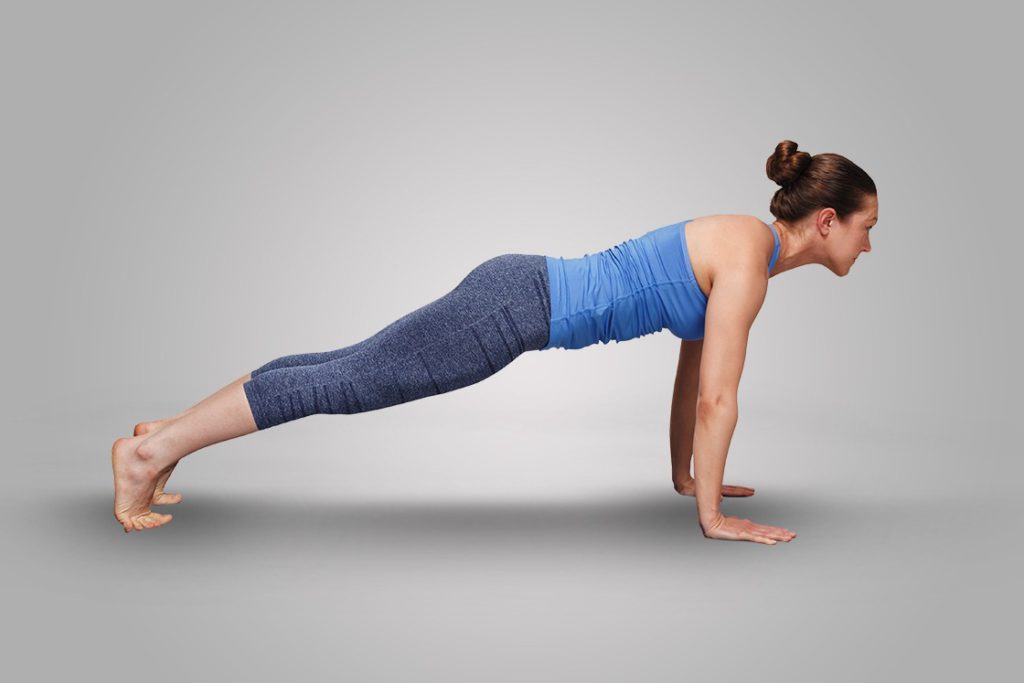
- Inhale, drawing the left foot backward, placing it beside the right foot.
- Exhale, curling the toes in and pressing the hands on the floor, lower the chest closer to the floor.
- Balance the entire body on the toes and hands, forming a straight line from head to heels.
- Hold your breath in this position, focusing on maintaining a strong and straight posture.
- Ensure the shoulders are stacked over the wrists, engaging the core muscles for stability.
- Keep the body parallel to the floor, with controlled and balanced alignment.
- Hold the pose for a few breaths, preparing for the transition to the next pose, Ashtanga Namaskar (Eight-Limbed Pose).
Benefits of Chaturanga Dandasana (Four-Limb Pose)
- Core Strengthening: The pose actively engages the core muscles, promoting strength and stability in the abdominal region.
- Arm and Shoulder Toning: Chaturanga dandasana tones and strengthens the arms and shoulders, contributing to upper body fitness.
- Improved Posture: Regular practice helps improve overall posture by enhancing the strength of the spinal muscles.
- Enhanced Stability: Holding the position challenges the entire body, fostering stability and control in the torso and limbs.
Precautions for Chaturanga Dandasana (Four-Limb Pose)
- Shoulder Alignment: Avoid letting the shoulders dip below the elbows. Maintain proper alignment to prevent unnecessary strain on the shoulder joints.
- Wrist Health: Take care of the wrists by ensuring they are positioned directly under the shoulders. Distribute weight evenly to avoid excess pressure on the wrists.
- Avoid Sagging: Prevent the lower back from sagging by engaging the core muscles. This helps protect the lumbar spine and maintains a straight line from head to heels.
- Consultation for Injuries: Individuals with wrist, shoulder, or lower back injuries should seek guidance from a yoga instructor or healthcare professional before attempting this pose.
- Mindful Breathing: As breath is held during this pose, individuals with respiratory conditions or hypertension should practice with awareness and consult a professional if needed.
6. Ashtanga Namaskar (Eight Limbed pose)
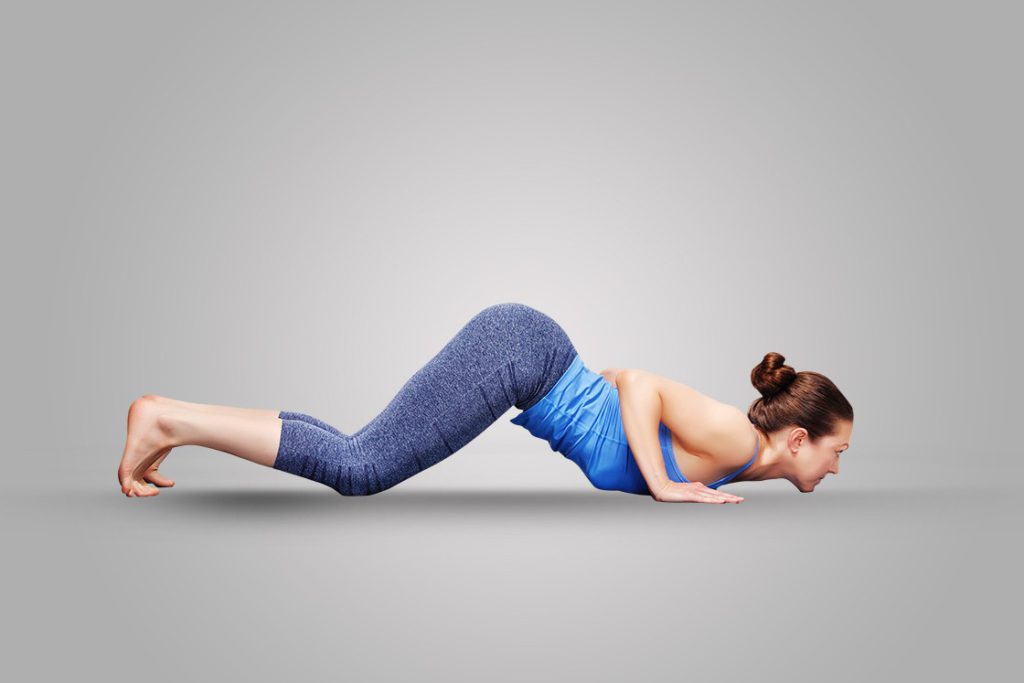
- Exhale, lower the knees to the floor, taking the hips slightly back.
- Slide a little forward, placing the chest and chin on the floor.
- Only the toes, knees, chest, hands, and chin touch the floor.
- Keep the buttocks, hips, and abdomen raised.
- Hold the posture while breathing out and maintain the position with steady and controlled breaths.
- Chant “Om Pushne Namaha” during this pose of the Sun Salutation sequence.
- Prepare for the next pose, Bhujangasana (Cobra Pose), as you transition from Ashtanga Namaskar.
Benefits of Ashtanga Namaskar (Eight-Limbed Pose)
- Upper Body Strength: The pose builds strength in the arms, shoulders, and chest, contributing to overall upper body toning.
- Core Activation: Ashtanga Namaskar engages the core muscles, promoting abdominal strength and strong core.
- Spinal Flexibility: Regular practice enhances the flexibility of the spine, particularly in the upper and mid-back regions.
- Therapeutic for Respiratory System: The pose involves controlled breathing, benefiting the respiratory system and promoting lung capacity.
- Stimulation of Digestive Organs: The compression created by the pose aids in massaging and stimulating the digestive organs, supporting healthy digestion.
Precautions for Ashtanga Namaskar (Eight-Limbed Pose)
- Wrist Sensitivity: Individuals with wrist issues should be cautious and may choose to modify the pose by using props or opting for alternative variations.
- Lower Back Health: Take care not to overarch the lower back. Engage the core muscles to provide support and avoid excess strain on the lumbar spine.
- Neck Alignment: Keep the neck in a neutral position, avoiding excessive strain. Ensure the chin is slightly tucked to maintain proper alignment.
- Consultation for Injuries: Individuals with existing shoulder, neck, or lower back injuries should consult with a yoga instructor or healthcare professional before attempting this pose.
7. Bhujangasana (Cobra pose)
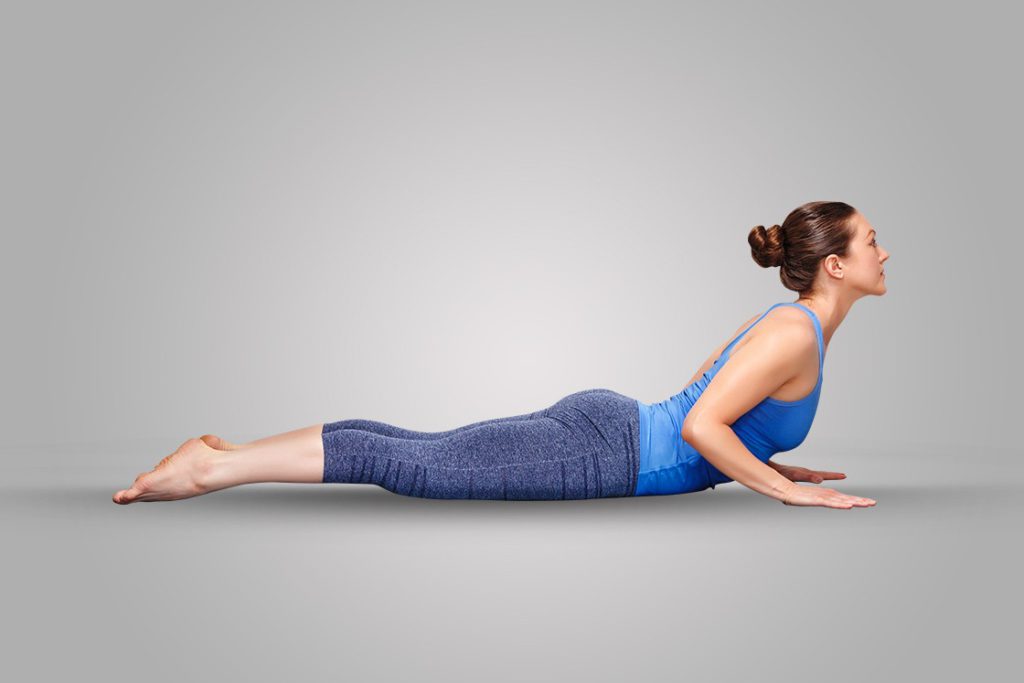
- Inhale, lower the hips, point the toes back, and slide the chest forward.
- Arch the back, rolling the shoulders down.
- Slowly look up, lifting the chest and head like a cobra raising its hood.
- Chant “Om Pushne Namaha” during the practice of Bhujangasana.
- Hold the pose with controlled breathing, focusing on opening the chest and lengthening the spine.
- Prepare for the next pose, Adho Mukha Svanasana (Downward-Facing Dog), as you transition from Bhujangasana.
Benefits of Bhujangasana (Cobra Pose)
- Spinal Flexibility: Bhujangasana actively stretches and opens up the spine, promoting flexibility in the entire spinal column.
- Strengthening Back Muscles: The pose targets the muscles of the back, especially the lower back, contributing to strength and resilience.
- Improved Posture: Regular practice helps in correcting and maintaining a healthy and upright posture by strengthening the muscles along the spine.
- Chest Expansion: Bhujangasana opens the chest, enhancing lung capacity and promoting better respiratory function.
Precautions for Bhujangasana (Cobra Pose)
- Low Back Sensitivity: Individuals with lower back issues, such as herniated discs or chronic pain, should approach Bhujangasana with caution.
- Wrist Health: Take care of the wrists, especially if you experience discomfort or pain. Distribute weight evenly across the palms and consider using props or modifications.
- Pregnancy: Pregnant individuals should avoid deep backbends like Bhujangasana, particularly in the later stages of pregnancy.
- Neck Strain: Those with neck issues or injuries should practice Bhujangasana with awareness. Avoid straining the neck by keeping movements gradual and controlled.
8. Adho Mukha Svanasana (Downward Facing Dog)
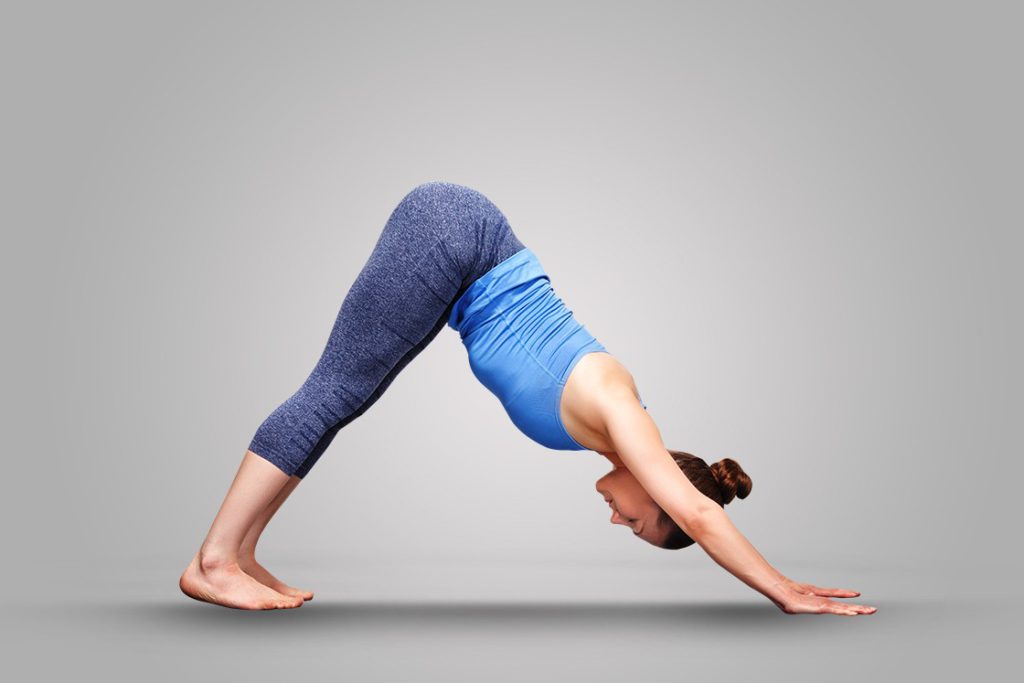
- Exhaling, lift the hips and push them backward, placing the heels on the floor.
- Straighten the arms, lowering the head between them, forming an inverted V with the legs, arms, and back.
- Press the palms and heels firmly into the floor, engaging the core muscles.
- Take a few breaths in this position, allowing the spine to lengthen, and maintaining a steady downward orientation.
- Chant “Om Khagaya Namaha” during the practice of Adho Mukha Svanasana.
Benefits of Adho Mukha Svanasana (Downward Facing Dog)
- Spinal Stretch: The pose provides a deep stretch to the entire length of the spine, promoting flexibility and relieving tension.
- Strengthens Upper Body: Adho Mukha Svanasana engages the arms, shoulders, and upper back, contributing to strength and stability in the upper body.
- Enhanced Circulation: The inverted position encourages blood flow to the brain, improving circulation and providing a revitalizing effect.
- Hamstring Flexibility: The elongation of the legs in Downward Facing Dog helps stretch and improve flexibility in the hamstrings.
Precautions for Adho Mukha Svanasana (Downward Facing Dog)
- Wrist Sensitivity: Individuals with wrist issues or carpal tunnel syndrome should be cautious. Distribute weight evenly across the palms and consider using props for support.
- High Blood Pressure: Those with high blood pressure should practice Downward Facing Dog with awareness, avoiding excessive strain and ensuring a gradual transition into the pose.
- Pregnancy: Pregnant individuals, especially in the later stages of pregnancy, should modify or avoid deep inversions like Adho Mukha Svanasana. Consult with a qualified instructor for suitable variations.
- Recent Shoulder or Arm Injury: If you’ve had a recent shoulder or arm injury, approach this pose with care. Consider modifying the pose or avoiding it until you’ve recovered.
9. Ashwa Sanchalanasana (Equestrian pose)
- Inhale to bring the right foot forward between the hands, bending the knee.
- Simultaneously, lower the left knee to touch the floor, tuck the left toes in, and push the pelvis forward.
- Tilt the head backward to gaze up, maintaining a gentle arch in the spine.
- Chant “Om Adityaya Namaha” during the practice of Ashwa Sanchalanasana.
- Prepare for the next steps in the Surya Namaskar sequence, seamlessly transitioning from Equestrian Pose.
Benefits and precautions of this pose is explained in pose 4 of this sun salutation sequence.
10. Padahastasana (Standing forward bend)
- Exhaling, bring the right foot forward and bend forward at the hips.
- Bring the palms to the floor beside the feet, maintaining a straight spine.
- Recite the mantra, “Om Savitre Namaha,” during the practice of Padahastasana.
- Emphasize lengthening the spine while keeping the head close to the knees.
- Prepare for the next steps in the Surya Namaskar sequence, smoothly transitioning from Standing Forward Bend.
Benefits and precautions of this pose is explained in pose 3 of this sun salutation sequence.
11. Hasta Utthanasana (Raised arms pose)
- Inhale to raise the torso, standing erect.
- Stretch the arms upward, bringing them parallel to each other with palms facing each other.
- Chant the mantra “Om Arkaya Namaha” during the practice of Hasta Utthanasana.
- Prepare for the subsequent steps in the Surya Namaskar sequence, transitioning seamlessly from Raised Arms Pose.
Benefits and precautions of this pose is explained in pose 2 of this sun salutation sequence.
12. Pranamasana (Prayer pose)
- Exhaling, gently bring the arms down to join the palms in front of the chest.
- Chant “Om Bhaskaraya Namaha” during the practice of Pranamasana.
- This marks the completion of one round of Surya Namaskar.
- Prepare to start the next round or transition to relaxation pose like Shavasana.
- Maintain a focused and meditative state, acknowledging the completion of the sequence.
Benefits and precautions of this pose is explained in pose 1 of this sun salutation sequence.
How Many Sun Salutations Should You Do Daily?
Now that you’ve delved into 12 steps of Surya Namaskar, a common question arises: How many rounds should you aim for in your daily practice? Before even that, What is one round of Sun Salutation?
A one round of Sun Salutation encompasses two sequences. The first sequence involves leading with the right foot in positions 4 and 9, while the second begins with the left. It’s counted as one round of sun salutation.
For those in good health, commencing with 12 sets (6 rounds) of Surya Namaskar (which translates to 288 poses) is a wholesome starting point. As stamina and familiarity grow, consider gradually increasing the count.
If you’re new to the practice of sun salutation, a modest start of 3 rounds allows for a gentle initiation. Prioritize form and sync your breath with each movement. As your body adapts and strengthens, consider adding 1 or 2 rounds incrementally. Focus on a gradual and sustainable ascent.
Precautions and Contraindications
Surya Namaskar, with its rhythmic blend of poses and breathing, is a transformative practice. However, it’s vital to approach it with a mindful awareness of your body’s signals and potential limitations.
Prioritize safety by adhering to these precautions and being mindful of contraindications during your Surya Namaskar practice:
- Mindful Breathing and Movement – Syncing breath with movement is fundamental. Ensure a conscious alignment to avoid strain.
- Post-Surgery Caution – If you’ve recently undergone surgery or experienced a brain haemorrhage, approach Surya Namaskar with caution or as advised by a healthcare expert.
- Timing and Preparatory Measures:
- Practice Surya Namaskar on an empty stomach after cleansing your bowels.
- Warm-up adequately with gentle stretches before initiating the sequence.
- Avoidance in Specific Cases – Individuals with conditions like hernia or intestinal tuberculosis should refrain from Surya Namaskar.
- Monitoring Blood Pressure – If you have blood pressure concerns, it’s advisable to practice under expert guidance, ensuring a controlled and monitored approach.
- Adaptations for Varied Fitness Levels – Surya Namaskar can be adapted based on individual fitness levels. Begin gradually, and modify poses as needed.
Surya Namaskar Benefits
Surya Namaskar, or Sun Salutation, isn’t just a yoga sequence; it’s a powerhouse of health benefits. It serves as more than a warm-up; it’s a gateway to invigorating your entire body. As you move through sun salutation poses, your major muscle groups awaken, setting the tone for a dynamic practice. The rhythmic flow, especially in Sun Salutations B, not only elevates your heart rate but also tones muscles, sculpting your arms, abs, and legs.
Physical Health Benefits
- Flexibility Boost:
- Surya Namaskar’s dynamic poses stretch and tone muscles, enhancing overall flexibility. Regular practice ensures your body moves with ease.
- Metabolism Magic:
- Surya Namaskar sparks the endocrine system, leading to a metabolic boost. Say hello to improved digestion and maintained blood sugar levels with this sacred practice.
- Cardiovascular Harmony:
- The sequence involves inverted poses, promoting better blood circulation and a healthier heart. Keep your cardiovascular system in check with Surya Namaskar.
- Muscle Strengthener:
- Strengthen muscles from head to toe. Surya Namaskar targets various muscle groups, helping you build a robust and toned physique.
- Energizing Respiratory System:
- Breathe in, breathe out. Surya Namaskar synchronizes breath and movement, enhancing respiratory function. Your lungs will thank you for the revitalizing workout.
- Weight Management Ally:
- Say goodbye to excess weight. Surya Namaskar, with its calorie-burning magic, aids in weight management when practiced regularly.
- Balances Ayurvedic Doshas: By incorporating proper breathing throughout the poses, Surya Namaskar helps in regulating Vata, Kapha, ad Pitta. This is so because all the five elements are balanced.
Mental Health Benefits
- Stress Buster:
- Wave stress goodbye. Surya Namaskar’s rhythmic flow and mindful breathing ease tension, leaving you with a sense of calm.
- Mind-Body Harmony:
- Experience the synergy of mind and body. Surya Namaskar fosters a connection between physical movements and mental focus, promoting overall harmony.
- Mood Enhancer:
- Elevate your spirits. The practice stimulates the release of feel-good hormones, combating mood swings and promoting emotional well-being.
- Mindfulness Magnet:
- Immerse yourself in the present moment. Surya Namaskar’s meditative aspects cultivate mindfulness, enhancing your mental clarity.
- Anxiety Alleviator:
- Find serenity within. Surya Namaskar’s calming effects extend to reducing anxiety, providing a mental sanctuary in the midst of daily chaos.
- Enhanced Concentration:
- Sharpen your focus. The practice of Surya Namaskar engages your mind, promoting concentration and mental alertness.
Conclusion
Incorporate the 12 poses of Surya Namaskar, a sequence that extends a heartfelt offering to the sun. Meaning “Sun Salutation” in Sanskrit, it aligns body, mind, and spirit, rooted in ancient yogic traditions. The rhythmic blend of breath and movement offers myriad benefits – physical toning, flexibility enhancement, immune system activation, and stress reduction.
Whether you’re a beginner seeking alignment tips or an instructor aiming to integrate it into classes, Surya Namaskar illuminates the path to holistic well-being. Begin each yoga session or movement practice with this transformative sequence, embodying the essence of reverence to the sun.
Surya Namaskar FAQs
The optimal time to practice Surya Namaskar is during the early morning, ideally during sunrise. The fresh air and gentle sunlight enhance the benefits, providing a revitalizing start to your day. If mornings are challenging, it can also be done during the evening, but sunrise remains the preferred choice for its holistic impact on mind and body.
Yes, it is suitable for all the body types as long as you are not having any medical issues. Surya namaskar poses or entire sequence can be customized as per the convenience. There are several variations of surya namaskar available for the kids, pregnant women, senior citizens.
It is okay to practice Surya Namaskar without chanting the mantras. Beginners might practice it without chanting for 4 weeks continuously and once changes in energy levels is observed, you can easily fuse the chanting into the practice to gain the spiritual benefits.
There is no strict restriction about practicing Surya Namaskar during menstruation. However, if any uneasiness or pain is felt during the practice, it must be skipped for a few days. Also, you can reduce the number of rounds during primary day of the period and increase it gradually with passing
12 rounds of Surya Namaskar are considered an ideal practice. However, beginners can begin with 2-4 rounds. It can be increased up to 108 rounds of sun salutations maximum if seems convenient.


: How to Identify Its Dominance and Reduce It")


Shouldn’t this be:
For those in good health, commencing with 12 sets (12 rounds (instead of 6 rounds as your article says)) of Surya Namaskar (which translates to 288 poses) is a wholesome starting point.
12 rounds would mean 12 times Surya Namaskar one each leg, so 12X12=144X2=288 poses.
One round = Doing 12 steps at right leg at position 4 & 9 and then 12 steps with left leg at position 4 & 9.
1 set =1 round
Thanks