“Engage your core”. “Feel the heat generated in your core”.
These are some sentences you will often hear when you are performing yoga or are working out in a gym. Most instructors lay importance on the core muscles for making the correct pose or lifting heavyweights.
The core is often misunderstood as abs or only the abdominal muscles. People who are into exercise or yoga practice for a long time may understand what core muscles are but that liberty is not enjoyed by all.
Your abs form a small part of the core muscles. In fact, the core muscles are in the trunk of your body.
Let us first understand what are core muscles and their importance.
What are core muscles?
The core typically encompasses the area from the abs, diaphragm, pelvis, hip, glutes, and lower back. These areas combined contain 29 muscles that make up your core.
A healthy core is important to take away extra pressure or load from the spine and transfer the force from the lower body to the upper body and vice versa.
Due to the areas, it covers, simple activities like standing and sitting utilize the core muscles. Furthermore, bending to pick up stuff from the ground, stretching your hands upward to pick your favorite box of cereals, turning around, swinging a bat, trimming the hedge in your garden, all these activities somehow engage your core muscles.
Thus, from sitting to trekking, most activities, gentle or intense, require the movement of your core muscles.
What happens if you have a weak core?
Weak core muscles can cause injury or tightness, which can further lead to loss of movement.
Lower back pain, bad balance and stability, incorrect posture, difficulty in bending down or lifting up yourself, and difficulty in standing straight are some other common symptoms of weak core muscles.
When you have a weak core, it reduces your athletic performance and causes a hindrance in day-to-day activities as well.
Why is core strength important?
Looking at the symptoms of a weak core, you can well imagine why strengthening your core is equally important as your legs, arms, hips, back, and other body areas.
Include yoga poses that build your core muscles, so that your trunk gets strengthened. And a strong trunk promotes stability and also aid in enhancing the strength of your arms and legs as well. Strengthening your core will build more endurance and balance.
Even when you work and are sitting at your desk, typing on the keyboard, or moving around in your chair, your core muscles are one of the first muscles to be engaged.
And when you have lower back pain, you will notice that exercises that stretch your back and core muscles are often recommended.
Runners, swimmers, cyclists, golfers, footballers, and other athletes and sportspersons will be able to vouch for the immense importance a strong core holds in making them perform play with optimal strength.
Thus it is important that you also dedicate some time to stimulating and engaging your core muscles in order to enhance your inner strength.
What yoga poses are good to build core strength
Practicing yoga is one way to increase your core strength as it will focus on increasing stamina, stability, and balance gradually. You may or may not be able to build a six-pack ab but rest assured, your core muscles will be strengthened enough to help you out in the long run.
Most yoga poses for enhancing core strength are balancing poses that are either performed in a standing or half-reclining position. So make sure that you are not suffering from any injury or have recently undergone surgery, are going through pregnancy, or experiencing any other medical issue.
You may experience slight discomfort or strain while performing yoga poses for the core, which is normal. However, if the pain is severe, it is better to stop practicing immediately. You also have the option of using props such as yoga blocks, blankets or towels, cushions, yoga straps, etc to support yourself in the initial stages to find your balance and stability.
Do these yoga poses to get the core strength;
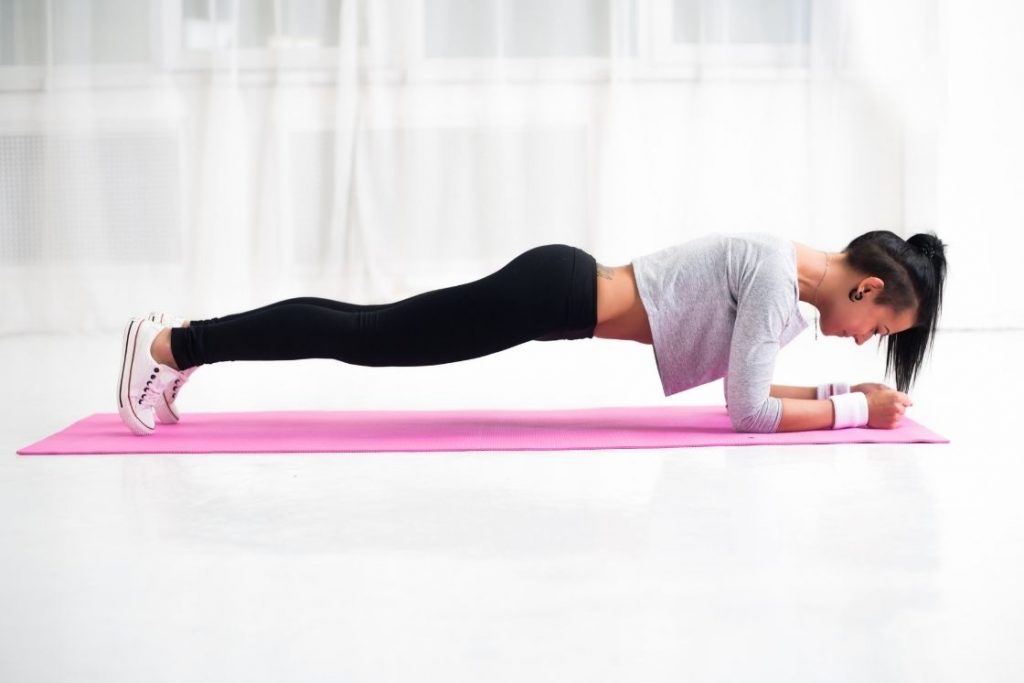
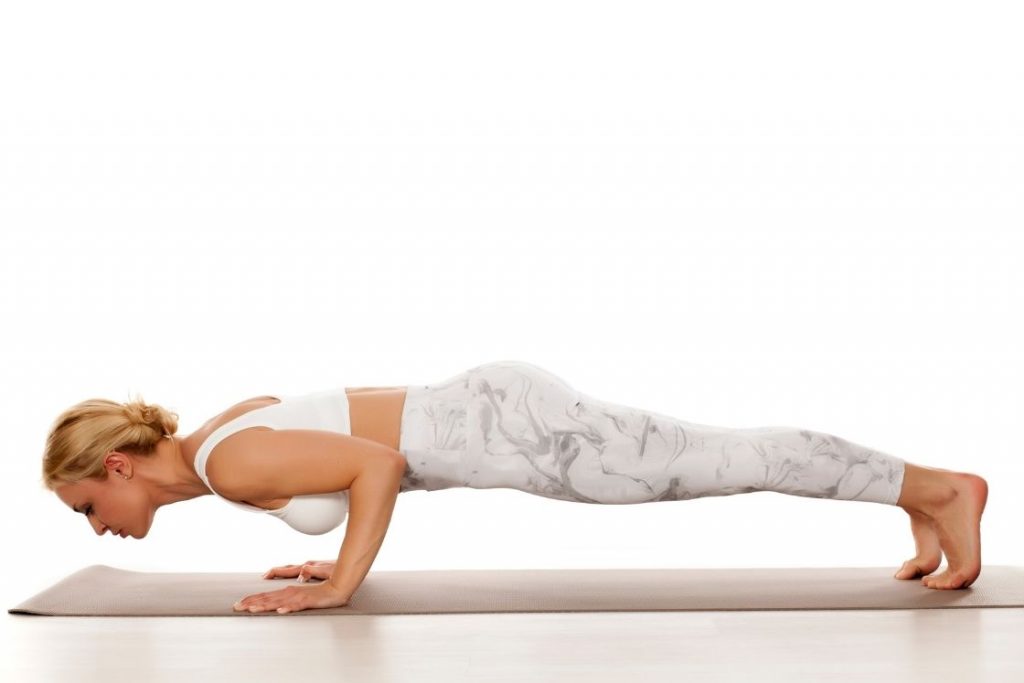
1. Plank Pose
It is quite obvious that we start the list with the plank pose.
Plank pose is the more revered pose to strengthen your core not only just with yoga practitioners but in many fitness programs. All your major core muscles are stimulated and activated when you perform this pose.
It also enhances your stability by strengthening your legs and arms as well.
To do plank pose for core strength,
- Lie stomach-down on your yoga mat with your arms bent at the elbows and hands are beside the shoulders with fingers spread. Place your feet verticle so that your toes and balls of the feet are touching the mat.
- Engage your core and press your hands to lift up your entire body to make a straight line.
- Your arms should be straight with your shoulder stacked over the wrists. They should be perpendicular to the ground. Do not lock your shoulders and elbows as it may cause a strain.
- Tuck your tailbone to keep your back, hips, and legs in a straight line. Stretching the crown of your head forward and heels towards the back will also help in maintaining the plank position.
- Pull up from your navel to keep your lower back from collapsing.
Start by holding it for at least 30 seconds and increase the time gradually. Release the pose by first bringing the knees to the mat.
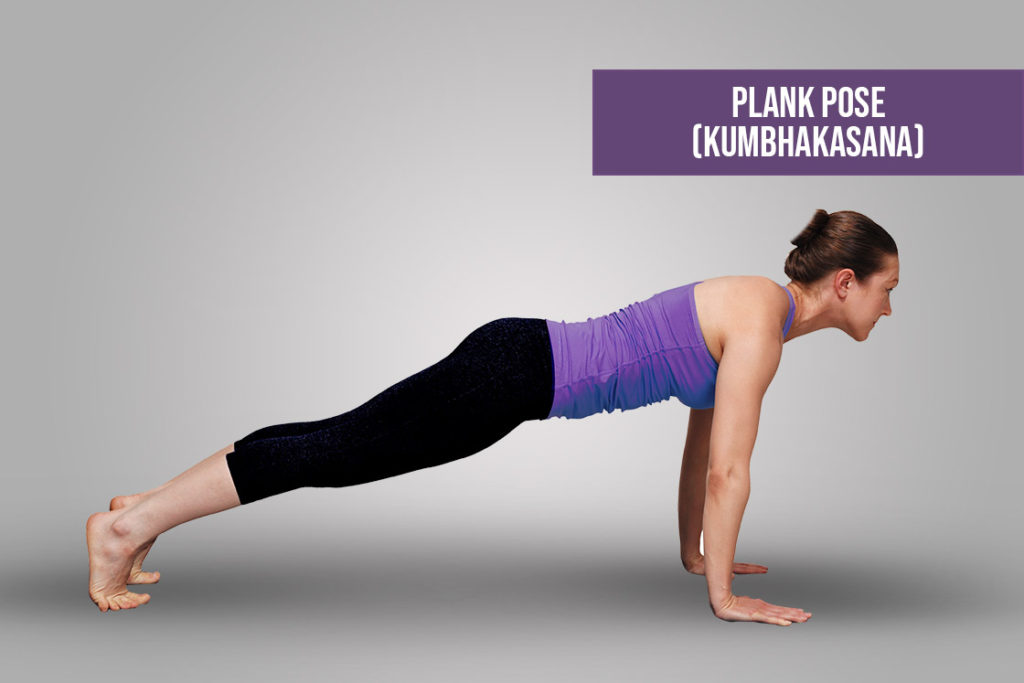
2. Low Plank (Chaturanga Dandasana)
Chaturanga Dandasana is a slightly difficult variation of the standard plank pose. In low plank distance between the ground and your body is not much and your arms are also positioned in a way that they support your upper body.
While strengthening is definitely the main function of this pose, you are also actively stimulating the forearms muscles and wrists.
- You can start by coming to the plank position and then bending your elbows so that your upper arms are parallel to each other.
- Your elbows should be close to the sides and your arms should make a 90-degree at the elbows. Also, your shoulders and elbows should be in line whereas your hands should be under your shoulders.
- The rest of your body will be maintaining the same posture as the plank.
Hold the pose for at least 30 seconds and increase the time gradually. Gently release the pose by first bringing the knees to the mat.
3. Side Plank Pose
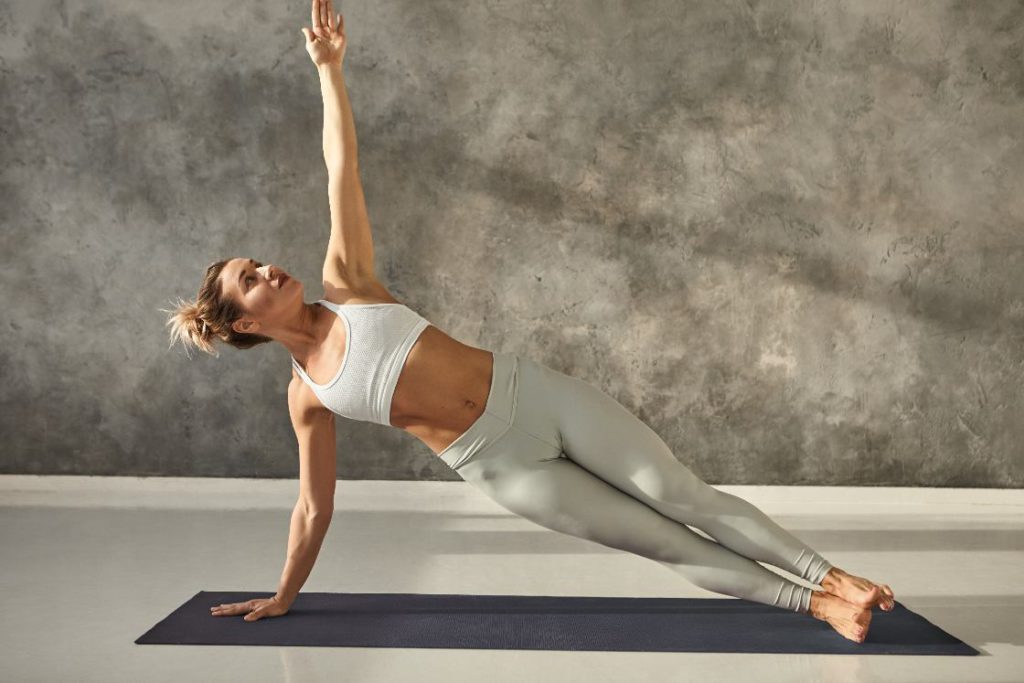
As the name suggests, in the side plank pose you are balancing your entire body on one side. In yoga, it’s popularly known by its Sanskrit name Vasisthasana. Here you will have to intensively activate your core so that you do not put too much weight on your arms and legs. It also works on strengthening your side abdominal muscles and abs.
- After staying in the plank pose for a few breaths, turn your body towards the right by putting some weight on the right arm.
- The outer edge of the right foot should now be touching the ground and firmly pressed. Your left leg will be placed entirely on the right leg.
- Stack your right shoulder directly above the right-hand wrists. Your left arm can be stretched overhead or rest on the left hip.
- Engage your right arm triceps to open your chest. Make sure the weight is being spread equally on the right palm.
Hold this pose for a minimum of 30 seconds and then repeat with the other arm.
4. Boat Pose
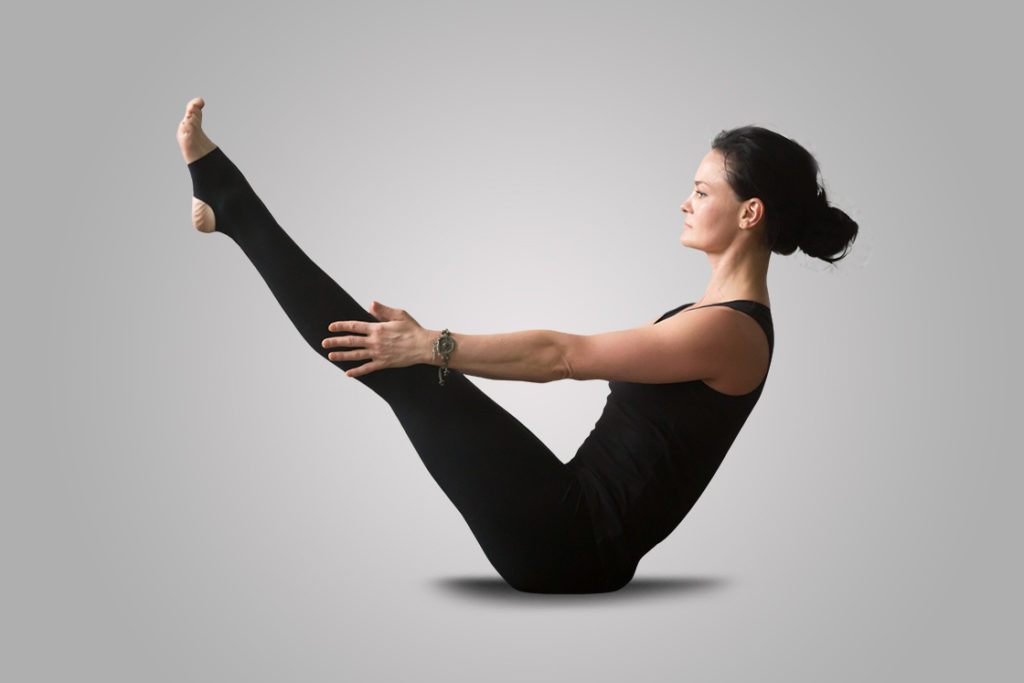
Boat pose requires you to use your core muscles to balance your entire upper body and legs away from the ground. It is also a good pose to stretch your hamstrings, hip flexors, and lower abdominal muscles.
If you have tight hamstrings, you can keep your knees bent or use a strap to form a resistance.
- Start by sitting in a Dandasana (Staff Pose). Keep your spine straight and arms at your sides.
- Bend both your legs at the knees with your feet firmly placed on the floor.
- Now slowly lift your feet off the floor, keeping the knee bent. Bring it up till your shins are parallel to the ground. Stay in this pose to find your stability and balance.
- This pose is also called a Half Boat Pose and if you want you can practice up till here.
- Next, after finding your stability, you need to straighten your legs to a 45-degree angle. Bring your arms in front of you and keep them straight with palms facing each other.
- Here before straightening knees, wrap a strap around the balls of your feet and hold the strap ends with your arms.
- Lift your chest to keep your spine straight and bring awareness to your stable breathing.
Hold this pose for at least 3 breaths. Gradually increase the time to stay in this pose.
5. Chair Pose
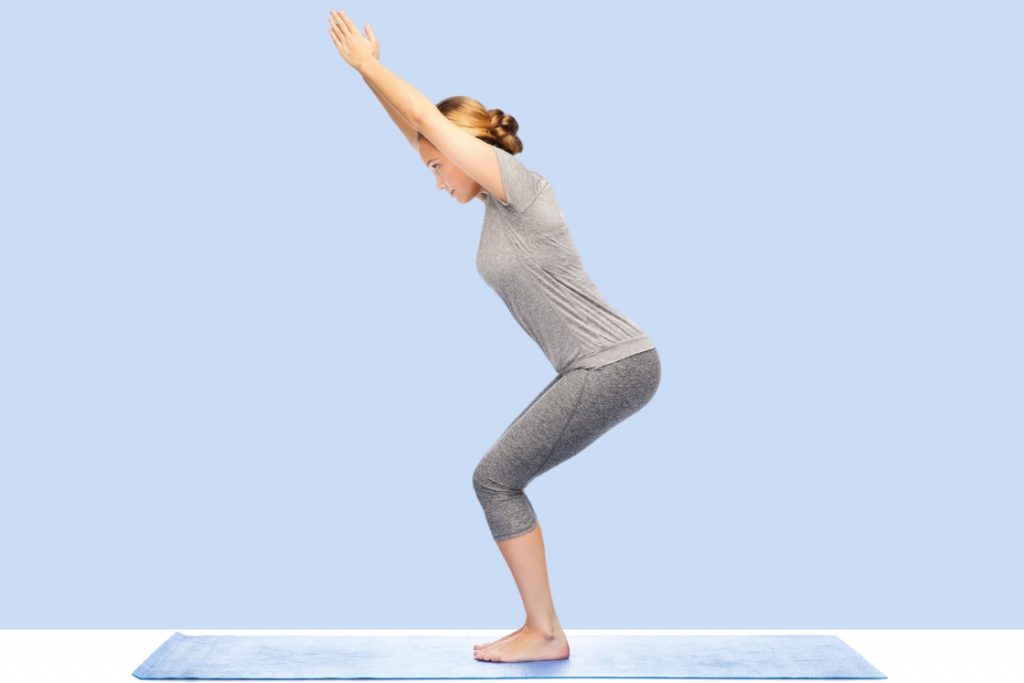
Chair pose can be thought of as performing a standing squat where your core muscles are engaged to keep you balanced and stable. Your buttocks, hips, and thighs are also at work to keep you from falling down or sideways.
It is also helpful in lengthening and stretching the spine and alleviating lower back pain.
- Stand in Tadasana (Mountain Pose) and spread your arms in front of you with palms down or stretch them overhead with palms facing each other.
- Keep your feet firmly on the ground, bend your knees, and bring your pelvis down. Imagine that you are about to lower yourself to sit on a chair.
- Your trunk will also lean forward as you push down. Try to keep your spine straight in this position.
- Do not lock your knees and keep your hips in line by engaging your core and tucking in your tailbone.
- Focus on an immovable point in front of you to help with your balance. Or you can gaze upwards towards your fingertips.
- To increase the stretch, push down your hips but make sure that your knees do not go beyond the toes.
Stay in this pose for a minimum of 2 minutes and you can gradually increase the time.
6. Eagle Pose
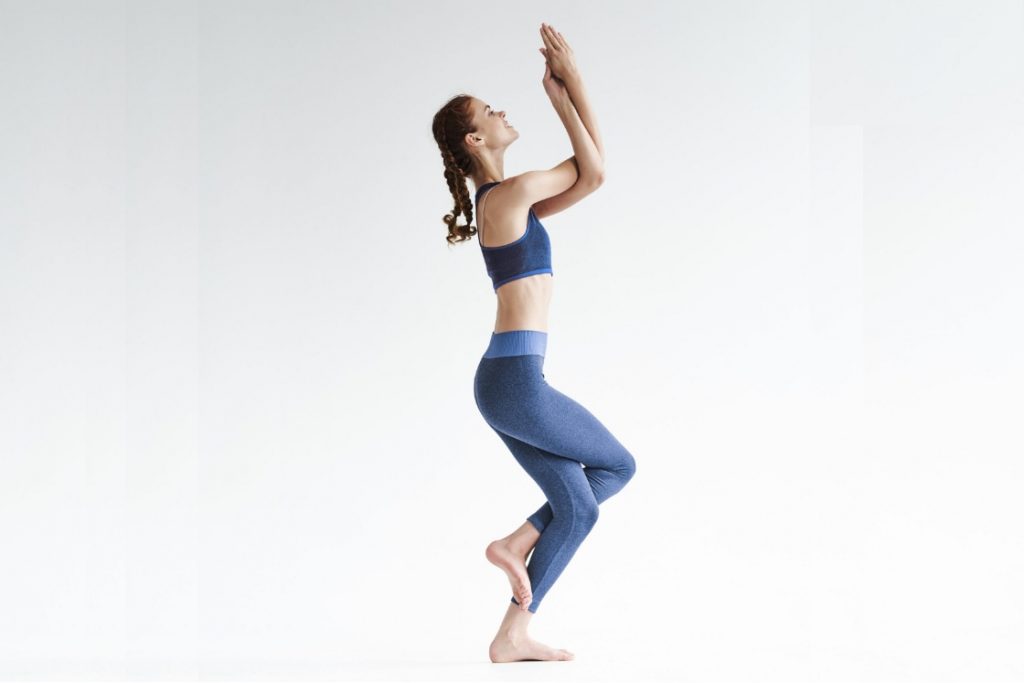
The eagle pose is beneficial in strengthening your core and building balance. It also makes your calves, knees, ankles, thighs, and hips strong. The arms position helps with the strengthening and stretching of the shoulders.
- Stand in moutain pose and slightely bend both your knees. You can also start by coming to the chair pose, with your hands beside you.
- Put some weight on the left foot, lift your right foot, and bring your right thigh over the left thigh. Wrap your right feet around the left calf such that the top of the left foot and toes touches the calf.
- Bring your arms in front of you at shoulder height with palms facing each other.
- Bend your right arm at the elbow with your fingers pointed up. Now bend your left elbow and take it over the right elbow to wrap around the right forearm.
- Try to join the palms together or you can interlock your fingers. Make sure that your shoulder stays away from your ears to avoid stooping.
Stay in this pose for 3-5 breaths and repeat the process with the other leg.
7. Warrior III Pose
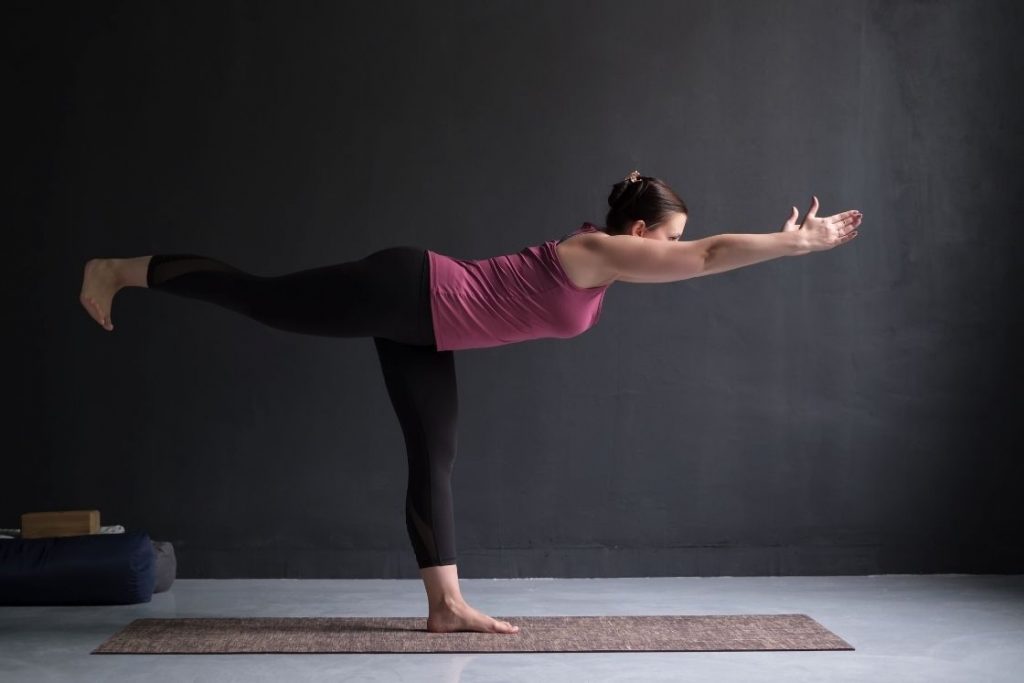
All the warrior poses are good for your core muscles however, warrior III gives a deeper and more intense focus on it. In this pose, while you are balancing the whole body on one leg, your core muscles are actively working to keep your upper body and the lifted leg in a straight line.
This pose also generates inner heat which can help in burning fat, it increases your flexibility, balance, and stamina. Your back, hamstrings, calves, and shoulders also get strengthened simultaneously.
- Start with standing straight in Mountain Pose.
- Bring your right leg forward by approx 1 foot with your toes pointing forward.
- Stretch your arms above your head and join your palms together or with arms, shoulder-distance apart, and finger spread.
- With your right foot firmly placed on the ground, lift your left leg to bring it parallel to the ground. Do not lock your right knee and make sure that your hips joint, knee and ankle are in one line.
- While lifting the leg, your upper body, along with the arms will move forward, bringing your entire upper body and left leg in a straight line. Your body will form a perfect ‘T’ stance.
- You can either look straight or look down, depending on your neck situation.
Stay in this pose for 3-5 breaths and release gently. Practice this pose with the other leg as well.
8. Downward Facing Dog
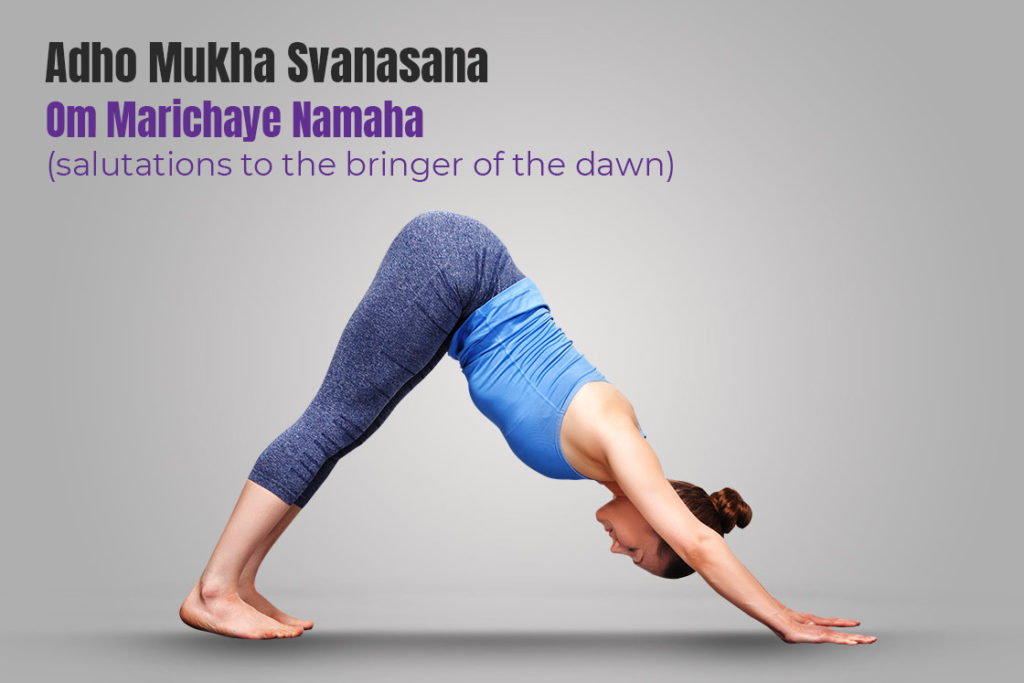
Downward dog pose helps in building your side abdominal muscles, which are part of your core muscles. It engages your front abdominal muscles to keep your back from collapsing. Practicing this pose will also help in building strength in your arms, shoulder, hips, hamstrings, and calves.
- Come to a tabletop position with your arms parallel to each other and shoulder-width apart. Keep your legs hip-width apart as well. Spread your finger to distribute the weight evenly on your hands.
- Press your hands and feet firmly onto the ground and lift your hips upwards. Avoid locking your shoulders, elbows, and knees, but keep them straight.
- Stretch your tailbone towards the ceiling to lift from the hips and keep your back straight. To stretch your hamstrings, press your heels on the ground while keeping a micro bend in the knees.
- Your upper body, from your hands to the hips should form a straight line. Make sure that your weight is evenly distributed in your arms and legs.
- To give support to your arms and feet, place a folded blanket under your heels and keep yoga blocks on their tallest height to place your hands in them.
- Let your head and neck hang freely and keep a fixed point as your focal point for a steady gaze.
Hold this pose for 5 breaths and release gently.
9. Upward Facing Dog
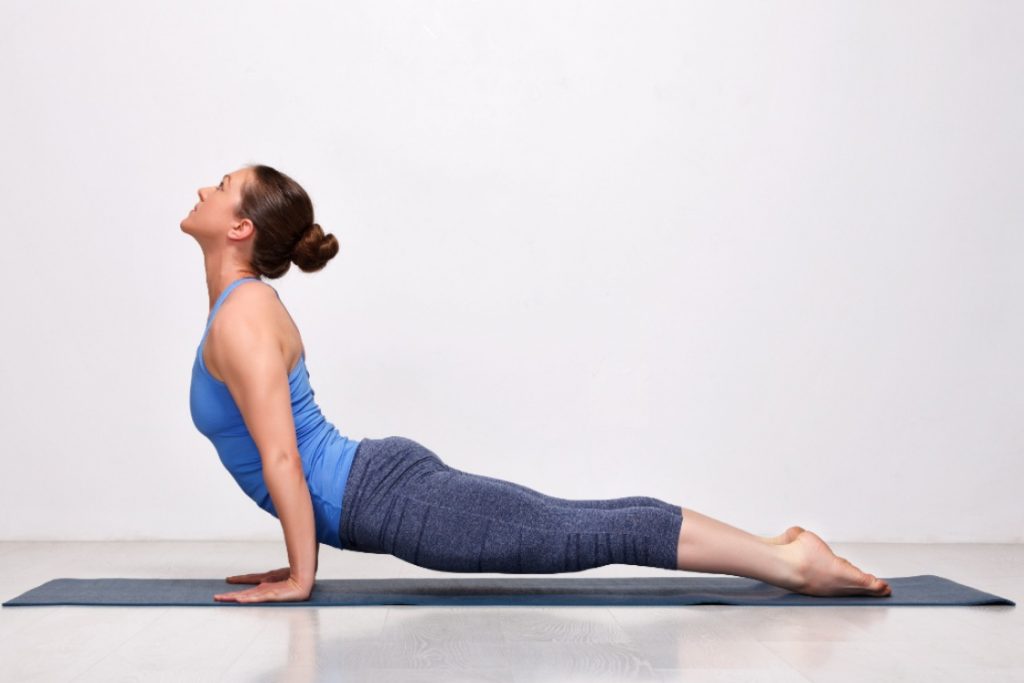
From down dog to up dog, it is a vinyasa that is generally performed in sun salutation practice. However, you can practice it as a stand-alone pose to strengthen your core, thighs, arms, shoulders, and calves. It also is practiced as a great chest and back opener that helps you relieve lower back pains.
- From the plank pose, lower your hips so that they just hover above the ground.
- Press your hands on the ground and engage your thighs, lift your feet to flip them so that the top of the feet touches the ground.
- Stay in this pose for a moment. After finding your stability and balance, lift your chest and crown of the head upwards, mimicking the cobra pose movement. Lift your chin and open your collarbones.
- Keep your shoulder blades back and shoulders away from the ears. Engage your Mula Bandha to keep your hips off the ground.
Stay in this pose for at least 1-3 minutes and release by lowering your hips and legs to the ground.
10. Bird Dog Pose
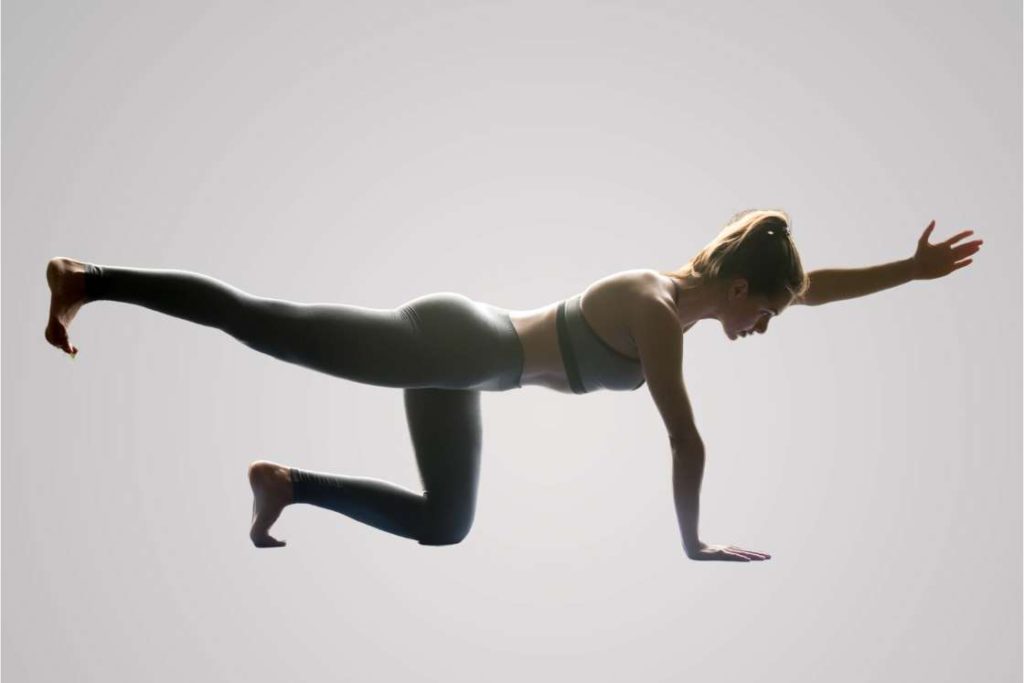
Bird Dog pose, aka Dandayamana Bharmanasana in Sanskrit, is a balancing variation to the Table Top pose. It can be termed as one of the best core exercises.
In table posture, extend one arm straight forward and opposite leg straight backwards – repeat the same another side. It’s the bird dog pose.
It is an easy yet challenging pose that will help your body in stabilizing and balancing. It also strengthens the hips, thighs, glutes, and lower back.
The uniqueness of this pose is that it also works on balancing the right and left lobes of the brain by using opposite limbs i.e., stretching forward your right arm along with your left leg.
- On your yoga mat, come to the Table Top position. Your hips should be aligned with your knees and your shoulders should be stacked over your wrists. The top of your feet should be down on the mat
- You can place a folded blanket or towel under your knees for more support.
- By engaging your core muscles, maintain a neutral and straight spine. Roll back your shoulder blades.
- With a slight weight on your left arm and right leg, lift your right arm and left leg. The lifted arm and leg should be parallel to the mat.
- Stretch your arm and leg in the opposite direction to keep your back straight. Make sure that you are using your core muscles to avoid sagging of the lower back.
- Do not hang your head so as to keep it in line with the spine.
Stay in this position for 3-5 breaths and gently lower both limbs. Start over with the other arm and leg.
Perform 2-3 sets of this pose.
Conclusion
Imbibe these poses in your daily yoga routine so that you are able to focus on the muscles that are often the first to get activated. Regular practice will make you energized and alleviate small aches and pains. You will soon notice that your posture has improved and are able to perform a few balancing poses with ease.
: How to Do, Benefits and Precautions")


