- Meaning
- Contraindications
- Steps
- Precautions
- Beginner’s tips
- Modifications
- Variations
- Grasshopper Pose Benefits
| Sanskrit Pronunciation | Parsva Bhuja Dandasana (PA-AAr-svA-BHu-jaa-dan-DAHS-anna) |
| Meaning | Parsva = side / Bhuja = Arm / asana = pose |
| Pose Type | Side Twisting and Forward Bending |
| Pose Level | Advanced pose |
| Stretches | Lower Back muscles, hips, hamstrings, thighs, neck, wrist, palms, forearms and shoulder, torso |
| Other Names | Dragonfly Pose, maksikanagasana, Vittelasana, Parsva Bhuja Dandasana, Grasshopper Pose |
Grasshopper pose is an advanced level balancing pose that helps in strengthening the wrist, forearms, elbow joints, and shoulder. The pose is achieved by combining deep twisting from the waist, hip opening, and balancing the body on arms, altogether.
It helps in squeezing the abdomen, which further ensures the health and wellness of the abdominal organs.
Parsva Bhuja Dandasana Meaning
Parsva Bhuja Dandasana is a Sanskrit word that can be translated as ‘Parsva‘ means side, ‘bhuja‘ means ‘arms’, ‘danda‘ means ‘stick’ and ‘asana’ means ‘pose’. When a person performs this asana the body needs to be balanced in either of the sides of the arms while keeping legs straight like a stick. It looks like a resting grasshopper in shape. Hence, the name is.
The grasshoppers are famous for their long and sharp jump, which become possible due to the immense power generated by their legs come into play. Similarly, the practice of Parsva Bhuja Dandasana invigorates the practitioners’ muscles that strengthen them on a regular practice to make strong movements.
Apart from that, there is an ability of grasshoppers to tune with sound and vibrations in order to establish the internal reflexes to survive better against what’s coming! Emulating the same quality, grasshopper pose helps in listening to the inner voice of the practitioner, which transforms the subtle aspect to find the more meaningful approach to one’s existence.
Another reason for getting grasshopper pose practiced most in the yogi’s community is that grasshoppers are also believed to be the lucky charm all around the globe. Hence, one can practice their luck every day with the help of the Grasshopper pose.
Practice Guide
For the safe practice of grasshopper pose, one can go through the steps given below.
Contraindications
- Practitioners with the condition of the pain of elbow, knee, pelvis, spinal, neck, wrist, and any of such joints should avoid performing Grasshopper pose. This would result in worsening the pain if ignored.
- Pregnant women with the later stage of pregnancy should refrain from doing this asana. However, in the initial stages, one should consult a physician before beginning the practice.
- Practitioners with the condition of carpal tunnel syndrome are advised not to practice grasshopper pose. This might magnify the pain due to tingling, and numbness in your hand from pressure on the median nerve in your wrist.
- Patients with high blood pressure should not perform this asana as the twisting involved might put pressure on the heart, which could be fatal. So, avoid or consult your doctor before enrolling in the pose.
Preparatory poses
For preparation to grasshopper pose, follow a few rounds of below poses;
- Half pigeon pose
- Side crane pose
- One-Legged King Pigeon Variation with a twist
- Revolved Firelog Pose
- Malasana (Galrland Pose)
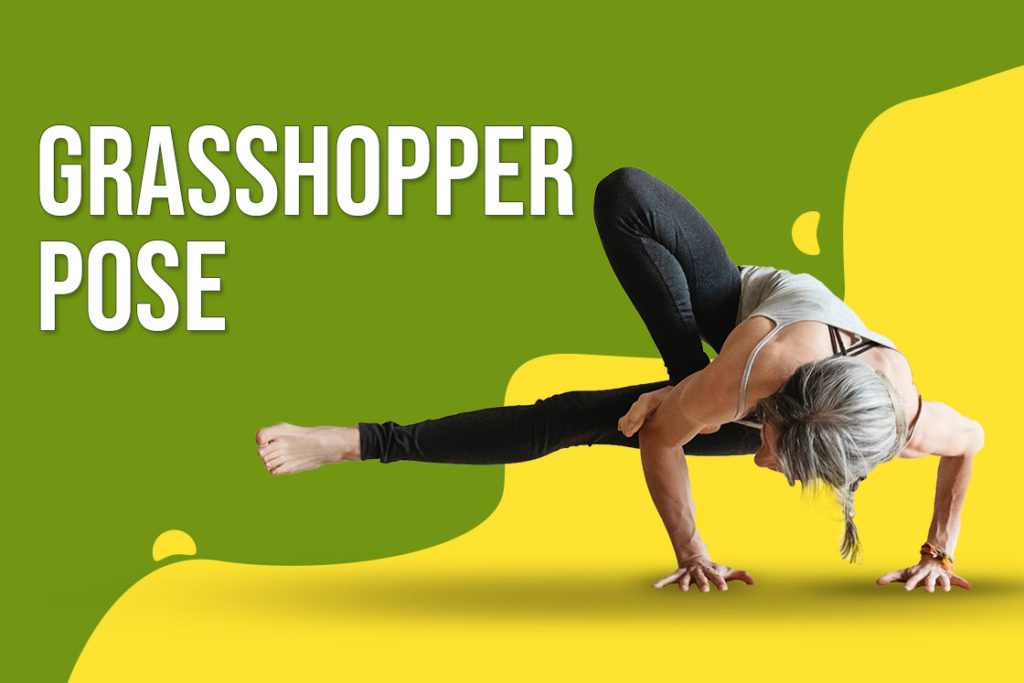
How to Do Grasshopper Pose (Parsva Bhuja Dandasana)
- Begin by acquiring the Parivrtta Ardha Utkatasana (Half Chair Pose) in which your right leg is folded and placed on the left thigh. Make Namaste Mudra with your hands and slightly twist your torso to the right so that the right knee touches your heel of the right foot.
- From here, come on the balls of your left foot. Slowly come down to the place your palms shoulder-width apart, away from the body on the left side by maintaining a twist in your torso.
- Now, try to shift your weight on your arms by moving your shoulder in a forwarding direction and so that the elbow can provide the necessary angle to maintain the pose on bending.
- Here, your right foot is firm over your right elbow and slowly lift off the left foot as well to the final pose. Keep your left foot straight in the direction of your left knee.
- Now, allow your thighs to be pushed against the hip joint in order to engage your hips. Maintain here for as long as your body can and then slowly rest your left foot on the floor and lift your right foot from the right elbow.
- Afterward, Slowly bring your torso in the middle and lift off palms to return into the Parivrtta Ardha Utkatasana, and then relax.
Follow Up Poses
Precautions
These precautions should be taken while performing grasshopper pose;
- In the grasshopper pose, as the practitioners come down to reach the floor in a twisted torso position, one should place their palms on the floor with firmness. Avoid instant shifting of your body weight on your palms, this may result in elbow injury.
- Placing your foot on your elbow or on your triceps is the most important alignment of the grasshopper’s pose. So, the practitioners should keep in mind that their triceps or that upper part of your elbow falls right on the inner arch of the foot.
- When practitioners begin to lift their left leg up the shoulder needs to be slightly forward to provide the necessary balance. Here, one should focus on pressing the fingers deep into the floor instead of raising the back part of the palm.
Beginners Tips
- Practitioners who are new to grasshopper pose might have stiffened hips and hamstrings. So, one should practice well with preparatory poses in order to free up the tension between the hips and hamstring. Because here, flexibility reduces various negative aspects of the asana.
- Beginners should go through the twisting and turning of their torso as they can easily hold the final position. However, they should also firm their palms on the floor to avoid the shakiness of the elbow, which could displace the foot place on the elbow.
- As the practitioners shift from the standing position into the arm balance. They can support their left hip by the left elbow, which helps the upper body bear the weight of the legs.
Modifications
In following ways, props can be used in grasshopper pose to modify the pose in easy steps;
- In order to provide an angle in the elbows to support the grasshopper pose, practitioners have to move their shoulders in a forward direction. Practitioners with a lack of experience in balancing might be prone to fall forward. To prevent this, one can place a soft cushion or a bolster under their head to save from hitting the floor.
- Practitioners who are unable to maintain a high in this pose required for perfect balance can place blocks under their palms. The gripping of fingers around the block also adds to the balancing framework of the pose.
- In the final position of grasshopper pose, if the practitioners having difficulty in holding their left leg straight, which is quite a task in such a situation due to the requirements of core strength. Then, one can simply rest his/her foot on the blocks.
Grasshopper Pose Variations
One can also practice the Grasshopper pose by changing the orientation of limbs. Following are some of the variations we get.
1. Baby Grasshopper Pose
Baby grasshopper pose is easier variation of main grasshopper pose.
In the grasshopper pose, the body is supported over the two palms that keep the left leg and rest the lower body in balance. However, whereas, the baby grasshopper becomes easy as it makes the practitioner support the bodyweight on the left hand and on the right leg. While the torso remains twisted to the left side in the final pose.
2. Funky Grasshopper Pose
Funky grasshopper pose is an advanced variation of grasshopper pose where the body is rested upon the right forearm and the left palm with the sole of the right foot on the triceps and right thigh on the left upper arm. The shoulder remains a little tilted to the floor.
Grasshopper Pose Benefits
Grasshopper pose makes the spine flexible by its twisting and turning action. It softens the vertebrae and soothes the nerves running across into them. It also improves focus and awareness.
The practice of the grasshopper pose will let you meet the following health benefits.
1. Improves Digestive Health
The Forward bend in the grasshopper pose stresses the abdomen and gives a massaging effect on the digestive system. As a result, it sets up a stimulated phase consisting of dilation of the stomach, a decrease in the pH of the gastric contents, and the presence of undigested material. This phase consists of local, hormonal, and neural responses. These responses stimulate secretions and powerful contractions.
2. Improves Flexibility
Twisting in this pose makes it a bit challenging for the practitioners but the same bless the body with swiftness as well. This makes the waist, lower back, spine, thighs, and shoulder blade quite flexible by stretching all through. Hence, improves the overall flexibility.
3. Strengthens Upper Body
The final position of the grasshopper pose keeps the upper body in quite a stressful condition. This stress in the form of bodyweight activates the musculoskeletal system of the upper body, which further strengthens the shoulder, wrist, forearms, back muscles, and spine. Hence, transform an individual into an aesthetic warrior.
4. Refines Focus and Concentration
The physical activity in this asana helps in boosting the brain’s dopamine, norepinephrine, and serotonin levels, which consecutively affects the focus and concentration of the practitioners. However, it may also be helpful in reducing the symptoms of ADHD (neurodevelopmental disorders of childhood) [efn_note] Attention deficit hyperactivity disorder (ADHD) https://www.nhs.uk/conditions/attention-deficit-hyperactivity-disorder-adhd/symptoms/ [/efn_note].
5. Reduces stress and Anxiety
Due to the advanced nature of the grasshopper pose, it increases blood circulation throughout the body. As a result, it stimulates the regions of the pituitary and hypothalamus glands, which further releases the brain’s feel-good neurotransmitters endorphins [efn_note] Endorphins https://en.wikipedia.org/wiki/Endorphins [/efn_note]. Therefore, helps the individual in overcoming stress and anxiety. Moreover, As per one of the studies [efn_note] The effects of Pranayama yoga on Stress and Anxiety https://www.slideshare.net/JatinChaudhary6/the-effects-of-pranayama-yoga-on-stress-and-anxiety [/efn_note] it acts as a therapeutic against stress and anxiety.
6. Balances Mooladhara Chakra
With the twisting along with appropriate breathing techniques and right alignment, practitioners can balance their Mooladhara (Root) Chakra. This further settles the negative qualities like laziness, inertia, self-centredness, and domination by one’s physical desires into positive attributes of the Muladhara Chakra are vitality, vigor, and growth.
Conclusion
Grasshopper pose is an excellent way to strengthen your upper body along with flexibility in the groin, hamstrings, spine and thigh. However, it also helps in settling the mental aspects by overcoming the stress and anxiety in the practitioners.One can practice this asana on a regular basis to see the long lasting effects on the individual.

: How to Do & Benefits")
: How to Do, Variations & Benefits")

