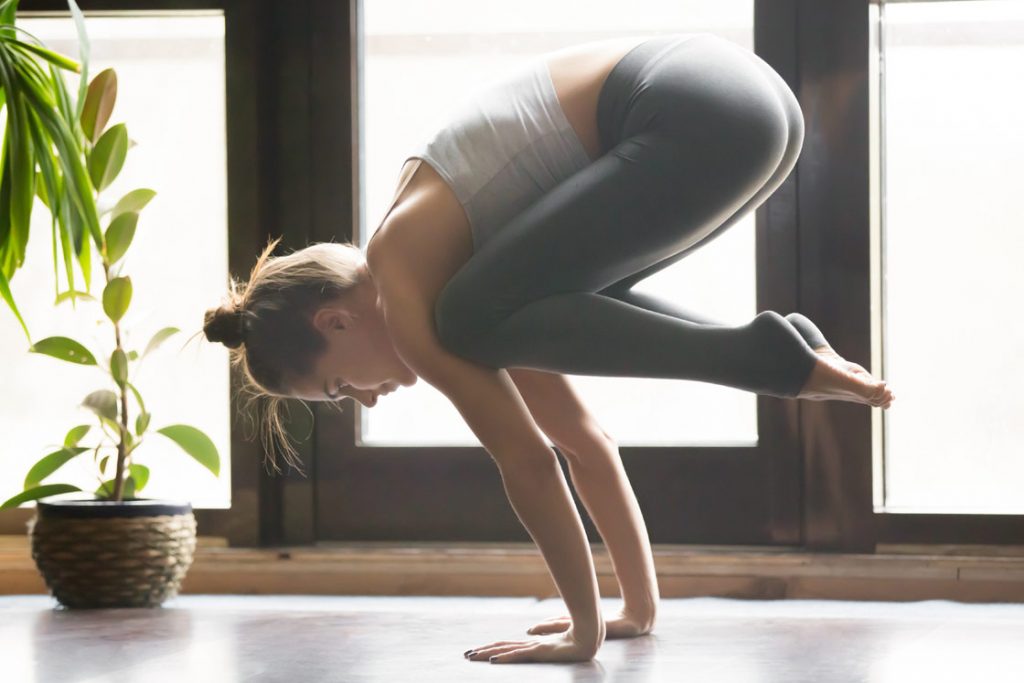
Crane Pose(Bakasana) is an advanced balancing pose where we balance the body on the arms. This yoga pose strengthens the wrists, forearms and abdominal muscles and stretches the upper back. It’s a great pose that keeps you fresh, energised and active.
When we perform this pose, our body looks like a crane or baka with both legs up, which is why it is also called crane pose or bakasana. The extended arms resemble the long legs of the crane and the body resembles the upper body of the crane.
It mainly trains the biceps, triceps and forearms, as well as the wrist, mid-body, upper back and lower back.
One of the first arm balances that many practitioners master is called Bakasana (crane pose). In Crane pose, you learn to connect your mind and body to your knees, your abdomen to your spine, and your arms to your knees.
Difference between Crane Pose (Bakasana) and Crow Pose(Kakasana)
Crane pose (Bakasana) and crow pose (Kakasana) are often confused and used synonymously. The formation of these poses is quite similar and yet different.
In Crane pose, the knees are crossed under the armpits and the hips are raised as high as possible. The main difference is keeping the arms straight.
In Crow Pose, on the other hand, your knees are not tucked under your armpits. You bend your arms from the elbows and make an angle of almost 90 degrees. Then you place your shins on your upper arms (triceps) and tighten your lower abdomen.
The difference is also in the names. The crane is a large bird with long legs compared to a crow. Therefore, in the crane pose, we keep our arms straight to form the legs of the crane and bend our arms to form the shorter legs of the crow.
Practice Guide to Perform Crane Pose(Bakasana)
Preparatory Poses
- Adho-Mukha Shvanasana (Downward-Facing Dog Pose)
- Navasana (Boat Pose)
- Dandasana (Staff Pose)
- Malasana (Garland Pose)
- Phalakasana (Plank Pose)
- Chaturanga Dandasana (Four-limbed Staff Pose)
Steps to Perform
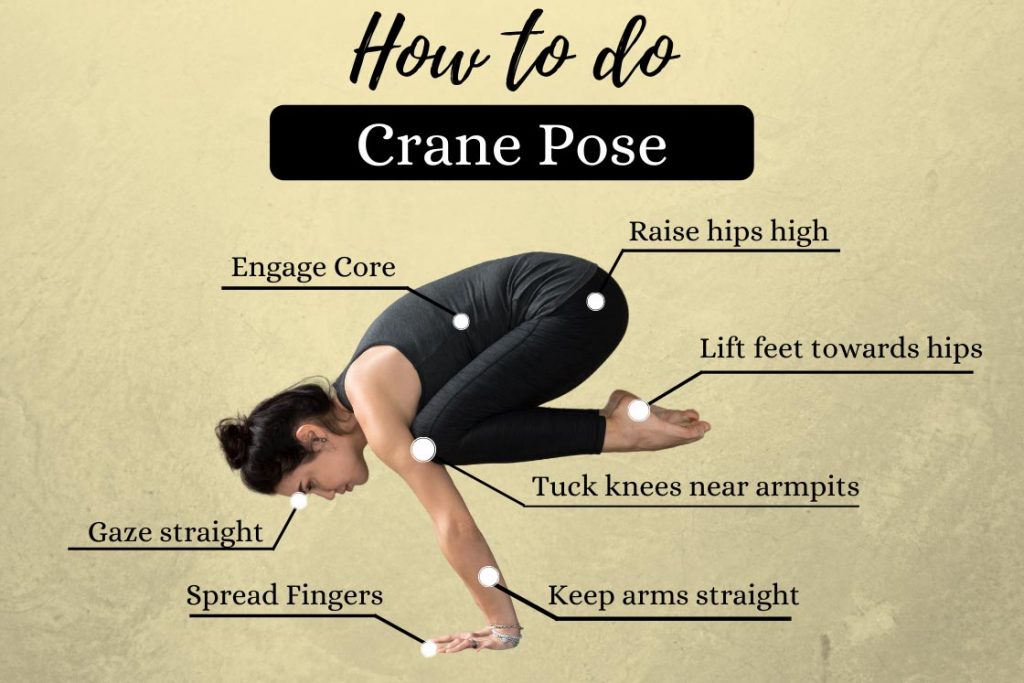
- Stand straight on your yoga mat in Tadasana(Mountain Pose) with your legs hip-width apart.
- Come to a full squat, keeping your spine and back straight, and spread the thighs a little wider than your torso.
- Keep your arms between the thighs with elbows rested on the inside of the knees.
- Stay in this pose to establish your stability.
- With an exhalation, place your palms on the mat about a foot in front of your feet and spread your fingers. Your palms should be shoulder-width apart, elbows facing outward.
- Bend your elbows, lift on the balls of your feet and place your knees on your upper arms, as close to your armpits as possible.
- Lean forward, inhale, and lift your feet off the floor, bringing your body’s weight to your arms.
- Straighten the arms without locking the elbows and try to maintain the body weight evenly on both hands. You can round your back if needed.
- Raise your hips and bring your feet closer to the hips.
- Hold this pose for 10-30 seconds initially or according to your strength and breath normally.
- When you are done, gently lower your body and place your feet on the floor to come to the original squat position.
Beginner’s Tips
- Avoid moving fast into the pose or trying to find balance. Find your equilibrium at each stage as you go slowly.
- Avoid letting your legs rest on your arms; instead, bring your knees as high into your arms as you can.
- You’ll feel more secure if you press your arms into your knees and your knees into your arms.
- You can place a folded blanket or yoga blocks under your hands for better grip and comfort to the wrists.
- Initially lift the legs one by one and build strength till you can lift both legs at once.
- Make sure your core muscles are working and not only your hips to support the leTor to assist you with the lift, push your upper arms up into your shins and pull your groin into your pelvis when you are ready to lift from the ground.
- Do not enter this pose by elevating their buttocks very high and far from their heels. Keep your heels and buttocks close together and tucked in.
- As this is an advanced-level balancing pose, you will tend to fall frequently. However, you should not get frustrated or angry. Give time to yourself and your body to get a better grip on the pose. Take the help of a teacher or a friend for better.
Precautions
- While performing the pose, you might topple forwards and get hurt. Put something soft like pillows or folded blankets in front of you to avoid injury.
- Do not place your entire weight only on the wrists or fingers. Spread the body weight evenly on the palms, fingers, and wrists of both hands.
- Try not to look back towards your heels, as it can lead to disbalance. Keep your gaze at a point directly beneath your head.
- While performing this pose, do not spread out your elbows on the sides as it can put pressure on your wrists. Keep them in line with the wrist and shoulders.
- Do not wear slippery fabrics like silk for this pose as they can be a hindrance while tucking your knees.
Contraindications
- If you are suffering from disorders such as Carpal Tunnel Syndrome or Spondylitis, do not perform this asana.
- As Crane Pose puts a lot of pressure on the abdomen region, so, performing it during pregnancy is not good for the health of the fetus. Also, do not perform it during menstrual cycles.
- If you have any recent injury or have undergone surgery in your arms, legs, hips, back, or neck, avoid practicing this asana.
- Patients with hypertension or migraines should avoid this asana as there is a sudden rush of blood flow to the head.
Variations and Modifications
Bakasana with eagle legs – Making the leg formation of the eagle pose, one leg crossed over the other on the knee, is an advanced variation of the crane pose. You should have established a significant level of stability and strength to make this leg formation once you have lifted from the ground.
Bakasana with a chair – In this modification, you can keep a stool or chair behind you so that your legs can rest comfortably. If you are a beginner, using a chair can aid in building strength in your core and arms.
Follow-up Poses
- Adho-Mukha Shvanasana (Downward-Facing Dog Pose)
- Sirsasana (Headstand)
- Sarvangasana (Shoulder Stand)
- Parsva Bhuja Dandasana (Grasshopper Pose)
Benefits of Crane Pose(Bakasana)
The Crane Pose allows you to build and improve your arm strength. It also strengthens your core strength and makes your body strong and flexible. This pose also boosts blood circulation to the spine which is beneficial for spine and back health.
Have a look at some of its benefits:
- Increases the strength of the arms and shoulders as they hold the entire body weight.
- Tones and strengthens the core muscles.
- Crane pose stretches the muscles of the middle and lower back.
- Opens your groin and strengthens your inner thighs.
- Massages the spinal and stimulates a better flow of blood to the spine.
- Improves the digestion and metabolism of the body through massaging the abdominal organs.
- Improves your body control and proprioception—the sense of where your body is in space.
- Brings awareness to the body and improves mind-body coordination.
- Prepares us mentally and physically to perform advanced arm balancing poses.
- Makes the body more active and increases overall confidence.
Conclusion
Focus is placed on raising and balancing in the crane stance. Greater focus and body awareness are also made possible, and it aids in the mind-body connection. As a result, it is recommended that beginners start with the crane pose and progress to more intermediate poses once they have mastered it.

