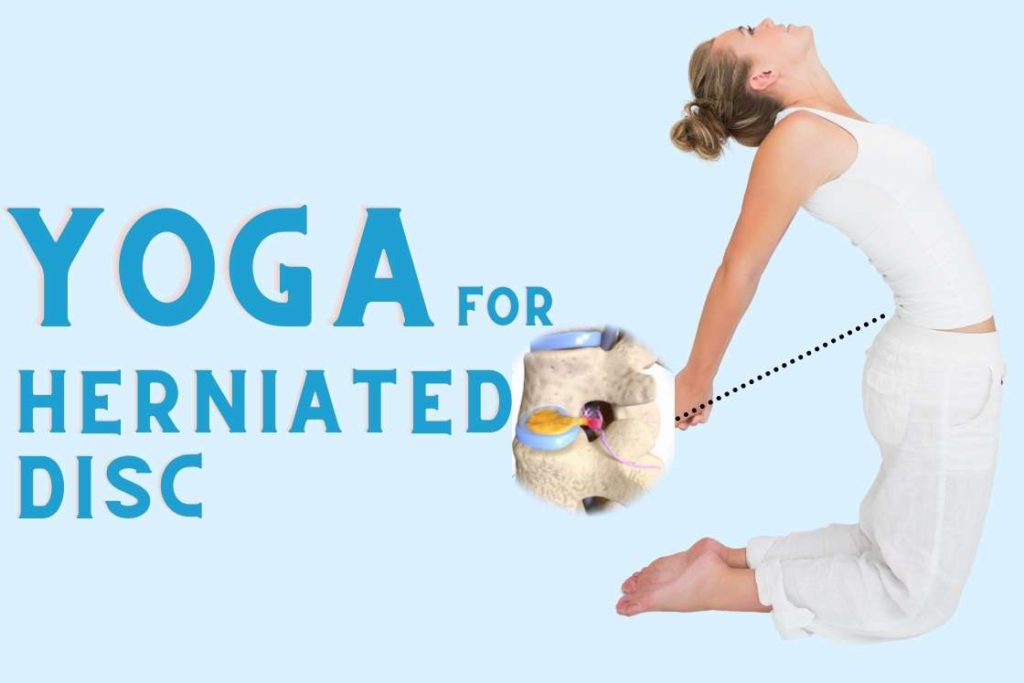
Understand your herniated disc
Your spine is made of 33 vertebrae, ring-like bone structures, which are joined to each other by intervertebral discs. The outer make of these discs is semi-firm and the insides contain a jelly-like substance.
Our daily activities flex our spine in such ways that it compresses these discs. When this pressure of flexion becomes excessive, it causes the jelly-like substance in the discs to herniate outward.

This is typically called a herniated disc or slipped disc, which is formed in the lumbar region (lower back) of the spine. So obviously the solution seems very simple, we need to avoid such flexions which is true but impractical, because the major cause of this flexion is sitting.
An ideal sitting position requires our lower back to be pressed forward. But, we are too used to reclining back into our chairs, which flexes the lumbar region, compressing the discs. When this flexion continues for prolonged hours, over weeks and months, a slipped or herniated disc is developed.
Yoga & Herniated Disc
Yoga is a very effective practice in herniated or slipped disc. So much so that even licensed chiropractors recommend it. The notion is quite simple. A herniated disc is mostly caused due to the wrong posture of the spinal cord: the basis of most yoga poses is to correct the spine posture. This makes yoga a natural and obvious remedy.
The main focus of yoga poses will be to inverse the flexion impact on your intervertebral discs and maintain a healthy posture. Hence you will need to practice poses that work on the lumbar region of your spine.
Yoga practices will also open up new possibilities to relieving herniated disc symptoms. Yoga asanas can increase blood flow to your spine and stimulate the nerves. This will help you relieve your slipped disc pain, by a great deal.
Finally, practicing yoga on a regular basis will develop a heightened sense of body awareness. An awareness that will allow you to maintain proper posture at all times of the day; even when not trying consciously.
Relieving the pain of slip disc
Anyone who is suffering from a slipped disc, the most prominent symptom that person will face is lower back pain or cervical herniated disc. A constant pain that feels stuck in the lower back and aggravates with both forward and backward movement.
Yoga poses have always been known to hold great efficacy in back pain management. Further, when having excruciating pain, some poses can be quite difficult to perform. However, certain poses like the easy pose (sukhasana), crocodile pose (Makrasana), and corpse pose (Shavasana), are extremely easy to perform and equally comforting to your back.
When to see a doctor?
Herniated discs often heal by themselves. All you have to do is give them time, rest, and proper exercise. So if the pain stays in your lower back, you can treat it naturally with remedies like yoga.
However, if the pain severely runs down your leg, numbing sensations in your leg, added with lack of leg muscle strength, you need to see a doctor. Although even then you will need to continue with practices like yoga and avoid lower lumbar flexion.
6 Yoga Poses To Help With Herniated Disc Issues
Each pose will either focus on healing the herniated disc or relieving the pain, or both.
1. Salamba sirsasana – Supported Headstand
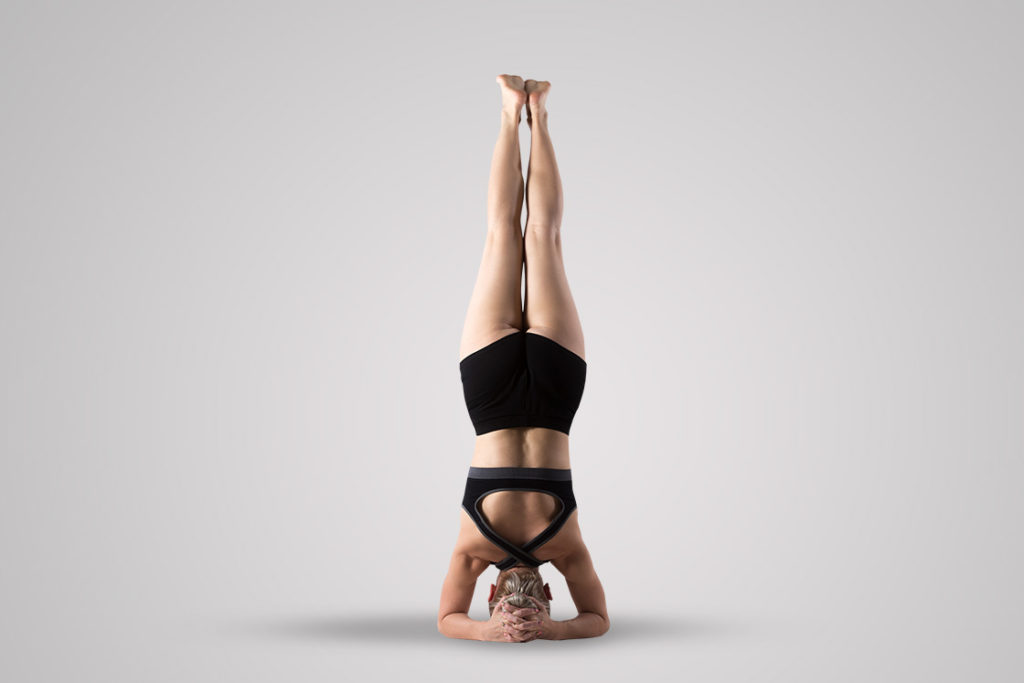
Salamba sirsasana or supported headstand increases blood flow to your spines. It maintains balanced tension and Stretch between your spines and intervertebral discs. These two functions of the headstand pose will help you pull back the herniated disc in place and eliminate pain.
To get into this pose, first find a trustworthy partner or better yet, an instructor.
- Lie on your back, supine, with your partner standing towards your leg.
- Keep your legs joined.
- Bend your knees and lift up your torso off the ground.
- Now your partner will need to hold your legs and pull it up. Pull you up till your entire body stands inverted on your head.
- You will provide further support, by holding the ground with your hand.
- Your support will have to ensure that there are no uneven movements to your spine, that can aggravate the slipped disc.
- Do it for a comfortable duration, but only once a day.
Note: It is advisable to find an experienced practitioner as your partner. Also to ease the hold, your partner can tie your feet together, and belay your feet and hip with a rope to the ceiling.
2. Viparita Dandasana – Inverted Staff Pose
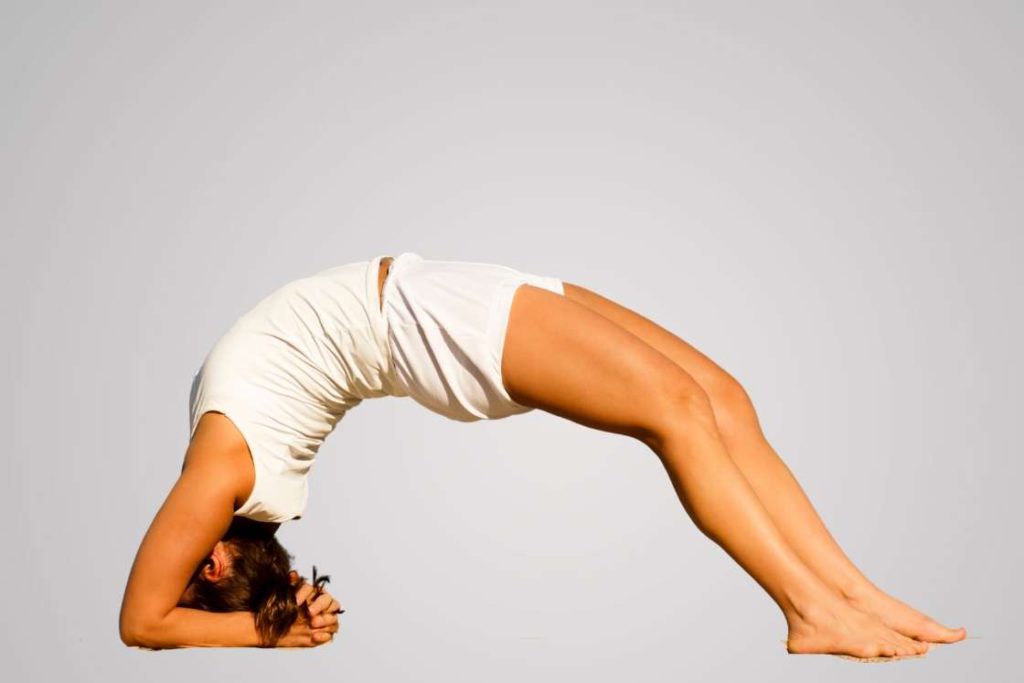
Viparita dandasana will give you significant pain relief. The herniated area can often face inflammation. Viparita dandasana will help reduce inflammation as well. When your spine flexes in unwanted directions, it compresses the disc to create herniation. Viparita dandasana can help resolve that compression of the slipped disc.
You will need either of three, a thick yoga bolster, a thick rolled blanket or an outward bulging exercise platform. Let’s discuss with the easiest available support, the blanket.
- Find a hefty blanket and roll it to give you a lift from the ground.
- Sit on the rolled blanket and gradually slide down to lie with your lumbar region on the blanket.
- Put your legs straight and plant it down on the floor. Do not break your knee and let your sole touch the ground.
- Fold your elbows and arch back on the other side of the blanket to touch the ground with your crown and elbows.
- Take 10 breaths and release.
Do not attempt this pose without the support in herniated disc. The blanket will give you the maximum benefit, but the outward bulged platform, will be much easier to practice on. Also when using the blanket or bolster, ensure your support helps you clear 2.5-3 feet off the ground.
3. Urdhva Mukha Svanasana – Upward dog pose
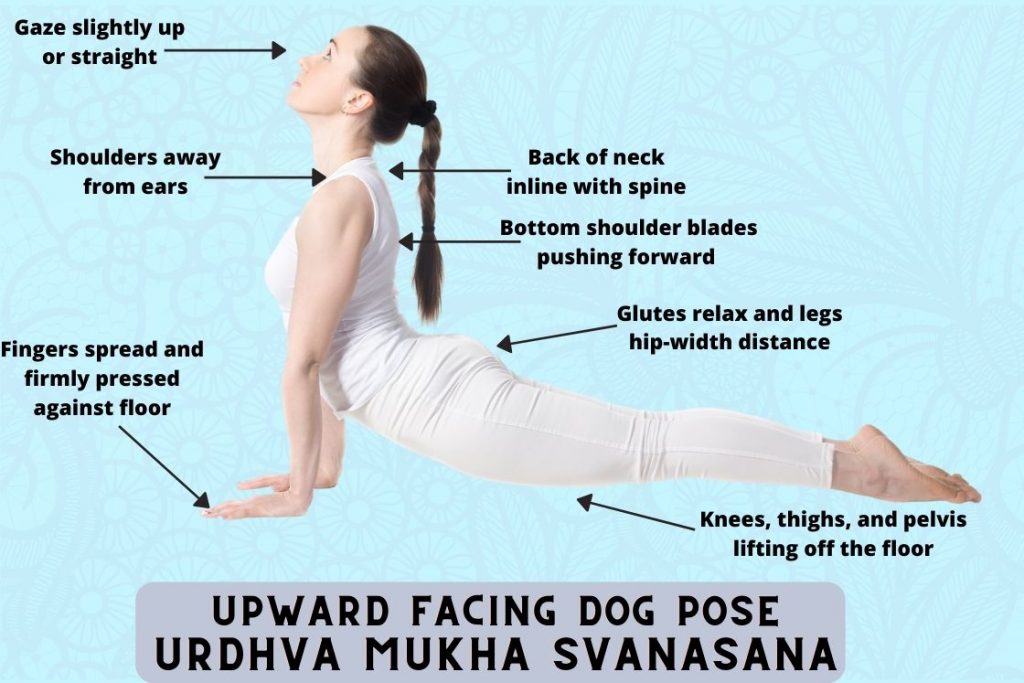
Urdhva Mukha Svanasana or upward-facing dog pose is an iconic pose when it comes to lumbar spine bending poses. Although some prefer the Bhujangasana or the cobra pose, especially because it specifically bends, and sharply, the lumbar region. Urdhva Mukha on the other hand gives your spine a more gradual backbend arch; making the pose less painful and injury-free. The Urdhva Mukha Svanasana will also help you repair the nerve damages.
- Get down on all fours. Ensure your wrists are exactly below your shoulders and your knees under your hips.
- Keep shoulder length gap between your hands and hip length gap between your knees.
- Keeping your hands and knees fixed, gradually bring down your body to the floor.
- Do not just drop your body, but carry your weight all the way down.
- Open your chest forward, press back your shoulder blades, and lift up your body by straightening your hands.
- This lift should create the needed backward arch in your spine.
- Now pronounce your posture, by rising up your chest and head.
- Do not squeeze your shoulders, rather firmly push them down.
- Gently arch back your head.
- Make sure the arch is maintained in your entire spine, and evenly.
- From your feet to knee will be in contact with the ground, and from lower thigh upto your head, you will arch up.
- Take 10 breaths and release
Ideally the pose requires you to lift your knees off the floor as well. You will practice the knee rested posture, as that is safer with herniated disc.
4. Ustrasana – Camel pose
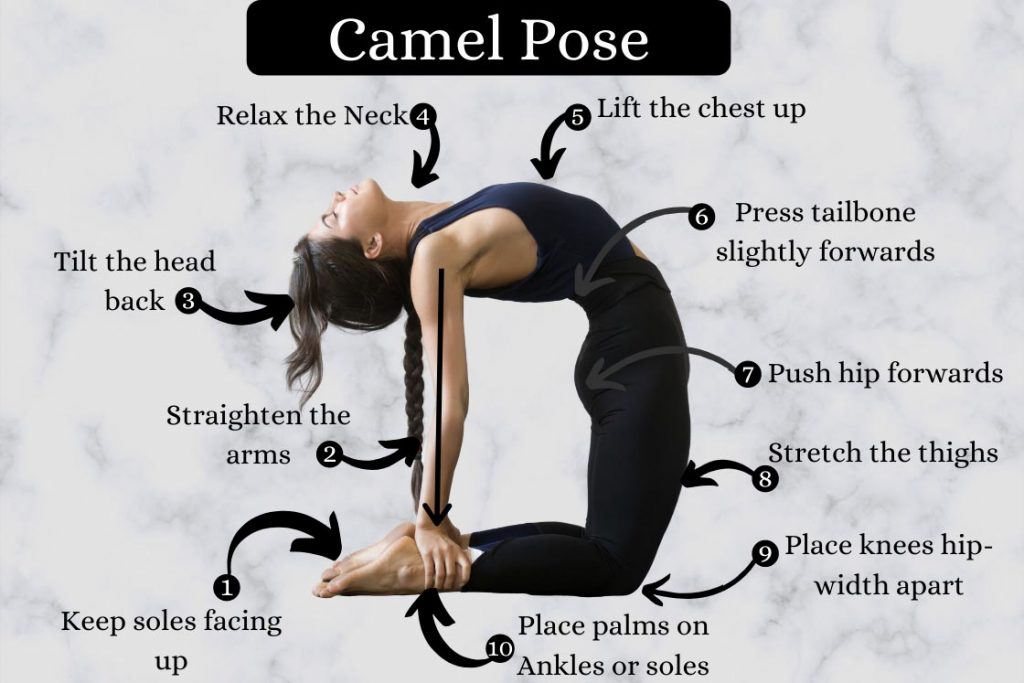
Ustrasana or the camel pose is the go to asana for any and all forms of back pain. Ustrasana is a good pose for your back muscles, nerves and spine. This is the only pose on the list that will give your spine a back bend while in erect position. This pose will also give you the maximum relief to your slip disc pain. Ustrasana has a fair bit of exercise for your legs as well, which too can come handy in slip disc.
- Kneel down on your knees.
- Place your hand on your hips and gently massage while you breathe. This will loosen your lower back.
- Push your hip front with your hand, for a few warm up stretches.
- And then when you feel ready, arch your lumbar region backward.
- Push back further by arching your upper spine and opening up your chest, to the maximum.
- Arch your head backwards, and touch your heels with your hands.
- Hold this pose for 5 breaths, and practice twice daily.
Ustrasana is going to need greater back flexibility, especially with a slipped disc. So do not start with this pose right away. Adapt to backbends with other poses and then try this. Alternatively, get a partner to give you a hand of support on the backbend.
5. Cat cow pose
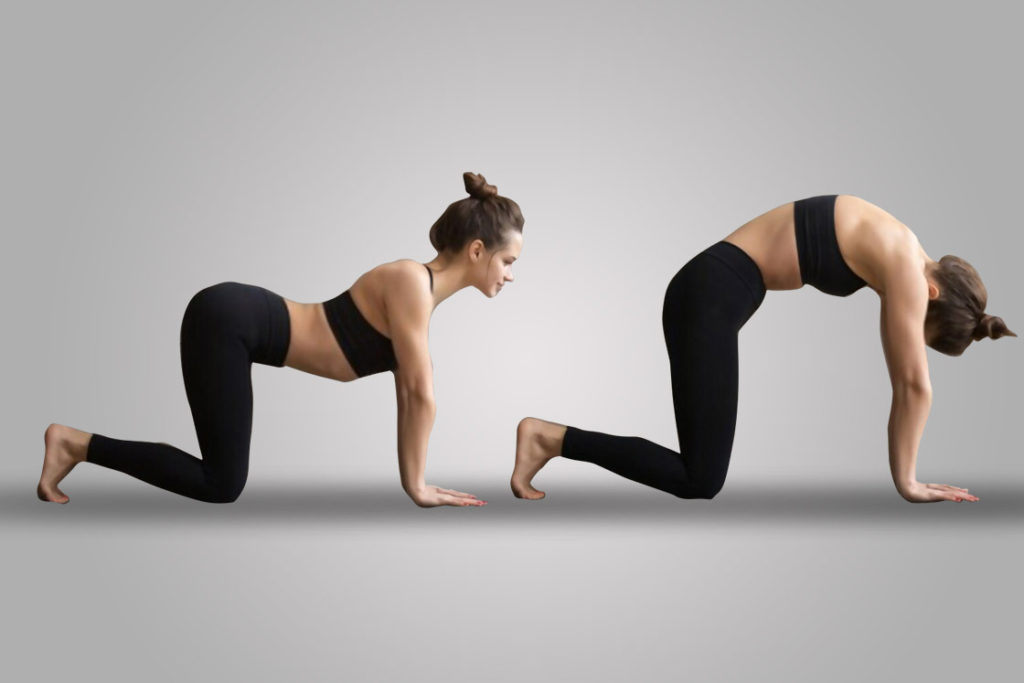
The cat-cow pose is one of the most recommended yoga on the list. Whilst most poses focus on a singular arch, stretch, or bend, the cat-cow pose engages two separate spine movements in a single pose. The back-and-forth motion of the spine will prove much better at healing, over hold tension in a fixed bend. The cat-cow pose will help the herniated disc contain its jelly-like insides, and mend the outer wall.
- Get down on all fours, with wrists exactly below your shoulders, and knees below your hips.
- Then on the inhale, your belly needs to fall down and shoulders roll back, creating a nice curve in your lumbar region.
- Look up towards the sky, and on the exhale, reverse your spine posture, shoulders roll Infront and look down.
- Curl up your belly like a cat. Your abs need to suck and push against your lumbar spine.
- Repeat this motion 10 times and do it maximum twice a day.
The cat cow pose needs a lot of body awareness, especially for the spine and belly posture. You need to specifically, yet simultaneously, focus on your abs, shoulders and spine. It’s best to practice the pose against a wall mirror, or Infront of a trained eye.
6. Supta Baddha Konasana – Reclining Bound Angle Pose
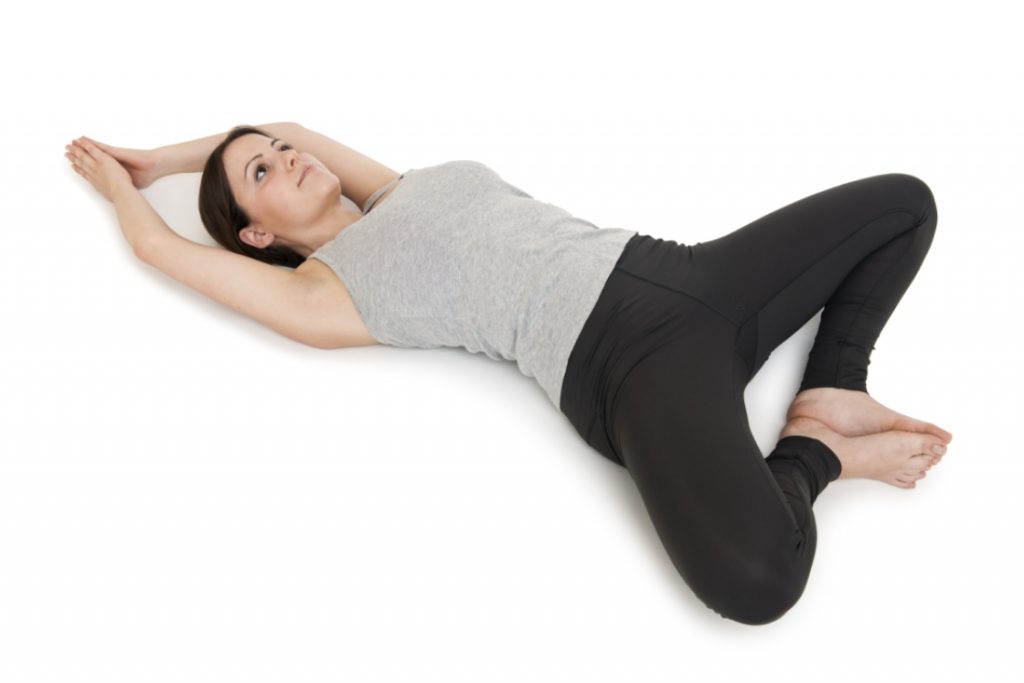
Supta Baddha Konasana will provide much-needed rest in your yoga routine. This pose subtly stretches your leg and groin muscles and nerves. It pulls your pelvis downward, and puts your lumbar in a curve it’s meant to be. A laid-down pose will help you relax every other tissue in your body, while the pose structure gently works on slip disc-related issues.
- Sit in a staff position.
- Bend your knees, and bring your feet closer to your groin.
- Touch your soles together into a butterfly posture, and clasp your feet together with your hands.
- Sit in this position for 5 breaths.
- Now slowly place your elbows on the floor and recline back.
- Gradually lie back all the way down, extend out and relax your arms, but hold the bound angle pose on your legs.
- You can lie and rest in this pose for upto 30 seconds
Note: If you have severe symptoms of slip disc and you the complete recline hurts your back, then try putting support, rolled blanket, pillow or bolster, under your lumbar region.
Yoga Poses to Avoid with Herniated Disc
Any yoga pose that brings your back into the round shape, like forward bend poses, can be quite contradictory for the herniated disc. Some common example of such yoga poses are Uttanasana, Paschimottanasana, and Upavistha Konasana.
While doing yoga with a herniated disc, be more cautious of your body movement. Wherever needed modify the pose or use props. You will have to modify the poses such that the benefits remain intact yet the stress is reduced. Remember, “no pain no gain,” is not a phrase you want to associate with slip disc exercises.
Continue your work with slip disc
A major concern for many with slip disc is balancing it with work. Sitting down in an office for 8 hours a day is what gave rise to cases of herniated discs, in the first place. But what you have got to understand is that sitting is not the problem, but sitting in the wrong posture is.
Yoga practices can train your spine to remain in proper posture, even when sitting. This will allow you to comfortably pursue your office job, without risking your lower lumbar. Although, you still must get yourself some break every 20 mins to 30 mins, to stand and walk a bit.
Slipped disc Vs muscle pain
A stressful confusion is the one between slipped disc and muscle pain. Pain in the lower back can be a result of multiple issues. Identifying the cause can be a tricky business.
If you have a simple muscle strain, your pain will be felt mostly in the forward bends. Whereas, in a slipped disc the pain can be felt both ways while bending forward and returning from the bend. In fact, the pain on the return is slightly more.
Additionally, muscle pain will be localized to your lower back. Herniated discs on the other hand can shoot down your leg. This is mainly because of the damage of nerves running down your leg. Sometimes your leg muscles might even lose their strength.
Conclusion
So now with the basics of slip disc and the yoga poses covered, there is only one final topic that remains to be discussed. How long will it take heal your slip disc.
The healing period will vary from person to person, depending on the severity of the condition. However, taking a mean, most cases resolve within 4-6 weeks; the pain starts to subdue after almost 10 days of self-care.
: Meaning, Steps, Benefits & Variations")

: How to Do, Benefits, and Variations")

