Your legs take the entire weight of your body. While standing, walking, jogging, or running all your leg muscles are at work to keep your body stable and upright. When performing active sports such as swimming or cycling, it is your leg muscles again that push you forward and take most of the brunt.
And when you are sitting, you again use the strength of your lower legs and spread your weight evenly on the feet to stand upright.
Just like any other body part, your leg strength is equally important for performing your daily activities. It is your legs that take you to the place of your work, to go out with your friends, to travel, perform your favorite sport, dancing, do gardening, sit, stand, walk, and even work out.
So it becomes important that you not only work towards toning your leg muscles but also strengthen them from the inside out.
Importance of Strengthening the Legs
Strong legs keep you stable and give you the right posture. As we rely on our lower body strength to help us stay rooted to the ground, it is important the muscles and joints are in their top shape and form.
When we focus on leg muscles, we are focusing on every major muscles group such as the feet, calves, quadriceps, hamstrings. It helps in better circulation of blood to these areas which keeps them healthy and from getting fatigued.
Regular leg exercise also helps in preventing injuries as the leg muscles become more flexible and offer a range of motion. It helps release any stress or tightness in the muscle to increase mobility.
Strengthening your legs will ensure that both your legs get equal attention in building strength, flexibility, and mobility. It is understood that the dominant leg, mostly the right leg, is often overworked. When you perform leg strengthening exercises, you are paying attention to both legs individually, thus creating a balance.
This will also help in the correct alignment of your body. In turn, it alleviates lower back pains and reduces joint pains as well.
In the hindsight, when your muscles are strengthened, your bones also receive equal benefits. This is because, when the leg muscles are stiff, the pressure shifts to the bones, which can lead to their deterioration. Releasing stiffness will release the extra pressure on the bones.
Athletes or sportspersons who use their leg muscles will greatly benefit as overworking the leg muscles can also be a cause of injury. Regular stretching and strengthening exercises will keep the muscles stimulated and also have a therapeutic effect.
Strengthening of leg muscles through Yoga
Practicing yoga is one way through which you will not only be targeting one specific muscle group but will also be working towards the overall strengthening of the leg.
When you perform poses that require you to stand or balance, you activate the leg muscles to give you stability and keep you in an upright position. You are also equally spreading the weight on your feet which ensures that both your legs are balanced in supporting your body weight while performing yoga poses.
In Yin Yoga, where you focus on stretching your connective tissues, you can work on deep stretches to strengthen your joints and the tissues that hold these joints. This is very different from a regular gym workout, where the main focus is only on muscles.
Thus, yoga will help you in building a healthy and strong leg but also works on a deeper level.
Yoga poses to strengthen your legs
As stated earlier, yoga will provide a holistic balance to your legs by focusing on all the major muscles groups. Performing standing or balancing yoga poses makes it certain that your leg muscles get stimulated.
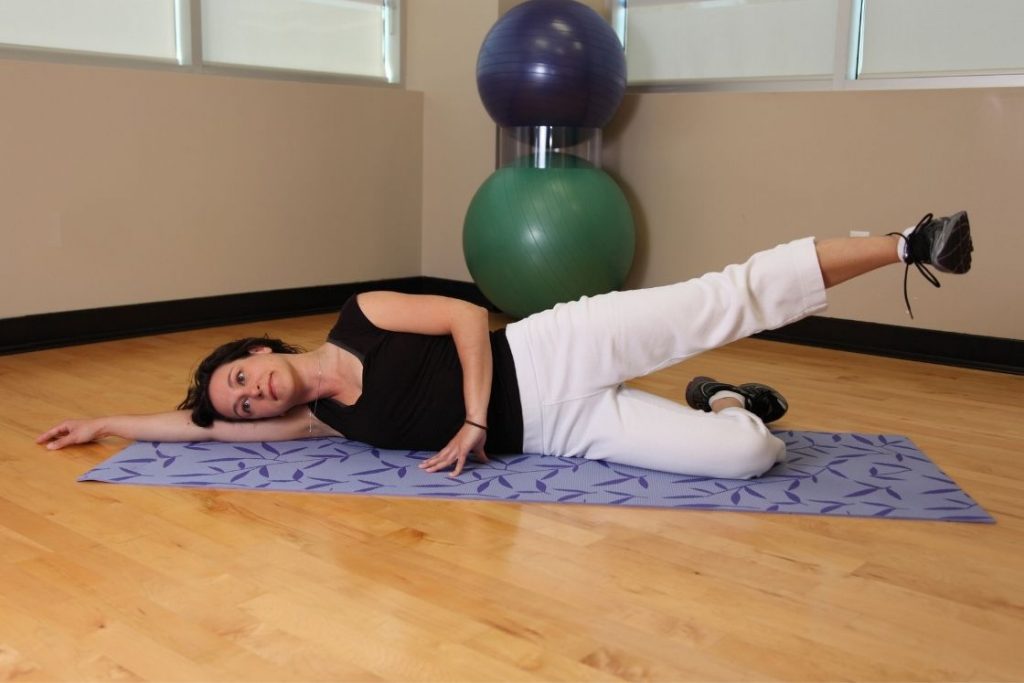
In reclining yoga poses, you stretch your legs by lifting them up or shifting them to the sides. Through this, you are also effectively stretching your calf and thigh muscles, which form part of some of the large muscles in the legs.
By practicing these poses, you will be also focusing on your ankles and knees. These joints are extremely important in the everyday movement of the leg.
Before starting yoga for legs, keep a few things in mind:
- If you have recently suffered an injury or undergone surgery in any part of your leg, refrain from practicing these yoga poses unless you have been cleared by your doctor.
- Pregnant and menstruating women should also apply caution as many poses may strain the abdomen.
- If you are suffering from any other health condition, consult your doctor and yoga instructor beforehand.
- Stop performing the pose as soon as you feel any discomfort or pain in any part of your body.
Here are some of the best and most effective yoga poses that will strengthen your leg muscles.
1. Mountain Pose (Tadasana)
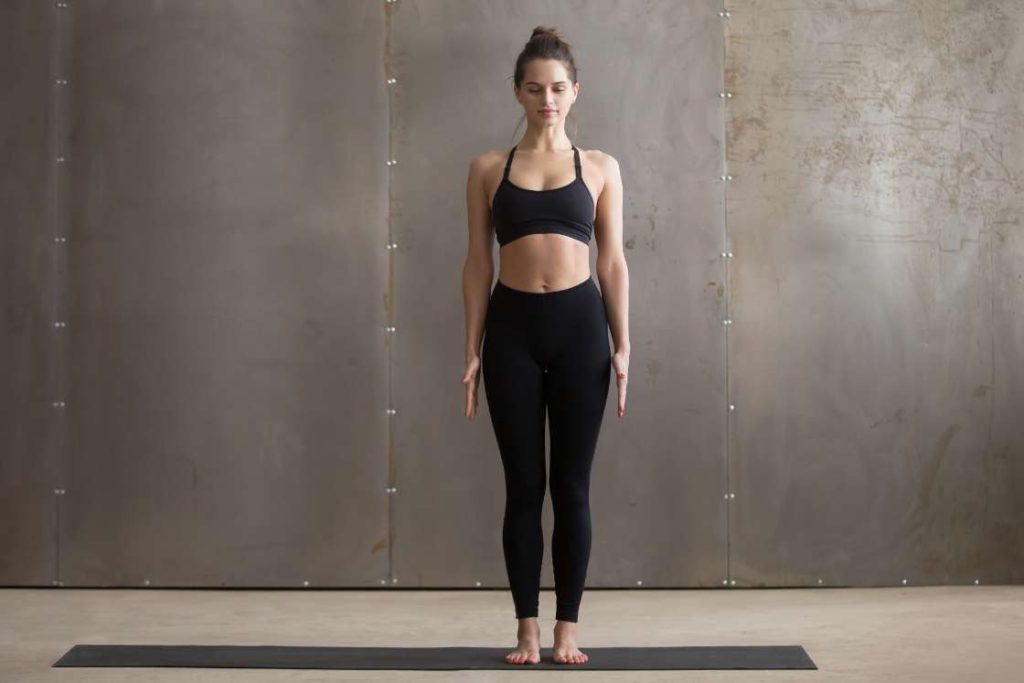
This beginner pose is used as a starting and transition pose in many standing poses. As the name suggests, in this pose you need to stand firm in one place like a mountain. This can only be achieved if your weight is evenly distributed in your feet and legs and your hips are properly aligned.
This simple standing pose enhances your stability by keeping your entire leg engaged. Your arches of the foot also get undivided attention as you have to keep your feet firmly on the ground.
Some of the benefits of practicing mountain pose include relief from flat feet, strengthening of thighs, knees, and ankles, alignment of hips and pelvis, firming your buttocks, and correcting your posture.
- Stand straight on a yoga mat with your feet parallel to each other.
- You have the option of keeping your feet slightly apart so that your ankles do not touch each other. Or instead of the feet, you can only spread your heels.
- Lift the balls of the feet, spread apart the toes, and bring them back on the mat to create a wider base for weight distribution.
- Draw in your navel and keep the back straight yet maintain the natural curve of the spine.
- Your arms can naturally hang beside you. Keep your shoulder away from the ears and roll your shoulder blades back and then down. This will open up your collar bones and chest.
- Ensure that your chin is not tilted down or upwards. Keep your head straight and gaze straight ahead at an immovable point.
- Once you have found your stability, stay in this pose for 5-10 breaths.
To gain an extra stretch for your calves in mountain pose, stand on the balls of the feet for a minute and then slowly come back down. Do this process for 5-10 breaths and then stand still in Tadasana for a few seconds to relax.
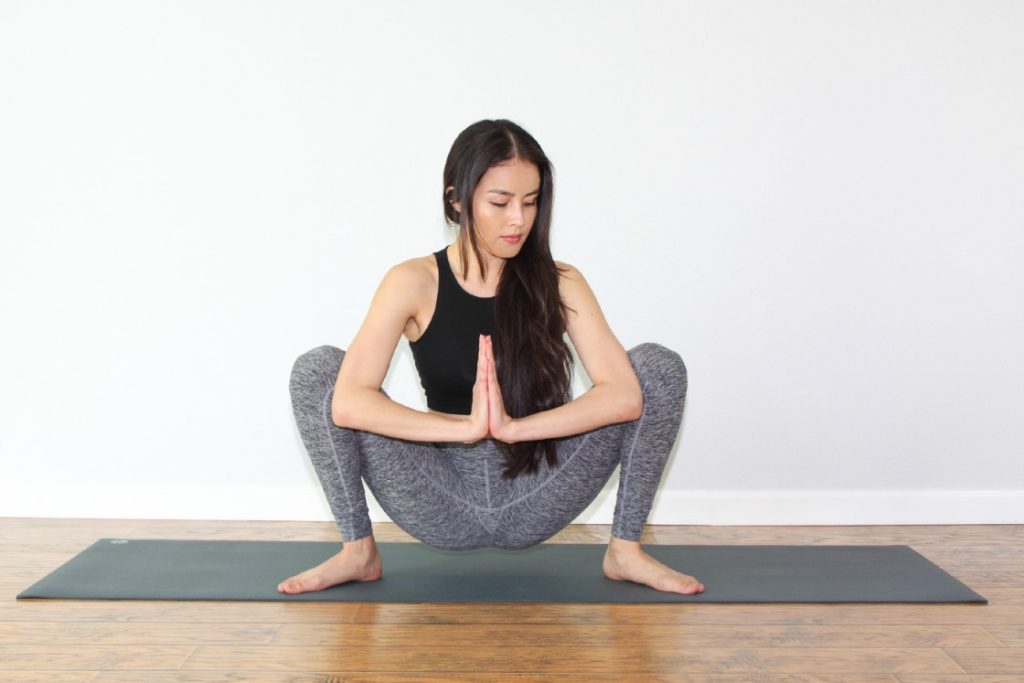
2. Hero Pose (Virasana)
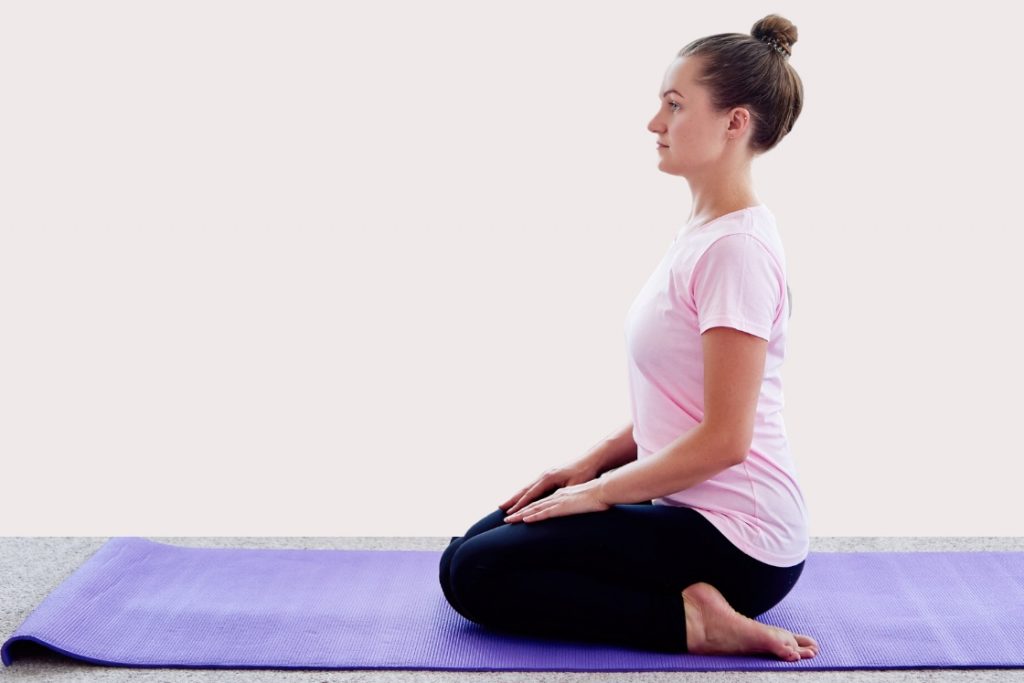
Hero pose is a beginner-level pose however the benefits it gives to the legs are the same as any other balancing pose. By performing hero pose, you are simultaneously strengthening your knees, shins, top of the feet, and quadriceps. The pose also strengthens the spine and corrects the slouching posture.
People who are involved in sports that require immense leg movement will be benefitted from its stretching abilities.
- Come to an upright kneeling position with the top of your feet flat on the mat.
- Place your hands on the mat and bring your knees together and move your feet at a distance that is slightly wider than the hip. The distance should be enough to place your buttocks between the gap.
- Slowly, move your hips down to sit in between your legs. If needed, create more space by manually moving your shins further. You can also place a yoga block under your buttocks to sit on it.
- Make sure that you are not seated on your feet. Also, the toes should not be tucked in or facing outwards. They should be pointed straight towards the back.
- Keep your spine straight, shoulders away from your ears, and gaze straight towards the front.
Hold this pose for 3-5 breaths.
3. Downward Facing Dog (Adho Mukha Svanasana)
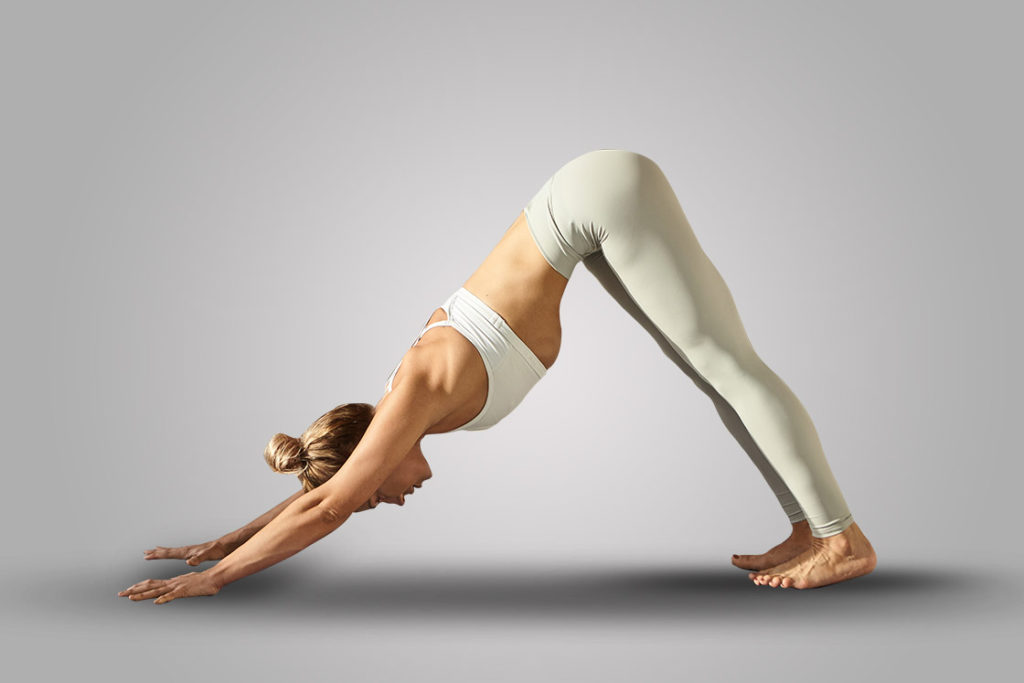
The downward dog is one of the favorite yoga poses for many practitioners. It works on stretching and strengthening all the major areas of your lower body and legs such as glutes, hamstrings, quads, calves, knees, feet. Moreover, your entire back, shoulders, arms, and wrists also get a good workout.
- Come to table top pose with your arms parallel to each other and shoulder-width apart. Keep your legs hip-width apart as well. Spread your finger to distribute the weight evenly on your hands.
- Press your hands and feet firmly onto the ground and lift your hips upwards. Avoid locking your shoulders, elbows, and knees, but keep them straight.
- Stretch your tailbone towards the ceiling to lift from the hips and keep your back straight. To stretch your hamstrings, press your heels on the ground while keeping a micro bend in the knees.
- Your upper body, from your hands to the hips should form a straight line. Make sure that your weight is evenly distributed in your arms and legs.
- To give support to your arms and feet, place a folded blanket under your heels and keep yoga blocks on their tallest height to place your hands in them.
- Let your head and neck hang freely and keep a fixed point as your focal point for a steady gaze.
Hold this pose for 5 breaths and release gently.
4. Extended Triangle Pose (Utthita Trikonasana)
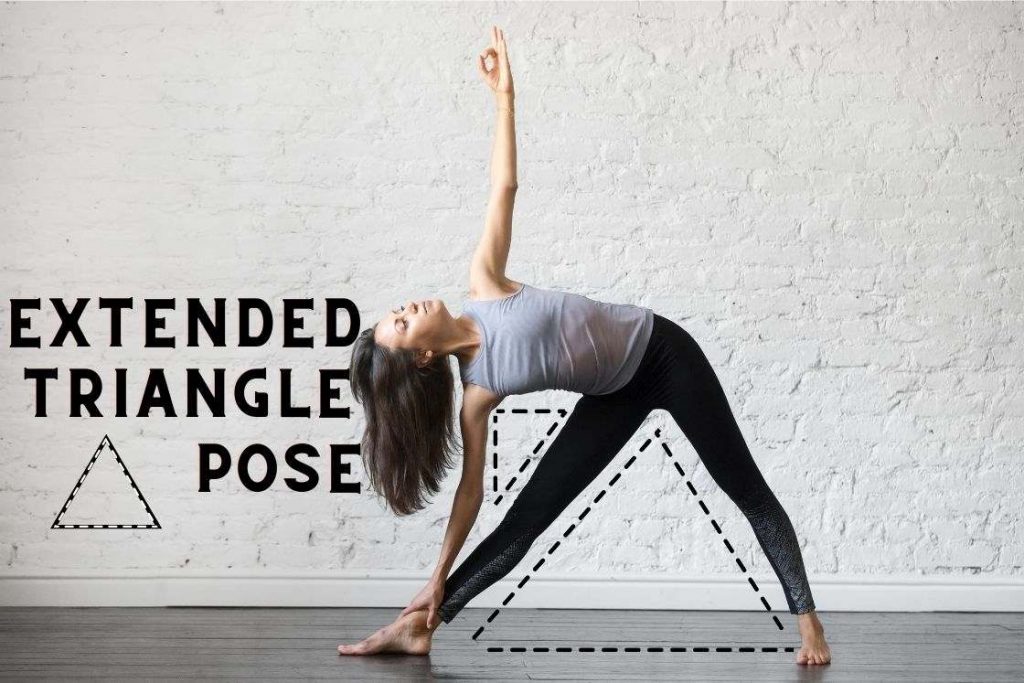
By practicing the triangle pose, you will be effectively stretching and lengthening your thighs, hips, and back muscles. These areas are equally important as they can get easily affected by any injury, pain, or misalignment in the legs. You will feel a nice stretch in the hamstrings and calf muscles as well.
- Stand in Mountain Pose, facing the longer side of the mat, with your feet 3-4 feet apart.
- Turn your left foot diagonally and your right foot should be pointed towards the shorter end of the mat. The heels of your feet should be aligned.
- Spread your arms to the side with your palms facing down. They should be parallel to the mat and your shoulders should be away from your ears.
- Start bending down towards your right foot from your hips, bringing your right arm down with you and your left arm moving upwards.
- Bend till your fingers touch your right foot. You have an option to bring your arm completely the mat, to your ankle, or to your shin. You can also use a yoga block at its highest side to rest your right hand.
- Keep your arms in a straight line with your left-hand fingers pointed towards the ceiling. Your left shoulder should be stacked on the right shoulder.
- Turn your head to gaze at your left fingers.
Hold this pose for 5 breaths and repeat the with the other leg.
5. Warrior I Pose (Virabhadrasana I)
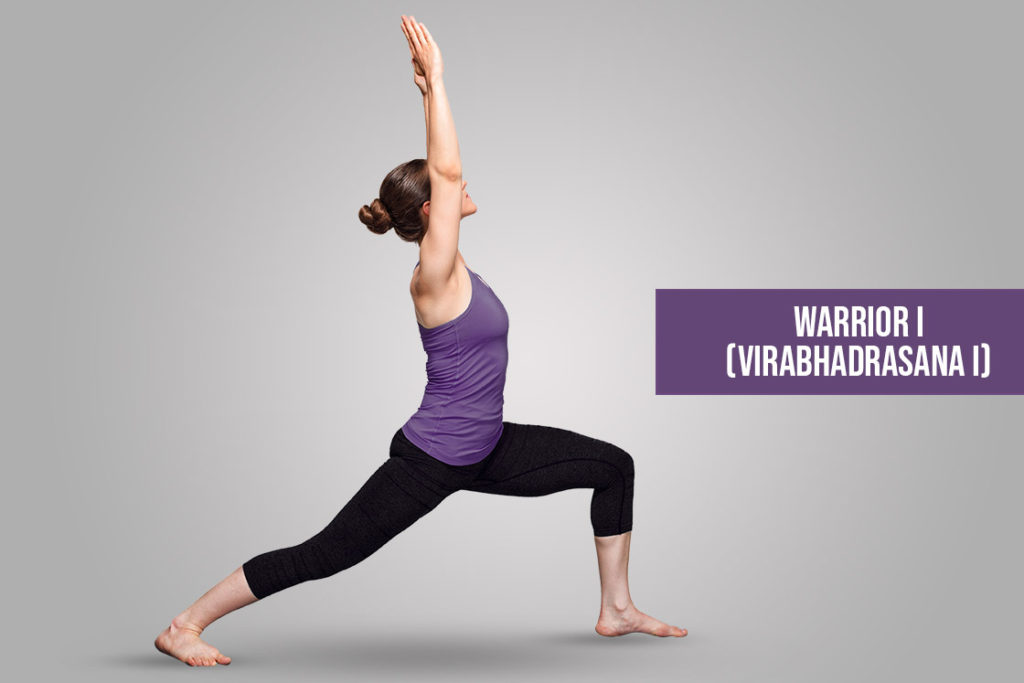
The warrior pose is yet another pose that is a favorite amongst yoga students. This pose helps in toning and strengthening the leg muscles. It also helps in building stability and balance for more difficult poses by energizing your legs and strengthening your ankles. Your hips and groin muscles are also stretched in this pose.
- Start by standing in Mountain Pose, facing the shorter end of the mat.
- Step your left foot to the back, placing your foot firmly on the floor and turning it to a 45-degree angle. Your knee should not be locked and the leg should be straight.
- Bend the right knee to make a 90-degree angle so that your thighs are parallel to the floor and your knee is stacked over the ankle. Make sure your right heel is in line with the left foot arch.
- Stretch your arms upwards with palms facing each other. Open your chest, lengthen the spine and draw in your abdomen while bringing your arms up.
- Your hips should also be facing forward and should not be tilting sideways.
- If you do not have any neck problems, tilt your head upwards to gaze at the fingertips.
- Press down on your left foot to keep your spine straight and keep your shoulders away from your ears.
Hold this pose for 3-5 breaths and repeat the process with the other leg.
6. Warrior II Pose (Virabhadrasana II)
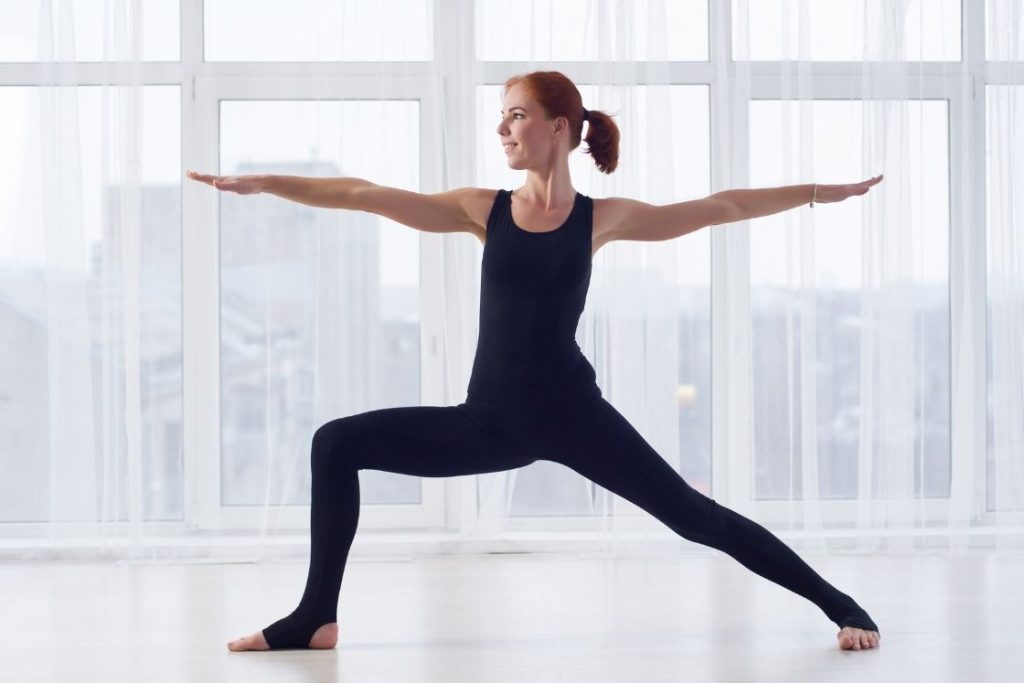
Though the process of performing warrior 2 pose is the same as a warrior I, it works on the hips and back leg in a slightly different way.
Warrior 2 pose gives a perfect stretch to your legs as it opens up the hips sideways. You will have to engage your back inner thigh for stability and balance in this pose. You also need to be aware of keeping your front leg knee firmly in its place to strengthen your thighs and lower leg.
- Begin with standing in mountain pose, facing the longer end of the mat.
- Spread your legs apart by about 3-4 feet and extend your arms sideways, parallel to the ground, with palms down. Make sure your shoulders are not hunched and are away from your ears.
- Bend your right knee at 90-degree while keeping the feet facing forward, stacking your knee over the ankle. Your thigh should be parallel to the ground as well as your right arm.
- Stretch your left leg to the back and turn your feet at a 45-degree angle.
- Turn your head to the right and gaze at the fingers.
Hold this pose for 3-5 breaths and repeat the process with the other leg.
7. Chair Pose (Utkatasana)
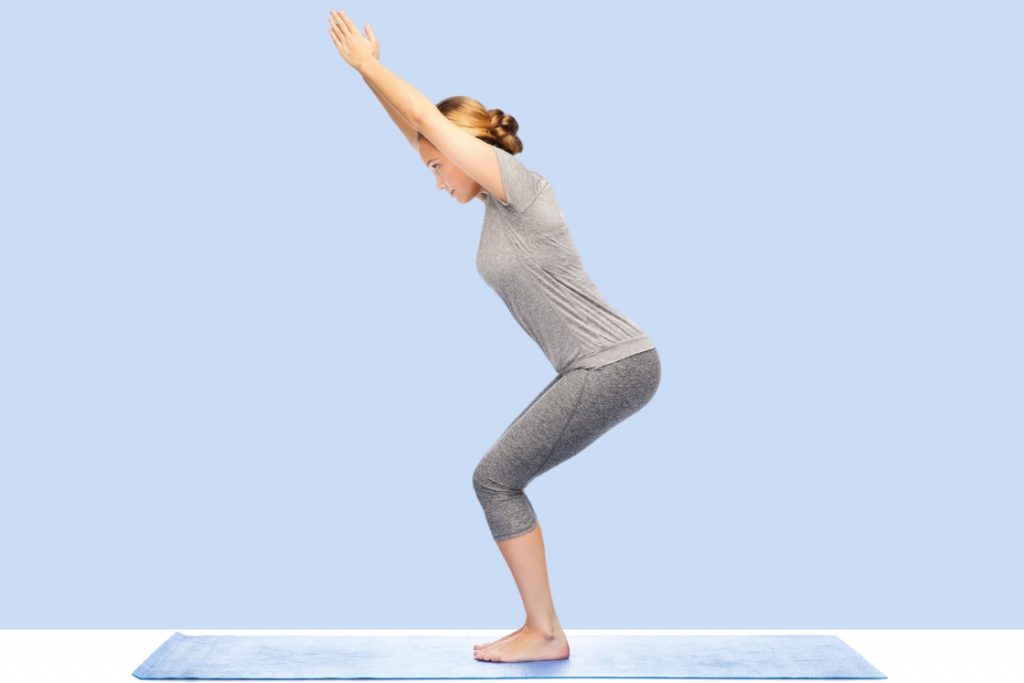
The chair pose is known for generating inner heat and toning the entire body. This is a partially balancing pose where you have to engage your core to balance yourself in the sitting-on-the-chair position.
Chair yoga pose strengthens your thigh muscles as well as your lower legs and feet. While performing it, you should be aware of spreading the weight equally on all corners of the feet.
- Stand in Mountain Pose. Spread your arms in front of you with palms down or stretch them overhead with palms facing each other.
- Place your feet firmly on the ground, bend your knees, and bring your pelvis down. Imagine as if you are about to sit on a chair.
- Your trunk will also lean forward as you push down, which is normal. Try to keep your spine straight in this position.
- Do not lock your knees and keep your hips in line by engaging your core and tucking in your tailbone.
- You can gaze upwards towards your fingertips or keep your head straight to focus on a point in front of you.
To increase the stretch in your legs, push down your hips but make sure that your knees do not go beyond the toes.
Stay in this pose for at least 3 minutes and gradually increase the time.
8. Garland pose (Malasana)
Apart from being a deep hip opener, garland pose also stretches your calf muscles, quadriceps, and lower back. It is also helpful in preventing knee joint pain. Your knee and ankles also get sufficient attention in this pose.
- Stand straight with your legs spread shoulder-width apart.
- Keep your back straight, feet firmly planted to the ground, and toes pointing sideways.
- Start lowering down by bending your knees and going on a full squat. Make sure that you are not bending forward.
- Here you can use a yoga block to support your tailbone. Use the yoga block on its flattest surface and when you squat, place your sitting bone on it.
- When you have completely reached the squatting posture bring your hands in front of your chest in Anjali Mudra.
- If your calves are tight and you are not able to keep your heels on the mat, you can use a folded blanket for support and an enhanced cushion.
Stay in this pose for at least 1-3 minutes and then slowly rest your buttocks on the floor and stretch your legs out.
9. Legs Up-the-Wall Pose (Viparita Karani)
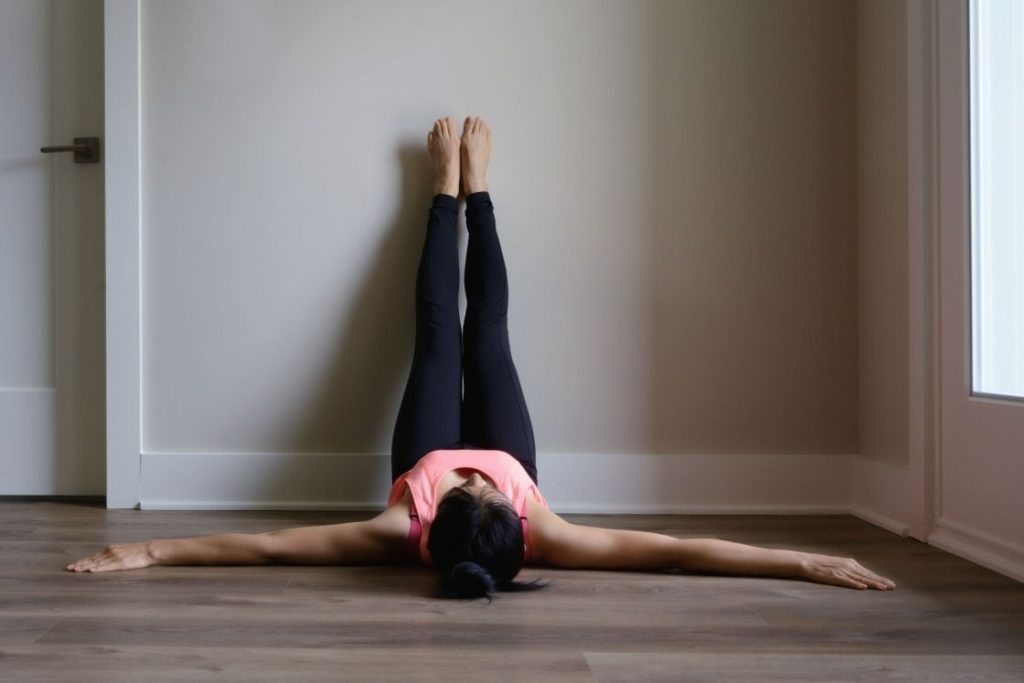
This pose is most recommended for people who use their legs actively. Even people who experience swelling in their legs or have to sit for long hours can greatly benefit from this pose. The legs up the wall pose is a relaxing pose that helps in circulation and reduces swelling from the ankles and knees.
Even though it focuses on relaxation, it still somehow strengthens the muscles by relaxing them from rigorous workouts and enhancing the blood flow.
- Place your yoga mat near the wall and lie down on your back.
- Keep sliding forward, while moving your legs up the wall till your hips touch the wall.
- Lying on a folded blanket will provide an extra cushion to your back. You can also place a cushion or yoga block under your hips for added support.
- You can keep your arms on your side with palms up, spread sideways with fingers spread, on top of abdomen or chest.
Stay in this pose for a maximum of 15 minutes.
Conclusion
It is your legs that take you to your destination. It is the legs that make you dance to your favorite song. It is the legs that make the athletes, swimmers, cyclists, and marathon runners win medals. And if these legs suffer, you not only lose your morale but also your confidence and enthusiasm for life.
Hence, to keep you going, it is important to stretch and strengthen your leg muscles to maintain mobility and flexibility. Strong legs will also aid in performing more challenging yoga poses.

: Meaning, Steps, & Benefits")
: Steps, Benefits, Precautions")

