| Sanskrit Pronunciation | Bala Parsva Bhuja Dandasana (bala-PA-AAr-svA-BHu-jaa-dan-DAHS-anna) |
| Meaning | Bala = Baby / Parsva = side / Bhuja = Arm / asana = pose |
| Pose Type | Side Twisting and Forward Bending |
| Pose Level | Intermediate pose |
| Stretches | Lower Back muscles, hips, hamstrings, thighs, neck, wrist, palms, forearms and shoulder, torso |
| Other Names | Bala Parsva Bhuja Dandasana, Baby Hopper I, Bala Parsva Bhuja Dand |
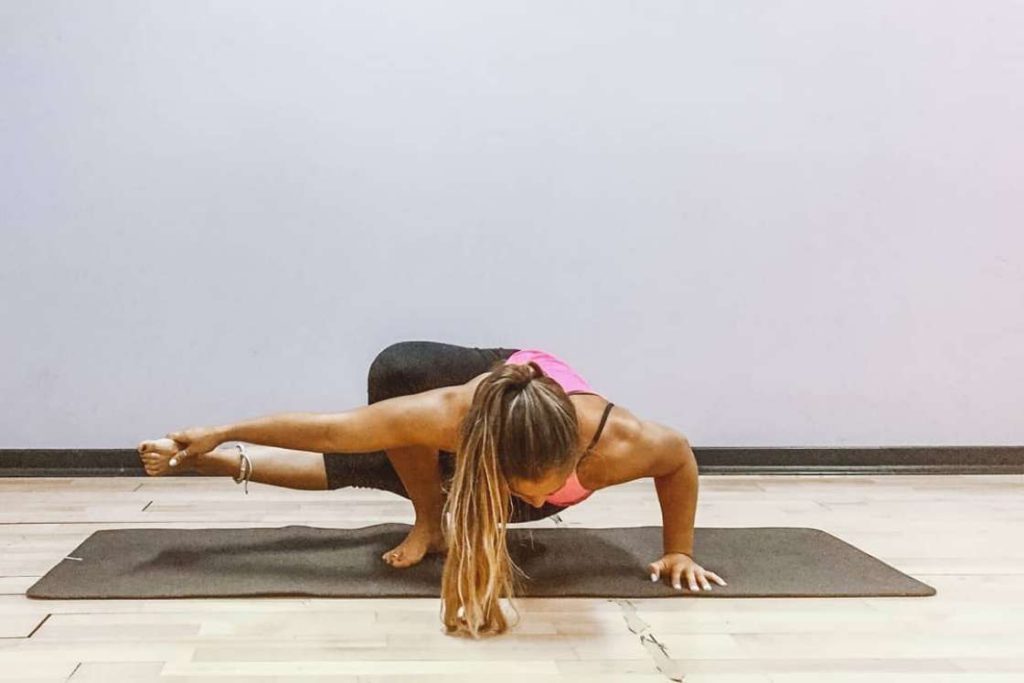
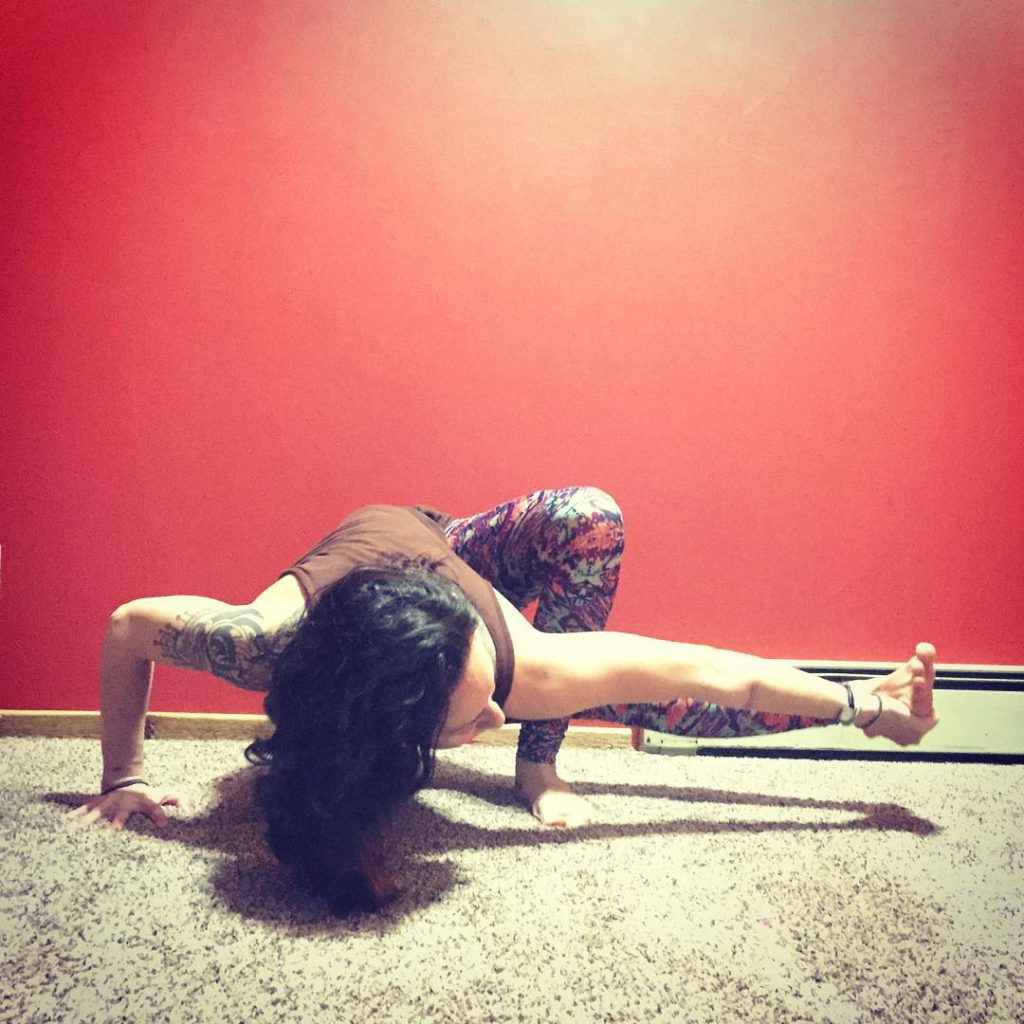
Baby Grasshopper Pose is a balancing intermediate pose. It’s widely practiced as a part of Grasshopper Vinyasa Flow.
Balancing the body on one arm and a foot in this asana brings a twist in the spine and opens the hips. This improves flexibility and strengthening.
Meaning & Interpretation
The Sanskrit name of Baby Grasshopper Pose is Bala Parsva Bhuja Dandasana. ‘Bala’ means ‘Baby’, ‘Parsva’ means ‘side’, ‘Danda’ means ‘staff’ and ‘asana’ means ‘Pose’. The twisted body supported over an arm and a foot looks like a baby grasshopper, hence the name. Compare to the grasshopper pose, the less challenging nature of this asana also introduces ‘baby’ term in its name.
The Grasshopper Symbolizes luck, stability, courage, fertility, balance, and freedom in a practitioner’s life. Practicing baby grasshopper pose incorporates fertility and freedom in the practitioner through balancing and stability.
The leap or shift in the positions by the Grasshopper can be an adjustment in a relationship and inner transition. Hence, practicing Baby Grasshopper Pose sets up a personal link with the inner being of the practitioner. This leads to the transition of the inner self, which contributes toward the spiritual possibilities lifting mental state higher.
Baby Grasshopper Pose vs. Grasshopper Pose
The Grasshopper Pose is an advanced variation than the Baby Grasshopper Pose. In fact, both the asanas are quite similar in position and way of practice. Following are some of the differences with which the practitioner can grasp each of them thoroughly.
- In Grasshopper Pose, The body of the practitioner is balanced on both of the arms while in Baby Grasshopper Pose, it is supported over an arm and foot.
- The Right leg placed over the right hand in Grasshopper Pose whereas, in Baby Grasshopper Pose, it is placed in front of the left thigh.
- In Baby Grasshopper Pose, The left leg is grabbed by the right arm while in the Grasshopper Pose, it remains in the air without any hand support.
- The Head is facing the floor in a Grasshopper pose while in Baby Grasshopper Pose, it is in the front direction.
- Most of the benefits of both poses are almost similar as they stretch the hamstring and opens up the hip. However, due to the involvement of the upper body more in the Grasshopper than the Baby Grasshopper Pose. It strengthens the upper body framework in practitioners.
Practice Guide

Contraindications
Baby grasshopper pose should not be practiced in injury of the knee, wrist, shoulder, and lower back. Also, practitioners who have undergone surgery on the abdomen, waist, or any other crucial joint should not practice this asana. Women with pregnancy and menstruation cycle should not practice this asana until becomes normal.
Preparatory Poses
- Marichayasana (Sitting Side Twist)
- Gomukhasana (Cow Face Pose)
- Parsvottanasana (Revolved Intense Side Stretch Pose)
How to Do Grasshopper Pose (Steps)
- Begin by coming into Dandasana (Staff Pose). Your feet should be flexed and are at the hip-distance apart. Lengthen the spine and push the shoulder blade toward each other.
- Now, bend the right knee and bring the right foot parallel to the left inner thigh, right knee closer to the chest.
- From here, lift the right leg by grabbing the shin and the ankle. Twist your torso slightly to the left and place it outside of the left thigh.
- Now, by deepening the twist of the torso place your left hand in line in accordance with your toes of the right foot and left shoulder.
- After this, raise your right arm with fingers widespread and take it in a forwarding direction to lengthen your spine.
- Then shift your weight on the left hip by leaning forward with your chest. Now, your left foot and left knee facing the direction of the leaned chest.
- Afterward, bend forward and reach to the left foot by the right hand, and grabbed it from the sole. Now, by tucking your left elbow beside the ribs and by engaging your core muscles, lift up the right foot.
- Here, your body will be balanced on the right foot and left arm and gaze in the front direction. This is the final position. Maintain here for few seconds and return by dropping the left foot on the floor. Leaned back in Dandasana.
Follow Up Poses
Precautions
Keep the following precautions points in mind while doing baby grasshopper pose.
- Avoid loosening the left foot before lifting it with the help of the right hand. It should be flexed enough to form a link along with the right hand, which gives a firm foundation for the takeoff.
- When you are about to lift off the body from the floor, make sure that your left palm remains closer to the body and under the elbow as well. Otherwise, it hinders the attachment of the left elbow with the ribs.
- While leaning forward one should bring an appropriate gap in between the fingers to counteract the gradual change in weight shifting. If ignored, there might be falling due to inappropriate weight distribution.
Beginners Tips
Baby grasshopper pose can be simplified to beginners by using yoga props like strap, block, bolster, etc.
Follow the tips below to perform baby grasshopper easily.
- Beginners might face difficulty in reaching to the left foot with the right hand due to a lack of flexibility. So, the practitioners can use a strap to reach your foot and grab your ankle if your hand does not reach your foot.
- While leaning into the forwarding direction it would be better to place a pillow or bolster at some distance from you. Beginners with less or no forearms strength might lose balance during the weight shifting and can invite injury.
- Beginners with the stiffened body might face difficulty in twisting and forcing this could only give birth to new injuries. So, to avoid this practitioners can go through several set of sun salutation. This will warm up the body and regular practice gradually improve the twisting as well.
Baby Grasshopper Variation
The practitioners can widen their field of practice by raising the challenge of Baby Grasshopper pose variations.
Mating Grasshopper Pose
In the Baby grasshopper pose, the body is balanced over an arm and a foot while in Mating Grasshopper pose, both arms support the posture. The left leg is grabbed by the right hand and the left leg acts as a other half in weight bearing in the Baby Grasshopper Pose. The right leg wrap around the left arm while the right leg suspended behind the left triceps, in the Mating Grasshopper.
The Mating Grasshopper is the challenging one. In this pose, the right leg is in between the both arms and wrapping around the left arm with a bend in right knee. The left leg rest on the behind part of the left triceps while your elbows remain squeezed throughout the pose to maintain the balance.
Therapeutic use
- Lowers back pain – Baby Grasshopper pose improves the range of motion of back muscles. This supports the entire lower back region and alleviates lower back pain.
- Reduces stress and anxiety – Twisting in the Baby Grasshopper Pose helps to open the shoulder and back along with the chest. This decreases the anxious feeling and simultaneously releases the stored tension in the body and affects the mental state positively.
Baby Grasshopper Pose Benefits
Practicing Baby grasshopper is an effective remedy for various body ailments. However, this also grants the practitioners with the following benefits.
1. Stretches the Core
The practice of Baby Grasshopper pose stretches the core muscles consist of some of the hardest working muscles in your body. The regular practice of this asana increases flexibility, which improves posture. Apart from that, it decrease your risk of injury and back pain by strengthening the core muscles, and help you move and work out with ease.
2. Helps in Diabetes
According to a research study, regular practice of Baby Grasshopper pose stimulates pancreas gland. This then secretes insulin in the proper amount and helps in diabetes.
3. Stimulates Reproductive Organs
The knot like position of the legs in baby grasshopper pose causes stress in the groin region, which stimulates reproductive organs. The pose is beneficial in increasing the blood circulation pelvic region. This further nourishes the reproductive cells and gives the appropriate oxygen to the muscles as well.
4. Helps in Lifestyle Disorders
In a research, it’s found grasshopper pose with other yoga asanas affects the metabolism that affects the various outcomes resulting in lifestyle disorders like, Hypertension, Diabetes, Aging, Digestive disorders. Hence, overcome on regular implementation.
5. Stimulates Swadishtana Chakra and Manipura Chakra
The right practice of the Baby Grasshopper pose with proper alignment can stimulate Swadisthana (Sacral) Chakra and Manipura (Solar Plexus) Chakra. In this way, the pose can grant practitioner passion, sexuality, intimacy, money, and creativity. It allows you to seize your personal power, develop your authentic self, and take responsibility for your life.
6. Overcomes Gastrointestinal Disorders
Baby Grasshopper Pose lay pressure on the abdomen region. This gives the massaging affects and stimulates the normal movement by tackling the causes on by one.
Conclusion
The practice of Baby Grasshopper pose is an effective yoga asana for the ailments like digestion, diabetes and reproductive related. However, It also helps in strengthening the lower body along with the hip opening and hamstring flexibility.
So, this asana should be practiced to improve the overall health and wellness of the practitioner.


