If you’ve suffered from panic attacks, have trouble sleeping, or feel anxious due to a triggering event, it might be possible that you are experiencing trauma. Trauma is one of the most common issues suffered by many individuals in the world and those who experience it frequently, go through a lot of mental and physical strain.
Dealing with trauma involves visits to a certified mental health doctor and tons of therapy and interventions. However, people are now seeking other alternative holistic methods such as trauma-informed yoga to manage their symptoms and boost recovery.
Today we will be looking into some yoga poses that will help you release trauma stored in the body and mind.
What is Trauma, and Can Yoga Facilitate Healing?
Trauma, in essence, is the lingering emotional and psychological impact resulting from distressing events, often leaving an imprint on both mind and body. These experiences can range from sudden shocks to prolonged stress, creating an intricate web of responses that affect mental health.
Trauma can emerge as a reaction to any situation that a person perceives as physically, emotionally, or negatively destructive. At any age, you can go through traumatic experiences that can have a lasting impact on your mental and emotional well-being.
Yoga as healing modality for trauma
Traditional approaches to trauma recovery often involve professional therapy and medical interventions. However, a growing number of individuals are turning to holistic methods like trauma-informed yoga to complement their healing journey. Yoga, with its mindful movement and focus on the mind-body connection, has shown promise in assisting individuals in releasing stored trauma.
The practice of trauma-informed yoga involves a sensitive approach, acknowledging the potential triggers and creating a safe space for participants. Through carefully curated poses and mindfulness techniques, yoga can aid in unwinding physical tension, soothing the nervous system, and fostering a sense of empowerment.
While it may not replace conventional therapeutic methods, incorporating trauma-informed yoga into a comprehensive wellness plan can be a valuable and empowering step toward healing.
Read more: The Healing Power of Yoga Mudras
How can Yoga help in Trauma Release?
Central to trauma healing yoga is the cultivation of self-awareness and the ability to stay present, allowing individuals to interpret and navigate bodily reactions effectively. Achieving a state of profound relaxation is key to re-regulating the neural system, and various methods and systems can facilitate this process.
Trauma-informed strategies, such as yoga, play a crucial role in creating a sense of safety and comfort for many individuals. The well-documented benefits of yoga for stress reduction make it a powerful tool in addressing the disruptions trauma can cause to the brain and nervous system.
Yoga, with its emphasis on breath and movement, specifically targets disturbances in the brain and nervous system resulting from trauma. Trauma-informed yoga goes beyond traditional practice, aiming to establish a safe and supportive environment where participants can enhance emotional management skills through breathwork and heightened bodily awareness.
When guided by experienced instructors within a therapeutic setting, trauma-informed yoga may even serve as a therapeutic modality for those who have experienced trauma. Trauma-informed yoga emphasizes choice and empowerment in every posture. Participants are encouraged to make choices based on their comfort, promoting a sense of control that may be lacking for trauma survivors.
Trauma can lead to a disconnection between the mind and body. Yoga encourages embodied awareness, fostering an understanding of sensations, emotions, and physical responses.
In the subsequent sections, we’ll explore seven yoga poses commonly included in trauma-informed routines, each offering valuable contributions to the process of trauma healing.
Release Trauma with These 7 Yoga Poses
In trauma-healing yoga, focus on poses that center around hip-opening and stretching is paramount. The hip region often becomes a repository for accumulated trauma, anxiety, and stress. By engaging in hip-opening poses, you initiate a process of unraveling and releasing the emotional and physical tension stored in this area.
Additionally, heart-opening poses, spinal movements, and postures that enhance circulation to the head play a pivotal role in releasing trauma from the body. These poses not only encourage a sense of emotional release and self-acceptance but also contribute to physical benefits by boosting blood flow and calming the nervous system.
Let’s explore seven yoga poses specifically curated to facilitate trauma release and foster holistic well-being:
Child’s Pose (Balasana)
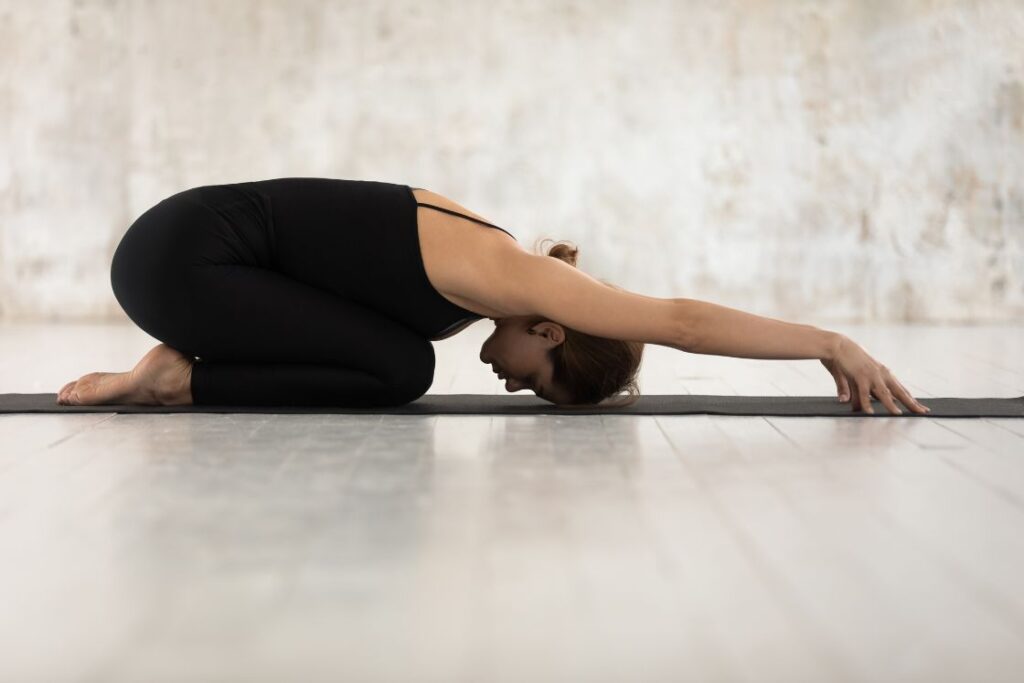
Begin your trauma-healing journey with the nurturing embrace of Child’s Pose. This grounding posture invites mindfulness and presence, offering a secure space for you to reconnect with your breath at any moment.
As you surrender into Child’s Pose, feel the gentle release of tension in your glutes and hips, creating a pathway for a serene flow of blood and oxygen. This physical release contributes to a calming effect on both the mind and nervous system.
The cooling impact on your body redirects your attention inward, fostering a sense of inner calm. For those who may find lying on their backs challenging, perhaps due to past trauma, Child’s Pose provides a compassionate alternative to Corpse Pose.
Child’s Pose for Trauma Release: Step-by-Step
- Start in a Kneeling Position: Begin on your hands and knees, with wrists directly beneath your shoulders and knees under your hips. Ensure a comfortable and stable foundation.
- Widen Your Knees: Gently separate your knees to a width that feels comfortable for you. This allows space for your torso to settle between your thighs.
- Hinge at the Hips: Slowly lower your hips back toward your heels, extending your arms forward as you hinge at the hips. Feel the stretch along your spine.
- Extend Your Arms: Reach your arms out in front of you, extending them fully. Allow your forehead to rest on the mat, creating a lengthening sensation through your spine and neck.
- Adjust Arm Position: Find a comfortable arm position that suits you. You can keep your arms extended or bring them alongside your body with palms facing up—whatever feels most soothing.
- Breathe Mindfully: Take slow, deep breaths, directing your breath into the areas that feel tension. As you inhale, envision releasing stress, and as you exhale, let go of any lingering tension.
- Stay Present: Bring your awareness to the present moment. If thoughts arise, acknowledge them without judgment, and gently guide your focus back to your breath and the comforting embrace of the pose.
- Hold and Release: Remain in Child’s Pose for a duration that feels comfortable, gradually increasing the time as you become more familiar with the posture. When ready to release, do so mindfully, bringing awareness back to your surroundings.
Remember, the key to using Child’s Pose for trauma release lies in moving at your own pace, honoring your body, and creating a safe space for self-care and healing.
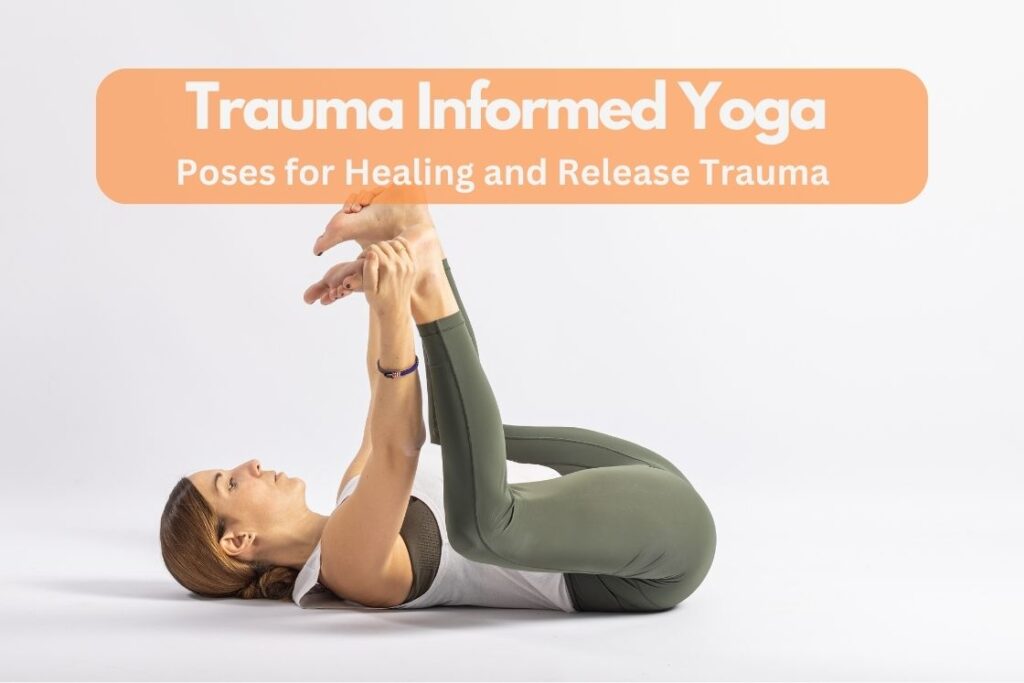
Legs-Up-The-Wall Pose (Viparita Karani)
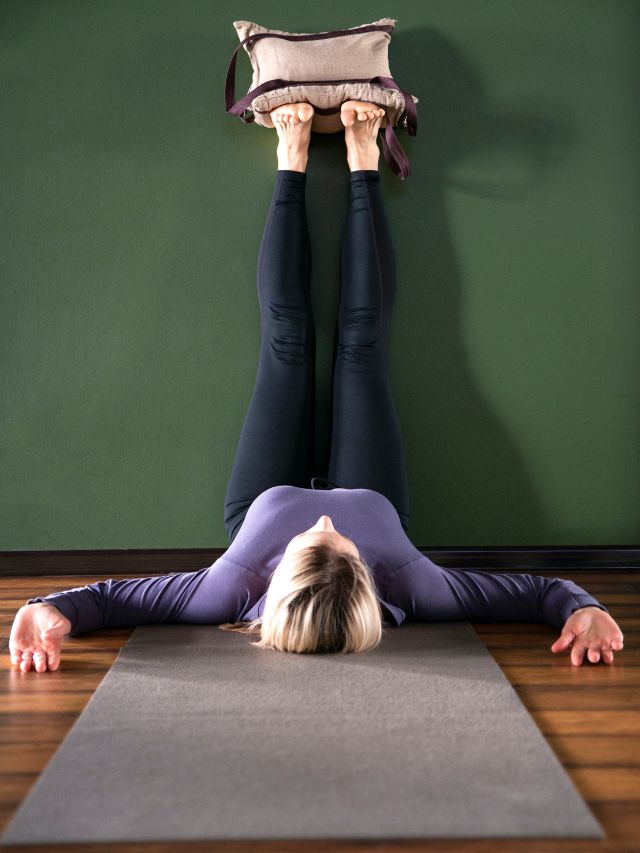
The next pose in your trauma healing journey is the Legs-Up-The-Wall pose, a rejuvenating posture designed to relax and release stagnant energy from the legs. As you indulge in this gentle inversion, you’ll experience both mental and physical rejuvenation.
Viparita Karani pose works wonders in alleviating mental fatigue and physically allowing the legs to expel old energy, promoting a profound sense of renewal. This pose doesn’t just stop at the physical; it extends its soothing touch to the neurological system, inducing an immediate calming effect. By stimulating the parasympathetic nervous system, your body and mind seamlessly transition into a state of relaxation, supported by the assurance signaled to the vagus nerve that it’s safe to unwind.
The slow, deliberate breathing encouraged by this pose further facilitates relaxation, creating a serene sanctuary for your trauma healing journey. Additionally, Legs-Up-The-Wall promotes optimal circulation and enhances blood flow to the brain, amplifying the overall therapeutic benefits of this soothing posture.
Legs-Up-The-Wall Pose for Trauma Release: Step-by-Step
- Preparation: Find a quiet and comfortable space where you won’t be disturbed. Clear a wall space, ensuring it’s free of any obstacles.
- Positioning: Sit sideways against the wall with your hip touching it. Gently swing your legs up along the wall while lying on your back. Your body should form an L-shape, with your legs resting vertically against the wall.
- Proper Alignment: Ensure your hips are comfortably nestled against the wall, and your spine is in a straight line. Adjust your distance from the wall as needed, allowing for a sense of ease in your lower back.
- Arm Placement: Rest your arms in a comfortable position, either by your sides with palms facing up or on your abdomen. Experiment with arm placement to find what feels most relaxing for you.
- Relaxation and Breath: Close your eyes and focus on your breath. Inhale deeply through your nose, allowing your abdomen to rise, and exhale slowly through your mouth. Embrace a slow and steady breathing rhythm to enhance relaxation.
- Stay in the Pose: Allow yourself to stay in this restorative position for 5 to 15 minutes, or longer if it feels comfortable. Use this time to let go of tension and bring your attention inward.
- Mindful Release: As you rest in the Legs-Up-The-Wall pose, visualize releasing tension and stagnant energy with each exhale. Cultivate a sense of ease and surrender, allowing the pose to support your journey towards trauma release.
- Exiting the Pose: When you’re ready to conclude the pose, gently bend your knees and roll to one side before slowly rising to a seated position. Take a moment to notice how you feel before transitioning back into your day.
Remember, it’s crucial to listen to your body and adjust the pose to suit your comfort level. If you have any concerns or health conditions, consult with a qualified yoga instructor or healthcare professional before attempting new poses.
Corpse Pose (Savasana)
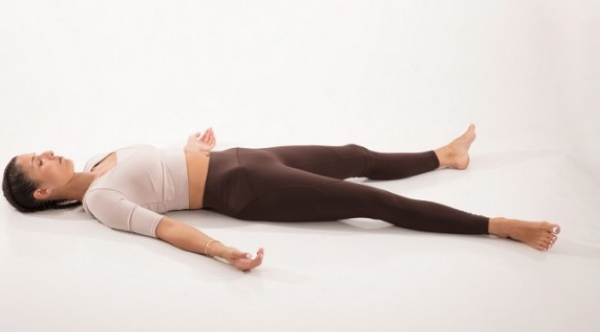
In trauma-informed yoga, Corpse Pose stands as a potent posture, providing a tranquil pathway to release stored trauma. As practitioners lie supine, the pose induces profound relaxation, systematically unwinding physical and emotional tension from toes to head.
This intentional relaxation fosters heightened mind-body awareness, allowing for the identification and gentle release of stored emotions.
Savasana’s stillness cultivates mental quietude, calming the nervous system and alleviating the fight-or-flight response associated with trauma.
Embracing emotional release through visualization, Corpse Pose becomes a therapeutic space for deep-seated tension to dissipate. Practiced for an extended duration, ideally 5-10 minutes or longer, Savasana becomes a nurturing posture, playing a pivotal role in the journey toward trauma release and holistic well-being.
Corpse Pose (Savasana) for Trauma Release: Step-by-Step Guide
- Starting Position: Begin by lying down on your back in a comfortable and relaxed manner. Extend your legs straight, letting them fall open naturally. Allow your arms to rest by your sides, with your palms facing up.
- Comfortable Alignment: Ensure your spine is in a neutral position and your body is comfortable on the mat. Adjust your position as needed to release any tension.
- Close Your Eyes: Softly close your eyes to turn your focus inward. This helps create a serene and introspective atmosphere, promoting relaxation.
- Mindful Breath: Bring awareness to your breath. Inhale deeply through your nose, feeling your chest and abdomen rise, and exhale through your mouth, letting go of any residual tension.
- Progressive Relaxation: Starting from your toes, consciously relax each part of your body. Move through your feet, legs, torso, arms, and head. This progressive relaxation technique enhances the release of physical and emotional tension.
- Mental Imagery: Engage in mental imagery by visualizing a peaceful and calming scene. This visualization aids in diverting the mind from stressors, contributing to a sense of tranquility.
- Time for Stillness: Allow yourself to remain in Corpse Pose for at least 5-10 minutes, or longer if desired. This extended period of stillness provides an opportunity for a deep release of stored trauma.
- Mindful Exit: When ready to conclude the pose, begin to deepen your breath. Gently wiggle your fingers and toes, slowly awakening your body. Roll onto your side before gradually sitting up.
Corpse Pose, when approached with mindfulness, serves as a powerful tool for trauma release. Its emphasis on deep relaxation and mental quietude creates a space for both physical and emotional tension to dissipate.
Cat-Cow Pose (Marjaryasana-Bitilasana)
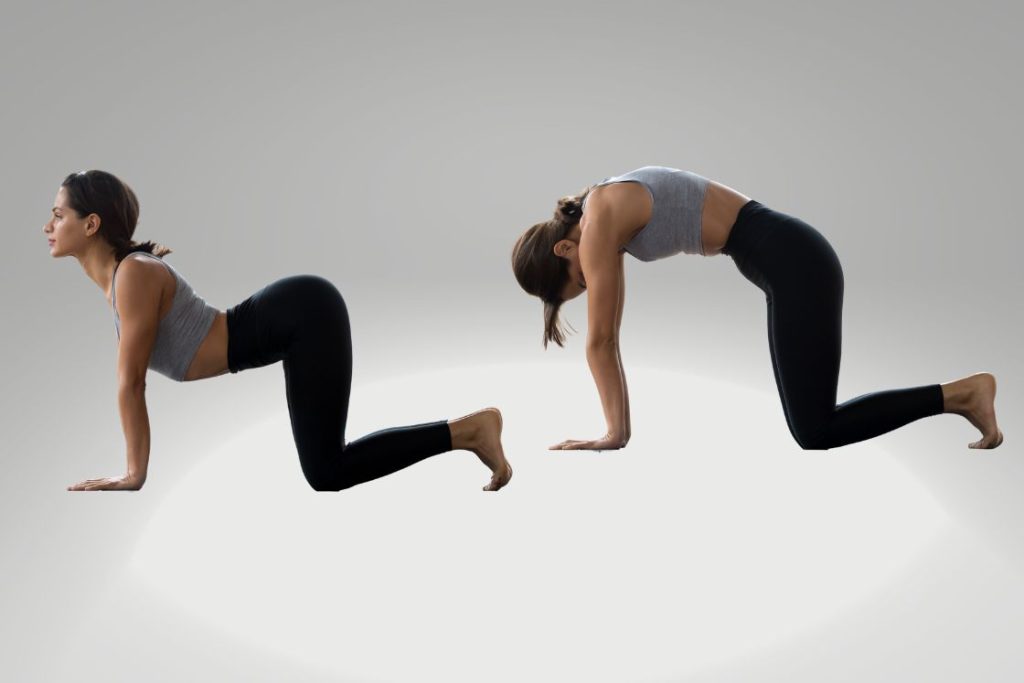
Cat-Cow Pose, a dynamic and fluid sequence, becomes a valuable posture in trauma release within the realm of yoga. This rhythmic flow between arching and rounding the spine offers a unique combination of physical and emotional benefits.
The undulating motion of Cat-Cow engages the entire spine, promoting flexibility and releasing tension stored in the back and neck. This intentional movement creates a gentle massage for the spine, fostering a sense of ease and openness.
As practitioners synchronize breath with movement in Cat-Cow, a mindful connection between body and breath is established. This heightened awareness serves as a grounding element, allowing individuals to stay present and release emotional tension stored in the body.
Moreover, the cyclical nature of Cat-Cow encourages a sense of fluidity and rhythm, which can be especially therapeutic for trauma survivors. This pose becomes a gentle yet empowering practice, inviting individuals to explore the nuances of movement and breath, contributing to the holistic journey of trauma release.
Cat-Cow Pose for Trauma Release: Step-by-Step Guide
- Starting Position – Tabletop: Begin in a tabletop position, with your wrists directly under your shoulders and your knees under your hips. Ensure a neutral spine as the starting point.
- Cow Pose – Inhale: Inhale deeply as you arch your back, dropping your belly towards the mat. Lift your head and tailbone towards the ceiling, creating a gentle curve in your spine. This movement releases tension in the back and opens up the front of the body.
- Mindful Breath and Movement: Coordinate your breath with the movement, allowing the inhalation to guide the extension of the spine. This synchronized breath and motion enhance the mind-body connection, promoting a sense of mindfulness and presence.
- Cat Pose – Exhale: On the exhale, round your spine towards the ceiling. Tuck your chin to your chest and engage your abdominal muscles. This rounding action releases tension in the upper back and stretches the spine in the opposite direction.
- Repeat the Flow: Continue to flow between Cow and Cat Poses in a rhythmic and fluid motion. Let the movement be gentle and intuitive, adapting to what feels comfortable for your body. The dynamic nature of Cat-Cow encourages a release of tension and emotional blockages.
- Explore Range of Motion: Explore the full range of motion in your spine during each cycle. This exploration allows for a gradual release of stored emotions and physical tension, particularly in the back and neck areas.
- Mindful Awareness: Maintain a heightened awareness of how your body responds to each movement. Notice any areas of tightness or resistance, and use the breath to gently guide your body towards release.
- Extended Flow: Continue the Cat-Cow flow for 5-10 minutes or longer, adapting the pace to your comfort. The extended duration provides a therapeutic space for deep-seated tension to unravel, fostering a holistic release in both body and mind.
- Final Resting Pose: Conclude your Cat-Cow practice by returning to a neutral tabletop position. Take a moment of stillness, allowing the effects of the movement to settle, and observe any changes in your body’s sensations.
Practicing Cat-Cow Pose with mindful awareness and a gentle, intuitive flow bec
Bridge Pose (Setu Bandhasana)
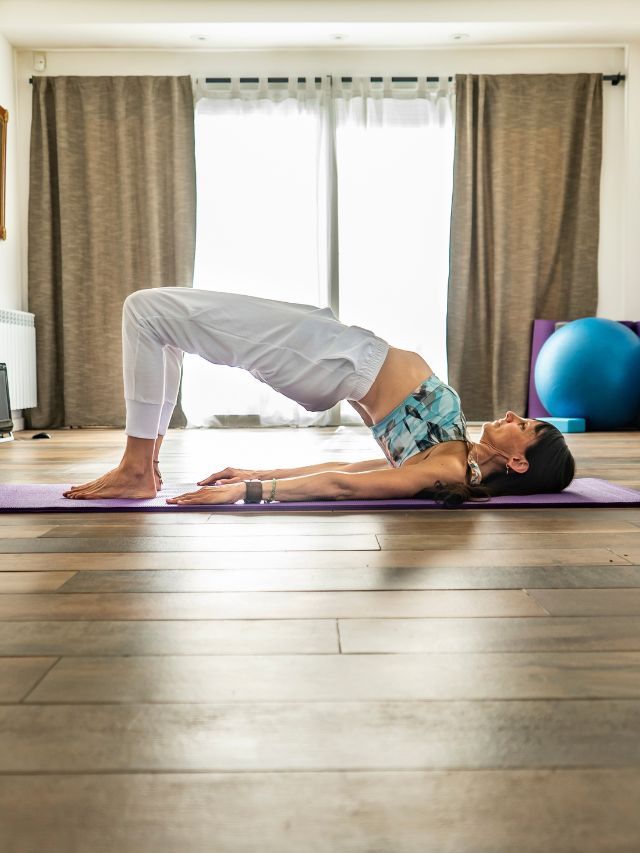
Step into tranquility with the Bridge Pose, a potent posture that seamlessly intertwines serenity, strength, and trauma release. As you ascend into the Bridge pose, feel the expansiveness of your chest, healing the heart chakra.
This pose is pivotal step in the journey toward forgiveness and self-love which is crucial for untangling the knots of past trauma and paving the way to inner peace.
The Bridge Pose is not just a physical practice; it is a ritual of rejuvenation and healing when approached with consistency and mindfulness. By unlocking the chest and fostering a connection with your heart center, this pose becomes a therapeutic gateway, releasing stored tension and promoting emotional well-being.
To maximize the benefits of an awakened and open body, consider incorporating the Bridge Pose at the conclusion of your yoga session. This intentional placement helps guide your body into a state of relaxation, allowing the transformative effects of trauma release to unfold.
Bridge Pose for Trauma Release: Step-by-Step Guide
- Begin in a Comfortable Supine Position: Start by lying on your back in a comfortable position, with your knees bent and feet hip-width apart. Ensure your feet are parallel to each other.
- Ground Yourself: Press your feet into the mat, anchoring them firmly. Place your arms alongside your body with palms facing down.
- Engage Pelvic Floor Muscles: As you inhale, engage your pelvic floor muscles and gently lift your hips towards the ceiling. Allow the movement to be slow and controlled.
- Lift Hips and Spine: Continue lifting your hips and spine off the mat, creating a straight line from your shoulders to your knees. Keep your knees directly over your heels.
- Open the Chest: Roll your shoulders underneath you, opening the chest. Clasp your hands together under your back, if comfortable, and press the arms into the mat.
- Feel the Heart Chakra Activation: As you hold the pose, focus on the opening of your chest and the activation of the heart chakra. Breathe deeply into this space.
- Hold and Breathe: Stay in the Bridge Pose for 30 seconds to a minute, breathing steadily. Allow any tension or emotions to release with each exhale.
- Lower Down Slowly: When ready to release, exhale and lower your spine and hips back down to the mat with control.
- Rest in Savasana (Corpse Pose): After the Bridge Pose, extend your legs and rest in Savasana, allowing the benefits of the pose to integrate.
Tips:
- Listen to your body and modify the pose as needed.
- Focus on the breath to enhance the mind-body connection.
- Gradually increase the duration of the pose as you become more comfortable.
Remember, practicing Bridge Pose with mindfulness and intention can contribute to the release of stored tension, promoting a sense of emotional well-being and trauma release.
Warrior II Pose (Virabhadrasana II)
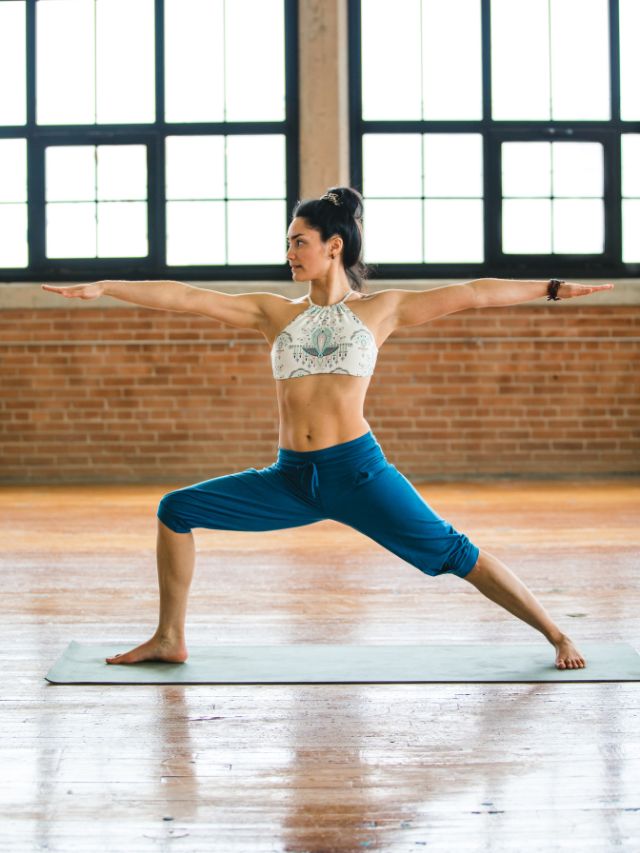
Warrior II Pose is a potent posture for trauma release, seamlessly blending strength and openness. Its wide stance provides stability, fostering empowerment crucial for healing trauma. Activating the hips and groin, common areas of trauma storage, the pose facilitates the release of emotional tension.
With expansive arm positioning, Warrior II encourages a heart-opening gesture, promoting vulnerability and emotional release. Coordinating breath and gaze enhances mindfulness, aiding in the recognition and release of stored tension.
Moreover, the endurance-building aspect of the pose contributes to physical strength and resilience. As individuals hold Warrior II, they tap into inner strength, crucial for reclaiming agency over their bodies in the healing journey.
Incorporating Warrior II into trauma-sensitive yoga offers a holistic approach, emphasizing strength, openness, and mindfulness in the release of trauma.
Warrior 2 Pose for Trauma Release: Step-by-Step Guide
- Starting Position: Begin by standing at the top of your mat with your feet hip-width apart. Take a moment to ground yourself, connecting with your breath.
- Step Back: Step your left foot back, keeping it about 3 to 4 feet behind your right foot. Your right foot should be pointing forward, and your left foot should be at a slight angle, around 45 degrees.
- Align Your Body: Open your hips and shoulders towards the side, aligning them with the long edge of your mat. Your torso should face the same direction as your left foot.
- Extend Your Arms: Extend your arms parallel to the floor, reaching actively in opposite directions. Your palms should be facing down. This expansive arm positioning is key for the emotional and physical benefits of the pose.
- Engage Your Core: Engage your core muscles to support your spine and maintain stability in the pose. This engagement helps ground your body and enhances the sense of empowerment.
- Bend Your Front Knee: Bend your right knee over your right ankle, ensuring it is directly above your heel. This action activates the hips and groin, facilitating the release of tension stored in these areas.
- Gaze Over Your Front Hand: Turn your head to gaze over your right hand, aligning your gaze with your fingertips. This focused gaze enhances mindfulness and concentration, contributing to the emotional release aspect of the pose.
- Hold and Breathe: Hold Warrior II for several breaths, allowing the pose to work its magic. Focus on your breath, feeling the strength and openness of the posture. Each inhale brings a sense of empowerment, and each exhale encourages release.
- Repeat on the Other Side: To balance the pose, switch sides. Step your right foot back, align your body, extend your arms, bend your left knee, and gaze over your left hand.
- Exit the Pose Mindfully: To release, straighten your front knee, bring your arms down, and step back to the top of your mat. Take a moment to stand in Mountain Pose, observing the sensations in your body.
Warrior II Pose, when practiced mindfully, becomes a potent posture for trauma release, offering a balance of strength, openness, and mindfulness.
Tree Pose (Vrikshasana)
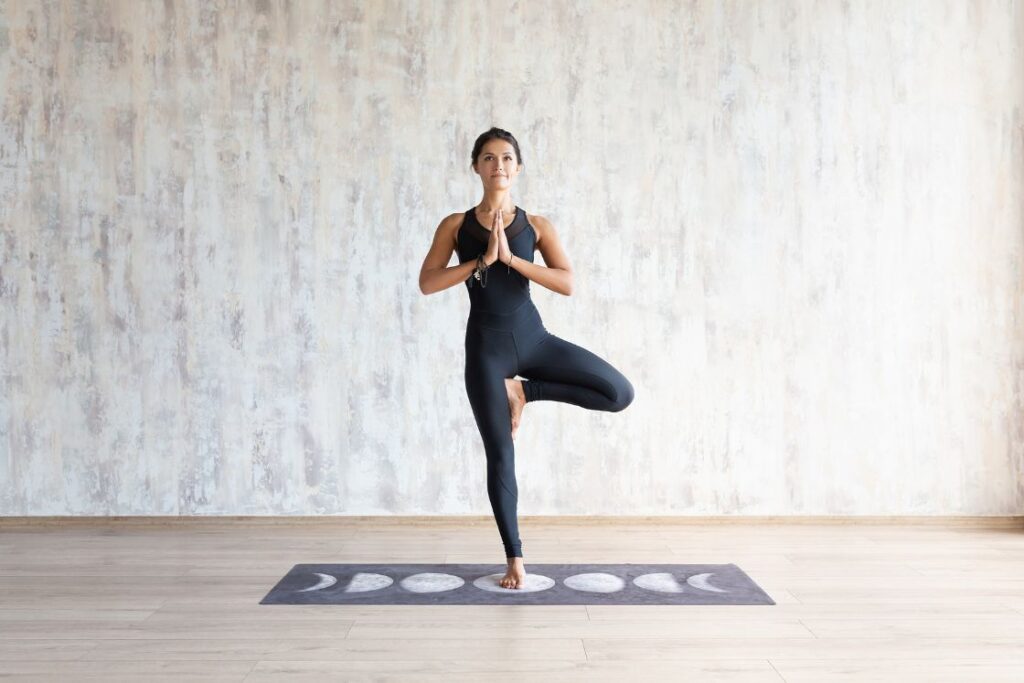
Tree Pose is a grounding and balancing posture. It’s a wonderful posture performed in trauma-informed yoga, offers a blend of stability and introspection for those on a healing journey.
The essence of Tree Pose lies in finding balance on one leg while maintaining a steady and rooted connection with the earth. This physical grounding becomes symbolic in the release of trauma, providing practitioners with a sense of stability and support.
As individuals stand tall in Tree Pose, they engage the core and focus their gaze, fostering a mindful connection between body and breath. This intentional presence allows for the release of tension, particularly in the lower body, creating space for emotional healing.
Moreover, the act of raising one foot and placing it on the inner thigh or calf requires concentration and mindfulness. This deliberate and focused movement encourages a gentle unraveling of stored emotions, making Tree Pose an embodiment of tranquility and balance in the journey of trauma release.
Tree Pose for Trauma Release: Step-by-Step Guide
- Starting Position: Begin by standing tall in Mountain Pose at the top of your mat. Ground both feet firmly into the floor, finding a stable and comfortable stance.
- Shift Weight to One Leg: Shift your weight onto your left foot, engaging the muscles in your left leg. This grounding action becomes the foundation for stability in Tree Pose.
- Lift the Other Leg: Lift your right foot off the ground, bringing the sole of your right foot to either the inner calf or inner thigh of the left leg. Avoid placing the foot directly on the knee to ensure a safe and stable position.
- Find a Drishti (Gaze Point): Choose a fixed point in front of you to focus your gaze. This helps in maintaining balance and concentration, fostering a sense of mindfulness.
- Hands in Prayer Position: Bring your palms together in a prayer position at your chest, or if comfortable, extend your arms overhead with palms facing each other. Find a position that allows you to feel balanced and centered.
- Engage Core Muscles: Engage your core muscles to stabilize your body. This engagement not only supports balance but also promotes a sense of inner strength and resilience.
- Root Down and Lift Up: Feel a sense of rootedness through your standing foot while simultaneously reaching upward through your spine. This duality of grounding and expansion symbolizes stability and growth in the face of trauma.
- Hold and Breathe: Hold Tree Pose for 30 seconds to a minute, or as long as feels comfortable. Focus on your breath, allowing the gentle swaying of the branches (your lifted leg) to become a mindful movement.
- Repeat on the Other Side: To balance the pose, switch sides. Shift your weight onto your right foot and lift your left foot to the inner calf or thigh. Repeat the same steps on this side.
- Exit Mindfully: To release from Tree Pose, bring your lifted foot down with control. Return to Mountain Pose and take a moment to observe the sensations in your body.
Performing Tree Pose with mindful awareness creates a grounded and centered experience, making it a valuable posture in the journey of trauma release.
Conclusion
Practicing yoga poses with mindfulness and awareness can contribute to the gradual release of trauma stored in the body. It’s crucial to approach yoga poses at your own pace, respecting your body’s limitations, and consider seeking guidance from a trauma-informed yoga instructor for added support.
Remember, the journey of healing is unique to each individual, and these poses are tools to aid you on your path to release stored trauma in the body: child’s pose, legs-up-the-wall pose, bridge pose, warrior II pose, corpse pose, cat-cow pose and tree pose.
As we weave through yoga poses, the journey toward trauma release is not merely physical but an intricate interplay of mind, body, and spirit. Each pose invites participants to embrace vulnerability, find stability, and foster mindfulness. In this collective practice, we uncover the resilience within, fostering a path to holistic well-being
: Steps, Variations & Benefits")
: How to Do, Benefits, Variation")
: How to Do, Variations, & Benefits")

