- Yoga and back strength
- Benefits of yoga
- Yoga Poses for strong back
- Bridge Pose
- Triangle Pose
- Cat/cow Pose
- Cobra Pose
- Child’s Pose
- Half Lord of Fishes
- Locust Pose
- Seated forward bend
- Supine twist
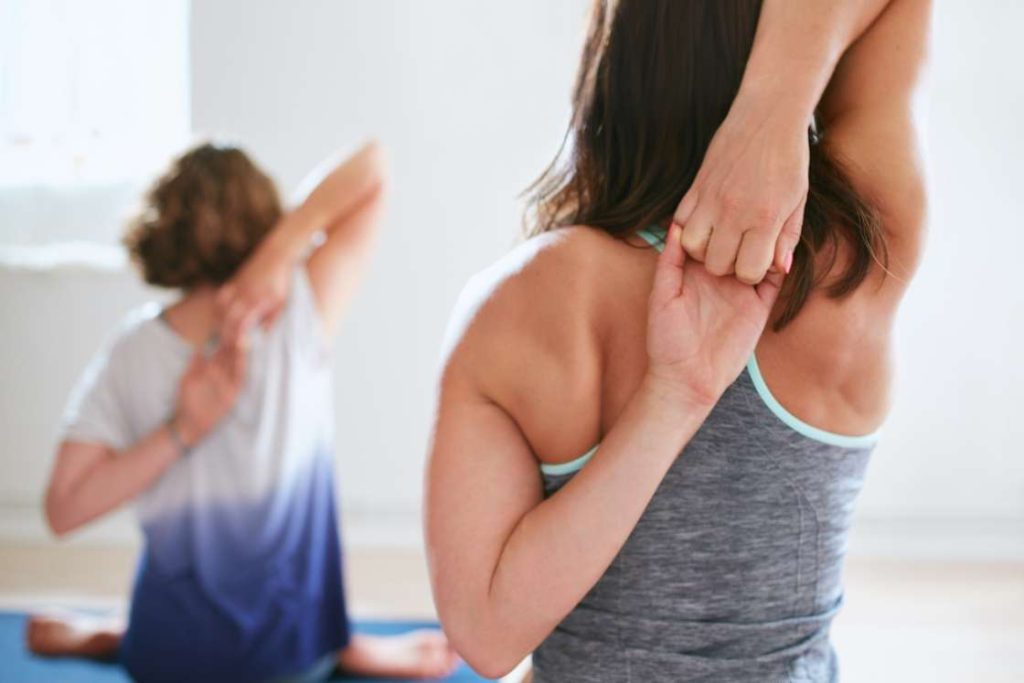
A strong, flexible back has always been the foundation of your comfort and health, whether you’re a seasoned yogi or a fitness fanatic. It’s easy to develop a bad back when our stressful lifestyles drive us to spend a lot of time in front of a computer screen or behind the wheel of a car.
A regular yoga practice targeted at troublesome spots in the back is the key to strengthening your back muscles. Everyday actions like driving, bending, or lifting might be extremely uncomfortable if you have lower or upper back discomfort. You could improve your strength and flexibility while relaxing and getting relief from back pain with basic yoga practices.
How does yoga help strengthening the back
Yoga’s emphasis on balance and stability helps your body to build resistance against the sources of back pain, such as weakened abdominal and pelvic muscles and a lack of hip flexibility. When these muscles are strengthened, your posture improves, which reduces the pressure on your back and hence the aches you suffer.
Stretching can also help to improve flexibility by boosting blood flow to tight muscles.
Yoga moves can assist an individual stretch their core and back muscles. This can aid to strengthen muscle groups that aren’t used frequently. Certain poses can help lengthen your spine, stretch and strengthen your muscles, and return your back to its right alignment for those with occasional stiffness or recurring problems.
Yoga is a low-impact exercise to build muscles all over the body, including the back. While there are various methods for improving back muscles, beginners and customers who find strenuous exercises difficult or painful can consider yoga.
Good posture, reduced injury risk, improved sports performance, lifting capabilities, and prevention of back, shoulder, and arm pain are among the benefits of strong upper back muscles. Perfect posture, stability, and balance become easier by building a strong lower back.
Benefits of yoga for back
The yoga poses will help in better blood circulation to the muscles of the back. The various twists and bends help in aligning the spine and maintaining the natural curve of the spine. The poses also help in strengthening the bones as well as the muscles surrounding the back. A strong back will keep the aches, pain, and various back ailments away.
Here are some additional benefits of practicing yoga for the back:
- It improves the strength of the back muscles by staying in these yoga positions and combining diverse motions.
- Yoga helps the body maintain good upright posture and mobility by gently strengthening the back muscles and the abdominal muscles, which are critical elements of the muscular network of the spine.
- Stretching improves blood flow, which allows nutrients and toxins to move in and out of the muscles and soft tissues of the lower back.
- Certain back muscles flex while others stretch in various yoga poses, improving muscular and joint relaxation and flexibility.
- Improved posture and a greater sense of balance will develop through regular practicing, leading to the head, shoulders, and pelvis in perfect alignment.
Practice these yoga poses for strong back
One should practice yoga poses carefully and softly to avoid any injury. Muscles can be overstretched or strained by making rapid motions or twisting aggressively. A person is likely to avoid injuries caused by weak or overused muscles by doing so.
If you’re a beginner or have never even practiced any yoga pose before, it’s advisable to perform under the supervision of a professional. Additionally, check with your doctor before starting yoga asanas, to avoid the aggravation of some health issues.
Never strain your muscles if you feel uncomfortable. Slowly but steadily, as your flexibility improves and your stiffness fades, you’ll notice your back loosening up.
1. Bridge Pose (Setu Bandhasana)
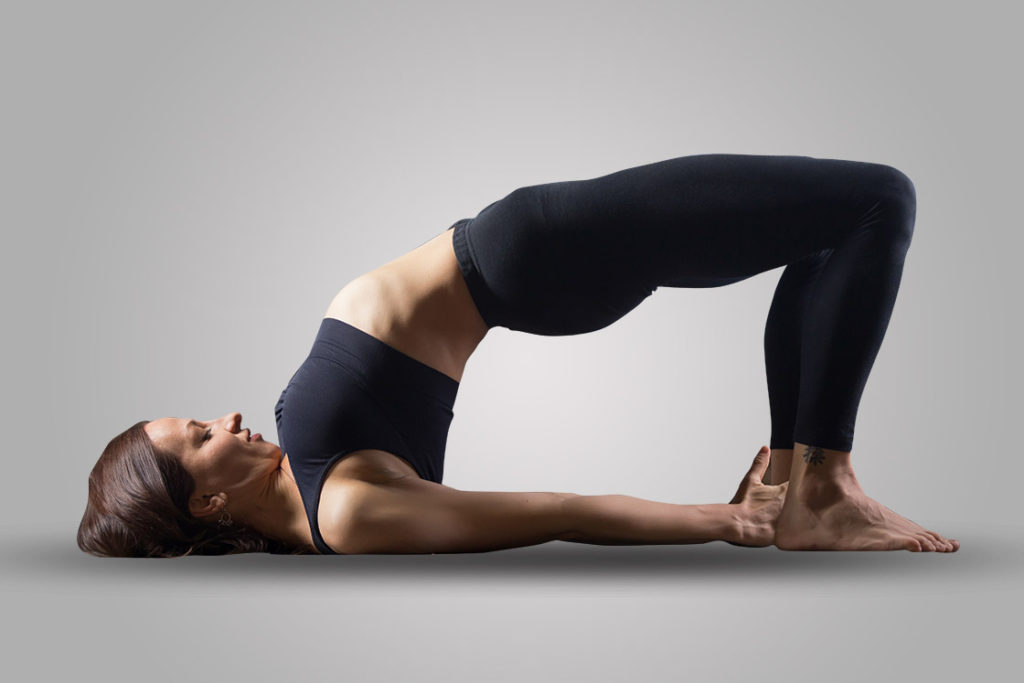
This backbend and inversion may be both stimulating and relaxing. Backaches and headaches may also be alleviated by flexing the spine in this pose. Bridge pose requires a strong contraction of the back muscles, particularly the lumbar region, which gets strengthened as a result of this.
Bridge pose strengthens the back and maintains the spine’s health and flexibility. This range of motion reduces stiffness and maintains posture. Sciatica sufferers can benefit from this pose since it relaxes their sciatic nerves.
How to perform
- Lie down on your mat with your legs bent at the knees. Spread them hip-width apart and press your soles firmly on the mat.
- Your lower legs should be parallel to each other with your knees in line with your ankles.
- Place your arms beside you, palms facing down. Stretch your hands towards the heels but not with the goal of holding the heels.
- Engage your core and placing your feet firmly on the mat, lift your hips off the mat. Use the support of your arms here as well.
- Keep pressing down your feet and lift your thighs, hips, lower back, and upper back.
- Keep lifting till your thighs are parallel to the ground.
- At this stage, your shoulder blades and head should be on the mat.
- Hold this position for 3-5 breaths.
2. Triangle Pose (Trikonasana)
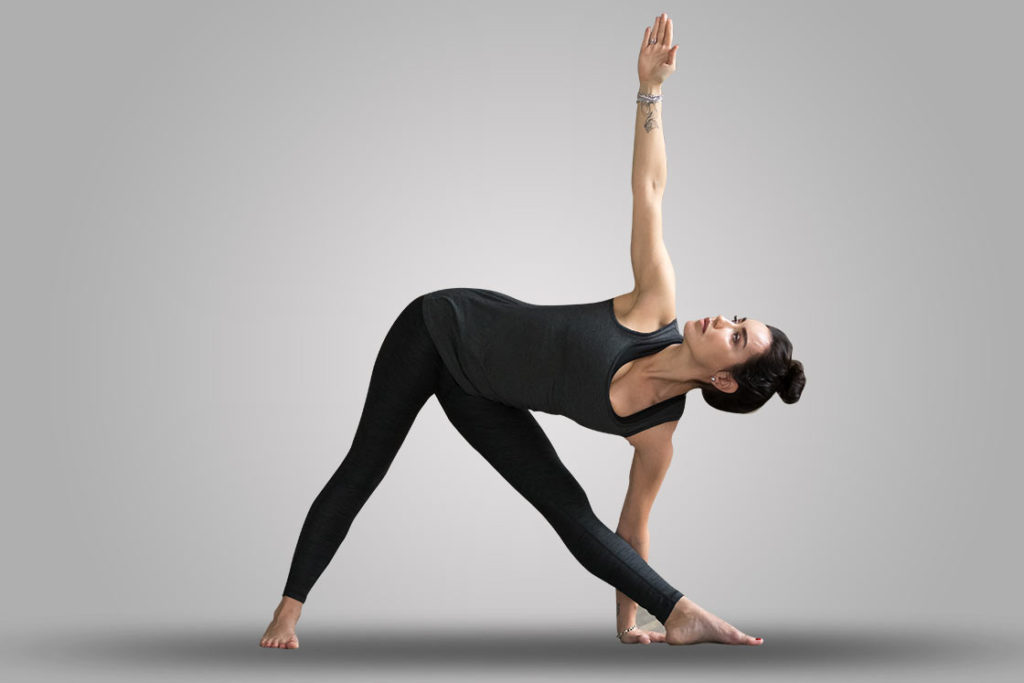
Backache, sciatica, and neck pain may be reduced by this classic standing pose. It strengthens your shoulders, chest, and legs while stretching your spine, hips, and groin. It may also aid in the lessening of tension and anxiety.
How to perform
- Stand in Tadasana (Mountain Pose) with your legs spread 3-4 feet apart.
- Turn your left foot diagonally and your right foot to point towards the shorter end of the mat. The heels of your feet should be aligned.
- Spread your arms to the side with your palms facing down. Make sure they are parallel to the ground and shoulders are away from your ears.
- Bend towards your right foot from your hips joint, bringing your right arm down with you. Keep bending till your fingers touch your feet.
- You have an option to bring your arm completely the mat, to your ankle, or to your shin. You can also use a yoga block at its highest side to rest your right hand.
- Both your arms should form a straight line with your left-hand fingers pointed towards the ceiling.
- Turn your head to gaze at your left fingers.
- Hold this pose for 3-5 breaths and repeat the above with the other leg.
3. Cat/Cow Pose (Marjaryasana/Bitilasana)
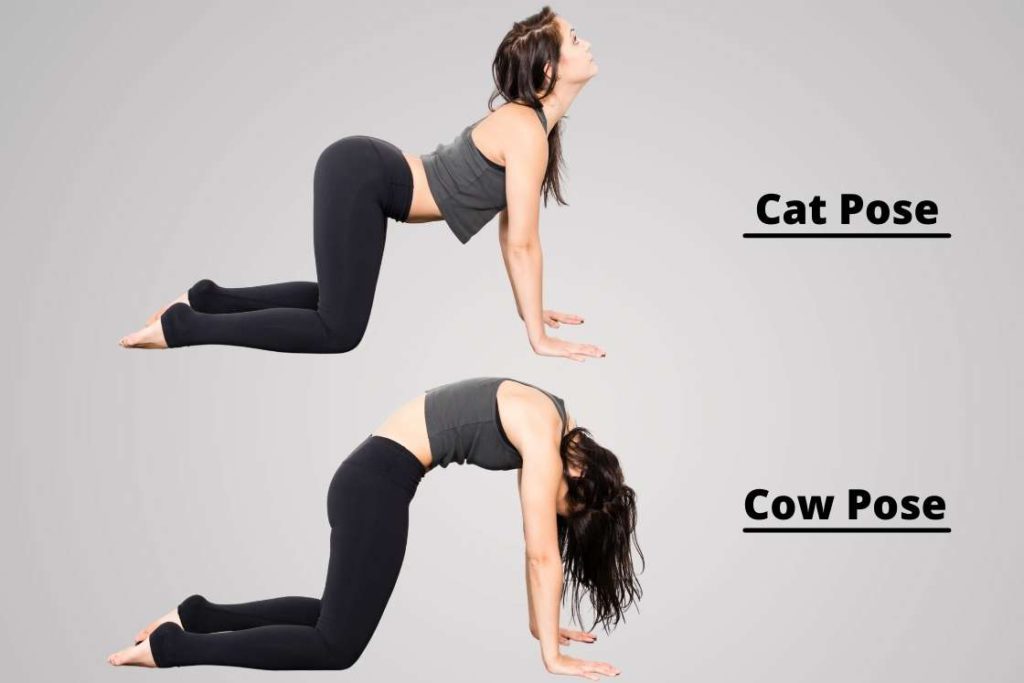
Cat cow is a dynamic movement pose that boosts blood circulation in back muscles. The spine is stretched and mobilized in this mild and easy back and forth pose. This pose expands your torso, shoulders, and neck as well.
This yoga pose promotes blood flow and healing elements to the spine, which can help with acute back pain.
How to perform
- Come to the tabletop position.
- Your shoulders should be stacked above your wrists and hips above your knees.
- Ensure that the bodyweight is evenly distributed on all four limbs.
- Inhale, allowing the stomach to dip, then push the sitting bones up, drawing the head, shoulders, and chest forward.
- Exhale while curving your back like a cat, pulling your belly button closer to your spine and your pelvis closer to your rib cage, and dropping your head toward the floor.
Perform this movement for at least 1 minute or 5-10 times.
4. Cobra Pose (Bhujanasana)
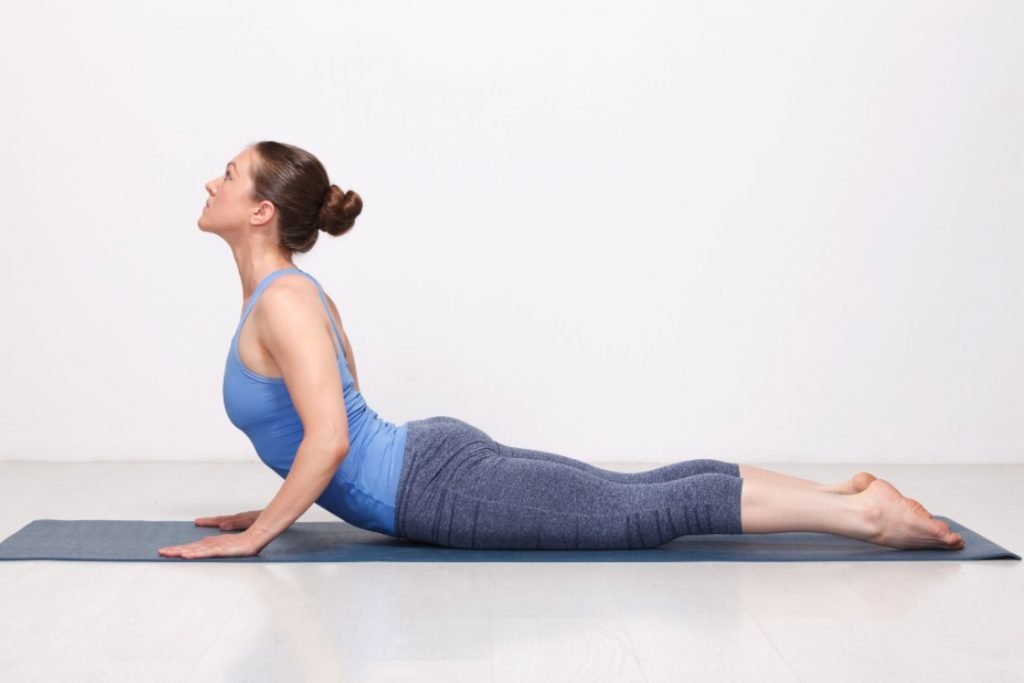
Cobra pose stretches your upper body, focusing on stiff shoulders, and alleviates back discomfort and soreness. In this pose, the back and neck muscles get a good stretch, alleviating any lingering pain or stress. It also rectifies your posture and helps lengthen your spine.
How to perform
- Lie down on your stomach and place your forearms placed beside your ribs. Keep your legs hip-width apart or joined together. The top of your feet should be flat with soles facing up.
- Bring your palms below your shoulders. Spread your fingers to create firm support and spread the weight evenly. Your elbows should be close to the torso and parallel to each other.
- Putting pressure on your hands, lift your head and your chest upwards, keeping your pelvis and legs on the mat. Keep the navel and lower body on the mat.
- If possible, you can straighten your arms by pushing the torso back. Tilt your head back and gaze upwards.
- Keep your shoulder away from your ears and shoulders blades pressed towards the back.
- Your arms should be relaxed yet firmly supporting your upper body weight with a slight bend in your elbows. Stay in this pose for 4-5 breathes and gently come back to rest your body on the mat.
5. Child’s Pose (Balasana)
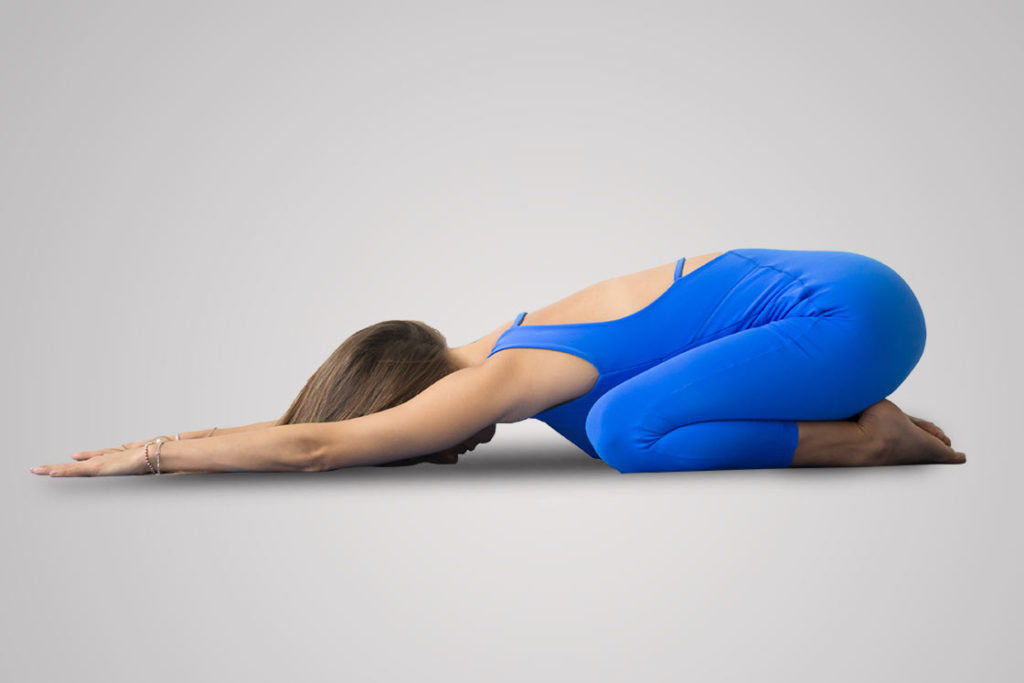
Child’s pose is a restorative pose that stretches the hips, hamstrings, spine, and back muscles, which releases the tension and stress accumulated in these areas. This pose also aids in reducing stress and fatigue, stretches the muscles of the back, and can relieve aches in the neck and back.
With a focus on your spine, you also enable it to be lengthened and stretched.
How to perform
- Sit in Vajrasana (Thunderbolt Pose) on a yoga mat.
- Place your buttocks on your heels and the top of your feet on the floor. Make sure both your big toe is touching. You can also sit on a cushion or yoga block to keep your spine straight.
- While keeping your spine straight, start bending forward.
- Continue bending till your belly touches your thighs. If possible, bring your forehead to touch the ground or place a bolster or a yoga block to rest your forehead.
- Spread your arms forward in front of you with your palms down and fingers spread. You can also keep them beside your thighs or place them behind your back with hands entwined or in Anjali Mudra.
- Stay in this position for as long as you are comfortable.
6. Half Lord of Fishes Pose (Ardha Matsyendrasana)
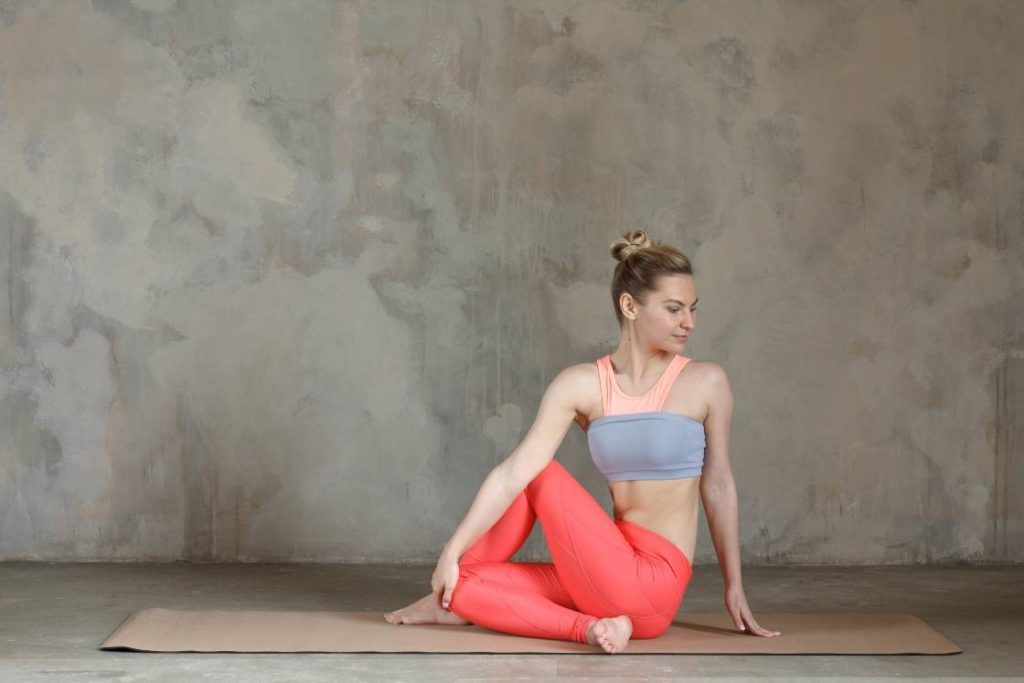
This pose enhances flexibility while also relieving stress in the spine, back, neck, shoulders, and hips. Any lingering backache can be relieved through this pose. It also improves oxygen circulation by increasing the oxygen supply to the lungs. This can help you feel less tired while also stimulating your internal organs.
How to perform
- Sit in Dandasana (Staff Pose). Bend your right knee, bringing the heel close to the sitting bone.
- Keeping your left leg straight, lift your right foot and bring it over the left thigh. Your right foot will now be placed outside the left thigh.
- Bend your left leg so that the left heel comes under the right buttock.
- Take your right arm back and place your palm firmly on the mat.
- Twist your torso toward the right and bring your left elbow to be placed on the outside of the right knee. Your left hand will be pointed upwards with your fingers closed.
- Alternatively, you can place the left arm in front of you, with elbows supported by the knee, for a deeper stretch. Or wrap your forearm around your right knee.
- Turn your head with the twist and gaze over your shoulders.
- Keep this pose for 5-8 breaths and repeat with the other leg.
7. Locust Pose (Salabhasana)
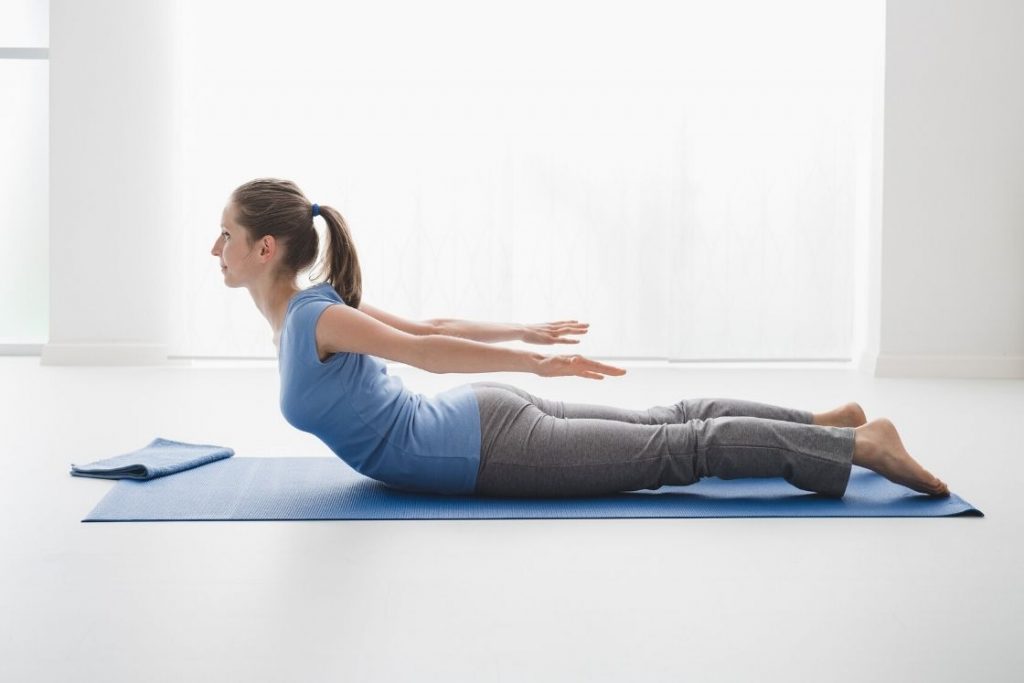
Lower back stiffness and stress may be relieved with this simple backbend pose. It helps to strengthen the back, arms, and legs. It relieves any persistent aches and pains in your lower back. This position strengthens the muscles of the entire body from the nape of the neck to the back of the heels, preparing beginners for a deeper backbend.
How to perform
- Lie down on your stomach with your legs and arms straight. Your forehead should be lightly resting on the mat.
- The top of your feet should be flat on the ground and palms should be facing up.
- Slowly and gently lift your head, chest, and arms. Take your time lifting your body and go as far as you can.
- Slide your shoulder blades down your back as much as you can.
- Maintain your gaze on the floor directly in front of you to keep your neck in a neutral position.
- Lift your legs as you lift your upper body for a deeper stretch.
- Maintain the position for 30 seconds to 1 minute or for at least 3 breaths.
8. Seated Forward Bend (Pashchimottanasana)

This pose stretches your spine, shoulders, and hamstrings in addition to relaxing your mind and alleviating stress. Stretching the entire back of your body by extending the top half of your body improves physical flexibility. When done correctly, it strengthens the erector spinae muscles and lengthens the spine.
How to perform
- Sit in a staff pose (dandasana) with a straight spine. Place your palms on the floor beside your hips. You can use a folded blanket under your buttocks for more support.
- Start bending forward from the hips. Without rounding your back, lengthen the spine to bend toward your legs.
- Keep your head aligned with the spine. Do not tilt it back or bend forward.
- Extend your arms as far as they will go on the outside of each leg.
- Hold the side of your feet with your hands if you can reach them. Use a strap to bridge the gap between your hands and feet.
- Keep bending when you feel you can no longer go further. You can also keep a cushion, a bolster, or a yoga block to support your forehead.
- Stay in this pose for a minimum of 3 minutes.
9. Supine twist (Supta Matsyendrasana)

If you have stiffness or tightness in your back or hips, supine spinal twist pose is essential because it stretches all of the muscles that go along the spine. In the back, the twisting motion restores and increases mobility. It stretches the back muscles and straightens the spine. This twist posture is excellent for people working at a desk all day.
How to perform
- Lie on your back with your legs stretched straight and arms spread horizontally to the side in a straight line.
- Bend your right knee and bring it towards your chest.
- Slowly bring your right knee over to the left side of your body, twisting the spine and lower back.
- Turn your head on the opposite side of the twist, i.e. the left side, and fix your gaze on the left-hand fingers.
- While twisting, your shoulder blades may rise hence make sure that they are touching the ground at all times.
- If you are having trouble keeping the right leg in its position, you can gently hold the knee with your right hand. Or to go into a deeper stretch, push down the right knee.
- Stay in this pose for 5-10 breaths and repeat with the other leg.
Conclusion
Backbends are beneficial to the spine because they strengthen the back while also helping to rectify the upper spine’s bend. Yoga seeks to create proper spinal curvature, which entails a balance of strength and flexibility. Don’t fail to listen to your body and execute each pose to the best possible standard.

: How to Do, Benefits, Precautions and Variations")
: Steps, Benefits, Variations")
 April 1st to 7th April
 Learn Mudras
  Deepen Your Practice
  Find Inner Peace
It’s fine if you are going ahead with Indian philosophy of lifestyle.,??