| Sanskrit Pronunciation | veer-AHS-anna, Virasana (वीरासन) |
| Meaning | vira – hero/warrior Asana – Pose |
| Pose Type | Seated and relaxing posture |
| Pose Level | Beginner, hold for 30 seconds to 1 minute |
| Beneficial In | Stretches and strengthen quadriceps, ankle |
| Known as | Hero pose, Saddle Pose |
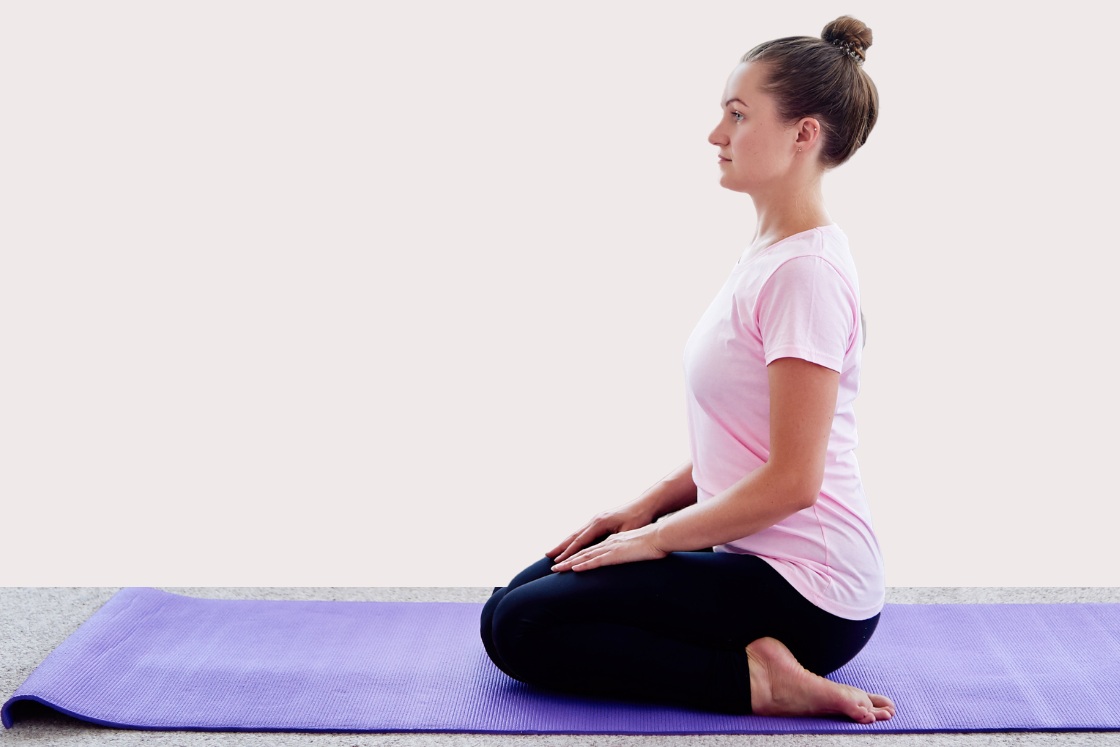
Virasana, or Hero Pose, is a kneeling yoga posture where you sit between your feet with your spine upright and your hands resting on your thighs. It’s a comfortable seated position often used for meditation and breathing practices.
Although simple in appearance, Hero Pose helps lengthen the spine and open the chest, creating space for smooth prana (life energy) flow. This is why in Bikram Yoga, Kapalabhati Pranayama is often practiced in Virasana to deepen breath awareness and stability.
Meaning of virasana (hero pose)
The word Vira in Sanskrit means “brave,” “strong,” or “heroic,” and comes from the root Virya, which represents energy, courage, and vitality in the body. Hence, Virasana translates to the “Pose of the Hero.”
In yogic symbolism, a hero is not only one who acts with courage but also one who conquers inner struggles. This idea is beautifully reflected in the image of Lord Hanuman, who, after the great war, is shown kneeling before Lord Rama a gesture of power combined with humility, earning him the title Vir Hanuman.
Sitting in Virasana reminds us of this balance between strength and surrender. When practiced with awareness, it helps calm the mind, steady the breath, and awaken the inner hero who has mastered thoughts and desires.
How to do hero pose (virasana): step-by-step guide
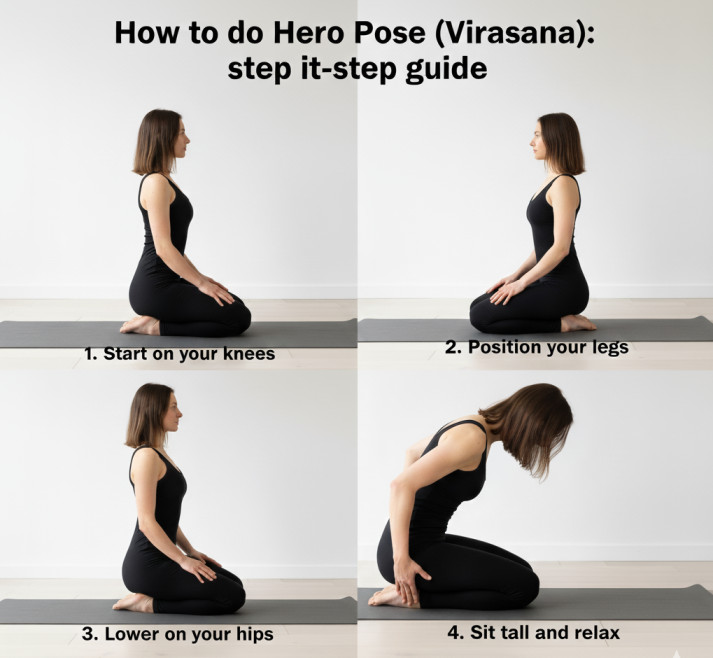
To practice Hero Pose, you can fold your yoga mat for knee support or do it directly on the floor. Follow these simple steps:
1. Start on your knees
Kneel on the floor or on a folded mat to cushion your knees. Keep your thighs straight and your upper body upright.
2. Position your legs.
Bring your knees together and move your feet slightly wider than your hips, so your lower legs form a gentle “V” shape. Press the tops of your feet into the floor and point your toes straight back.
3. Lower your hips.
Lean forward a little and gently move your calves outward with your hands. Slowly sit down between your feet, resting your sitting bones on the floor or a yoga block. Make sure your hips touch the inner heels without any pain.
4. Sit tall and relax.
Straighten your spine, roll your shoulders back, and open your chest. Keep your head aligned with your spine. Rest your hands on your thighs or in Dhyan Mudra on your lap.
5. Hold and breathe.
Stay in Hero Pose for 30 seconds to 1 minute, breathing slowly and evenly. To come out, lean forward, lift your hips, bring your feet together, and stretch your legs straight in front of you.
Modifications
If Hero Pose feels uncomfortable, try these simple adjustments to support your knees, ankles, and hips:
- If your hips don’t reach the floor: Place a yoga block or a thick folded towel under your sitting bones. Sit evenly on the support so both sides of your pelvis are balanced.
- If your knees feel strained: Tight hamstrings or biceps femoris muscles can cause knee pain. To reduce pressure, place a thin rolled blanket behind your knees and sit on a block or cushion.
- If your ankles feel overstretched: Slide a rolled blanket under the front of your ankles so that your toes lightly touch the mat. This helps reduce the stretch and keeps the ankles comfortable.
Variations
Here are some common variations of Hero Pose that add flexibility and depth to your practice:
Reclined Hero Pose (Supta Virasana)
From Hero Pose, walk your hands back and lower your elbows to the floor. Gently lean your torso backward until your back rests on the floor or a bolster. This variation opens the chest and stretches the front of the thighs and abdomen.
2. Side twist hero pose
While sitting in Hero Pose, place your palms on the floor beside your hips and twist your torso to one side. Keep your chest lifted and gaze over the shoulder of your back arm. This variation improves spinal flexibility and tones the waist.
3. Cow face hero pose (Gomukhasana arms in virasana)
Sit in Hero Pose. Bring your left arm behind your back and your right arm overhead, then bend the elbows and clasp your fingers behind you. This combination strengthens the shoulders and stretches the chest and triceps.
4. Downward-facing hero pose
From Hero Pose, stretch your arms forward in front of your body and slowly fold down, bringing your forehead to the floor. Keep your palms open and extended as in Downward-Facing Dog. This variation calms the mind and relaxes the back and shoulders.
Preparatory poses of virasana
Follow-up poses of virasana
- Bakasana (Crow Pose)
- Padmasana (Lotus Pose)
- Krounchasana (Heron Pose)
- Eka Pada Supta Virasana (One-Legged Reclining Hero Pose)
Contraindications & precautions
- Avoid practicing Hero Pose if you have a recent or chronic injury in the knees, ankles, or ligaments.
- People with heart conditions, severe arthritis, or migraine headaches should skip this pose.
- Do not hold the pose if you feel sharp pain or discomfort in your joints, hips, or lower back.
- Use a yoga block or folded blanket for support if sitting directly on the floor feels painful.
- Always come out of the posture slowly and mindfully, especially if you have joint sensitivity.
Virasana in yoga tradition and ancient texts
Virasana is one of the oldest and most traditional seated yoga postures, often used for Pranayama (breath control) and Dhyana (meditation). It has been mentioned in several classical yoga texts, including:
- Vyasa’s commentary on The Yoga Sutras of Patanjali
- “Light on Yoga” by B.K.S. Iyengar
- Ashtanga Vinyasa Yoga tradition
This simple kneeling posture is considered a beginner-level seated pose, ideal for rest after standing postures.
Although mantra or japa meditation is traditionally done in Padmasana (Lotus Pose) or Siddhasana, Virasana or Vajrasana can be excellent alternatives for those who find the other poses difficult.
Interestingly, Hero Pose and Thunderbolt Pose (Vajrasana) are among the few postures that can be practiced after meals, as both help support digestion and improve posture.
Virasana vs. Vajrasana (Hero pose vs. thunderbolt pose)
While both are kneeling postures, they differ mainly in the position of the feet and placement of the hips:
| Pose | Foot Position | Sitting Bones Placement |
|---|---|---|
| Virasana (Hero Pose) | Feet are placed beside the hips | Sitting bones rest on the floor (or block) between the feet |
| Vajrasana (Thunderbolt Pose) | Feet and heels are together | Sitting bones rest directly on the heels |
Hero pose benefits (virasana)
- Stretches the Legs and Pelvis: Hero Pose deeply stretches the quadriceps, knees, ankles, and pelvis. This improves lower-body flexibility and relieves tightness from standing or running for long periods.
- Improves Posture and Spinal Alignment: By encouraging an upright sitting position, Virasana strengthens the back and aligns the spine naturally. It helps reduce slouching and supports healthy posture.
- Enhances Digestion: Sitting in this pose after meals stimulates the digestive organs and eases issues like gas, indigestion, and constipation. It gently massages the abdominal area, improving overall gut health.
- Strengthens Knees and Ankles: The pose stretches and strengthens the connective tissues around the knees and ankles, keeping these joints flexible and mobile. It’s especially useful for people with stiffness or flat feet.
- Calms the Mind and Body: Hero Pose activates the Muladhara Chakra (Root Chakra), which promotes grounding and stability. It balances Vata dosha and helps quiet mental restlessness.
- Supports Circulation and Breathing: By opening the chest and aligning the spine, Virasana improves the flow of breath and blood circulation. It benefits the cardiovascular and respiratory systems, helping you breathe more efficiently.
- Reduces Fatigue After Physical Activity: Athletes often use this pose as a cooling posture after running or training. It relaxes the leg muscles, reduces foot strain, and helps the body recover faster.
- Eases Discomfort in Women: Practicing Hero Pose may help reduce symptoms of menopause and swelling in the legs during pregnancy. It promotes better circulation and relaxation through gentle pressure and grounding.
Conclusion
Hero Pose (Virasana) is a simple yet powerful posture that brings stability to both body and mind. It improves flexibility in the legs, supports digestion, and prepares the body for meditation or pranayama. With mindful practice and proper support, this pose helps you feel grounded, calm, and centered just like a true hero within.
FAQs hero pose (virasana)
1. Is Hero Pose suitable for beginners?
Yes, Hero Pose is a beginner-friendly seated posture. You can use a yoga block or folded blanket under your hips or knees to make it more comfortable.
2. How long should I stay in Hero Pose?
Start with 30 seconds to 1 minute and gradually increase up to 5 minutes as your flexibility improves. Listen to your body and avoid strain in the knees or ankles.
3. Can I do Hero Pose after eating?
Yes. Hero Pose is one of the few yoga poses you can safely do after meals, as it supports digestion and helps reduce bloating.
4. What is the best time to practice Hero Pose?
It can be practiced any time of day — after meals for digestion, or before meditation and pranayama to calm the mind and align the spine.
5. Can I meditate in Hero Pose?
Absolutely. Hero Pose provides a stable base for meditation and pranayama. It helps you sit upright comfortably while keeping the mind steady and focused.
6. What muscles are stretched in Hero Pose?
Virasana stretches the quadriceps, hip flexors, knees, and ankles while gently opening the chest and lengthening the spine.
7. How is Hero Pose different from Thunderbolt Pose (Vajrasana)?
In Hero Pose, the feet are placed beside the hips and the sitting bones rest on the floor or a block. In Thunderbolt Pose, the feet are together and the sitting bones rest directly on the heels.

: Steps, Benefits & Precautions")
: Meaning, Steps, Benefits & Precautions")

