Yin Yoga is an upcoming yoga style that is being imbibed by anyone who needs to relax and take a step back from the daily stress. Even though it is gentle, soft, reflective it is equally firm, strong, and physical in nature.
It focuses on improving your inner strength by focusing on the connective tissues that support the joints.
The hip is one of those areas that take the maximum weight of the body. Since most Yin Yoga poses require you to sit, recline or lie down, the hips are one of the areas that are constantly stimulated.
Benefits of Yin Yoga for tight hips
We experience stress and tension on a daily basis that adversely affects our muscles and joints. And it is said that most of it gets accumulated in the hips, which reduces its mobility, flexibility and invokes pain. This discomfort and pain may also spread to the lower back, knees, and legs, causing restriction in movement.
Hence releasing blockages from this area becomes important to keep yourself active and free from aches and stiffness.
Yin Yoga gives the hip joint, commonly known as the ball and socket joint, the space to breathe and clear the tension. The long holding of poses makes yin yoga perfect to open up tight hip flexors (front of the leg and hip), hamstring group (back of the leg), and gluteal group (back of hip/ buttocks) muscles.
Moreover, since we know Yin Yoga is a meditative style of yoga, it focuses more on seated and reclining postures. Indeed, most of the hip openers in yoga are seated poses that strengthen the hip joint (and gradually prepare the body) to sit comfortably for longer periods in meditation.
Hip Opening Yin Yoga sequence
This yin yoga sequence comprises 6 poses that are extremely beneficial in opening the hips and promoting relaxation. Hold these poses for at least 2 minutes and gradually extend up to 5-7 minutes. Make sure to be aware of any sensations along with your breathing.
You need to stay still as wiggling will make you lose focus and you will not be able to work on the target muscles.
At any point in time, you feel discomfort or strain, ease out of the pose gently. Find your edge and do not pressure yourself to move past it. Using props such as bolsters, straps, blocks, cushions, etc will help in getting the correct posture and staying longer in the pose.
1. Squat Pose
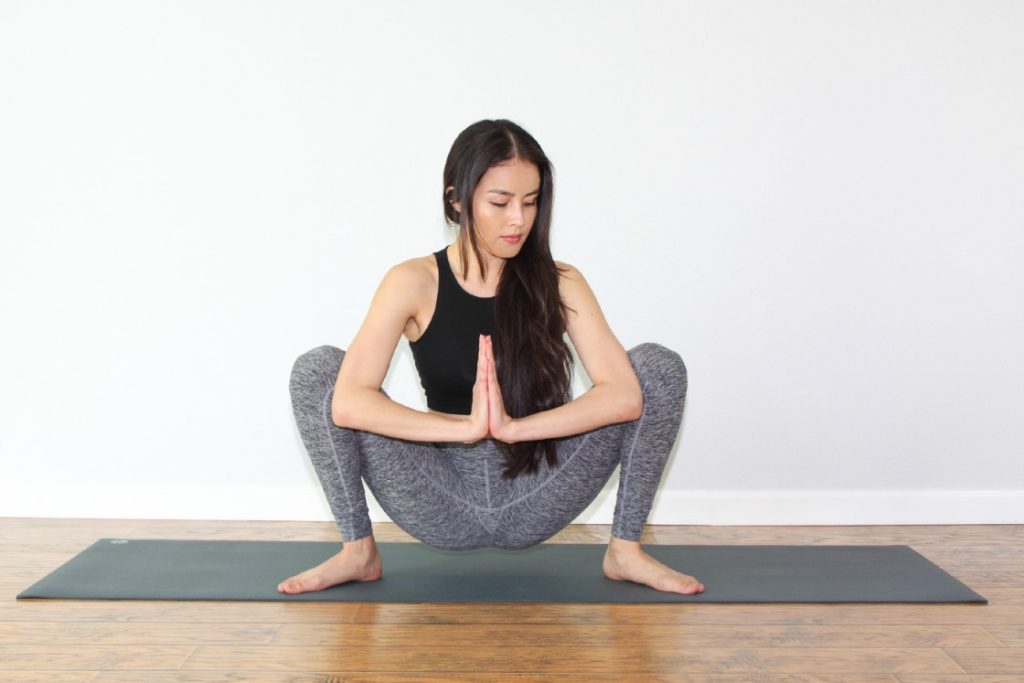
The squat pose is one of the most significant poses to open and stimulate the hips. By adjusting the leg position, your ankles will also experience the stretch. This pose helps in relieving stress from the lower back and the pelvic floor.
It is especially beneficial to ladies as it can help in reducing menstrual cramps and prepare the body for childbirth.
Stand straight with legs spread hip-width apart on your mat. Keep your hands in front of your chest in the ‘namaste’ position. Gently lower yourself to come to a squat with your arms lightly placed against the knees or shins. Hold this pose for at least 2-3 minutes. Then stand up straight. Repeat this process 3 times.
To come out of the pose, you can sit down completely and straighten your legs.
Safe practice tips
Use a rolled blanket or a cushion to support your heels if you are unable to keep them fully on the floor.
Make sure that your feet and knees are pointing in the same position. This will help you in keeping balanced and firmly grounded.
You can spread your legs further to let the gravity pull your tailbone downwards.
Variations to the pose
With your feet spread apart further, you will be targeting your hips. By keeping the closer or with the knees touching, you will be able to target your ankles.
Bring your hands behind your head and bend your head downwards the chest to give a stretch to the back of the neck.
An advanced variation of this pose is to keep your feet together and your knees spread apart. Circle your hands around the shins and clasp them in the back.
Contraindications
If your hips are extremely stiff, it is better to open them slightly with some other yoga poses first or else it can adversely affect the knees.
Avoid this pose if you have suffered injury or had surgery on your knees.
2. Butterfly Pose
One of the poses that can be easily performed by beginners, butterfly pose is beneficial for opening the outer hips. This pose stretches the inner thighs and lower back.
It is one of the most beneficial poses for women as it helps in regulating their periods, makes childbirth easy, and improves the functions of the ovaries.
Steps to perform
Sit on a yoga mat or a blanket. Put together the soles of your feet and slowly straighten the legs.
While straightening the legs, bend forward allowing your spine to make a fold.
Your hands can be on the mat or hold your feet. When you will hold your feet, the legs and arms will bend, creating a butterfly wing-like pattern.
Bend your head towards your feet.
Hold this pose for at least 3 minutes.
To come back, push away from the floor through your hands and roll up slowly. Lean back slightly to unlock your hips and then straighten your legs completely.
Tips to perform safely
Use a cushion or folded blanket to support your hips.
You can use a bolster to support your bend and the chest area.
If your knees are floating, place blocks under both knees.
Variations to the pose
Support your head with your hands, keeping the elbows on a block or your thighs.
Keep your spine straight if you have issues with flexion of the spine or lower back disorders. Use a bolster to keep your back straight or practice a reclining version.
In terms of hands, you can hold your feet, keep arms outstretched in front of you, keep them at your side or clasp your hands behind your back.
Experiment with the movement of legs. Keeping the legs straighter will give a wonderful stretch to the hamstrings. If you bring your feet close to the groin, the inner thighs get stretched.
Contraindications
If you are suffering from sciatica, either avoid practicing this pose or use a cushion to elevate your hips enough that your knees are below the hips.
If you’ve recently suffered any head injury, do not bend your head.
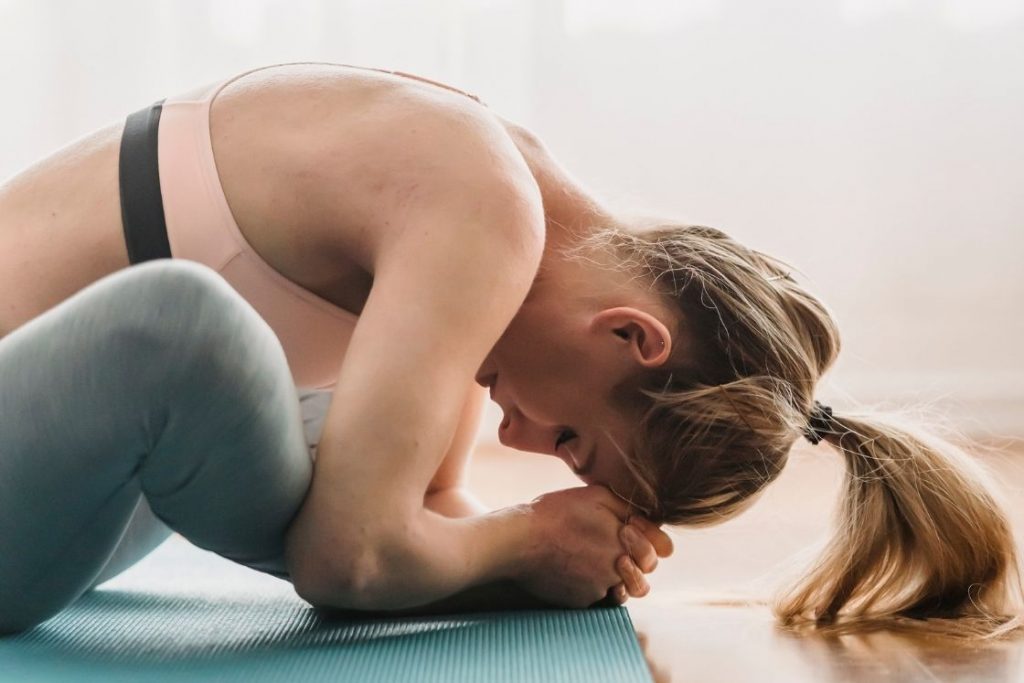
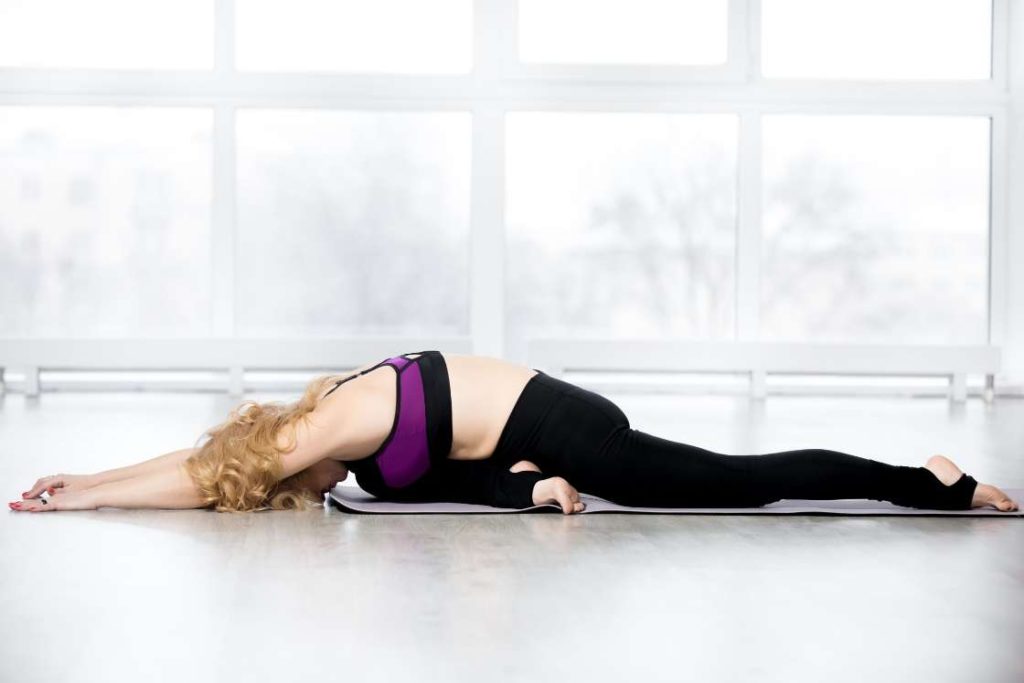
3. Child’s Pose
The Child’s pose is an excellent healing pose that gently stretches the spine. The forward bend compresses the stomach which will help with digestion. By bringing your head above the heart, you are also increasing the circulation in the body which will aid in keeping your mind clear and calm.
You can transition to this pose from the butterfly pose or start from the tabletop position
Steps to perform
Kneel on the yoga mat and keep toes untucked. Sit on top of the heel and spread your knees slightly.
Gently fold forward and bring your torso to touch your thighs and forehead to the ground.
You can either place your arms at your sides or stretch them in the front. Stay in this pose for anywhere between 3-5 minutes.
To come out of this pose, push with your hands and roll up to sit with a straight back.
Tips to perform safely
Release the strain on your shoulders by keeping your arms stretched out in the front.
If you feel discomfort in the lower belly by keeping your knees closed, you can spread them open slightly.
Keep a bolster under your chest for enhanced support and relaxation.
To support your head, you can either place them on your forearms or place a block, rolled blanket, or bolster.
For additional support to the ankles or heels, place a cushion or rolled blanket below the feet.
Variations to the pose
You can deepen or soften the stretch by increasing and decreasing the space between your knees.
Contraindications
As it puts pressure on the stomach, it is better to avoid this pose if you are pregnant, or have diarrhea.
In case of a knee, back, or neck injury, you should avoid practicing this pose or perform with moderation using props.
4. Frog Pose
The Frog pose is ideally a deeper variation of the Child’s pose. It also allows you to focus on opening the groin. This is another pose that helps in lengthening the spine and stretches your hamstrings. Women can also benefit from this pose as it provides relief from menstrual cramps.
Steps to perform
While keeping the child’s pose, slide forward and create space for your torse by spreading the knees as far apart as you can.
Your buttocks shouldn’t be lifted from your heels. Hold this position for at least 2 minutes.
Ease off from this pose by straightening your legs and lying on your belly or come back to the Child’s pose.
Tips to perform safely
If you start feeling a strain in your groins or hips, bring your hips forward. Or use a cushion or blanket to elevate the hips.
Relax your torse by keeping a bolster underneath the chest.
Spread your arms in case of discomfort in the shoulders.
In case your knees hurt, place a blanket or a cushion underneath them.
Beware of any tingling sensation in your arms. Spread your hands wider or move them closer as the case may be or stretch one arm at a time
Variations to the pose
You can bend one arm to keep your head on the forearm.
Bring your toes together and bring your hips back for an extended spinal stretch.
Before coming to the full Frog pose, you can lift your hips so that they are in line with the knees. It is also called the Half Frog pose.
Contraindications
If you have any issues with your head, back, knees, shoulders, hips, or pelvis, practice this pose in moderation.
Pregnant ladies should first consult their doctor before performing this pose. The compression on the stomach can cause a strain.
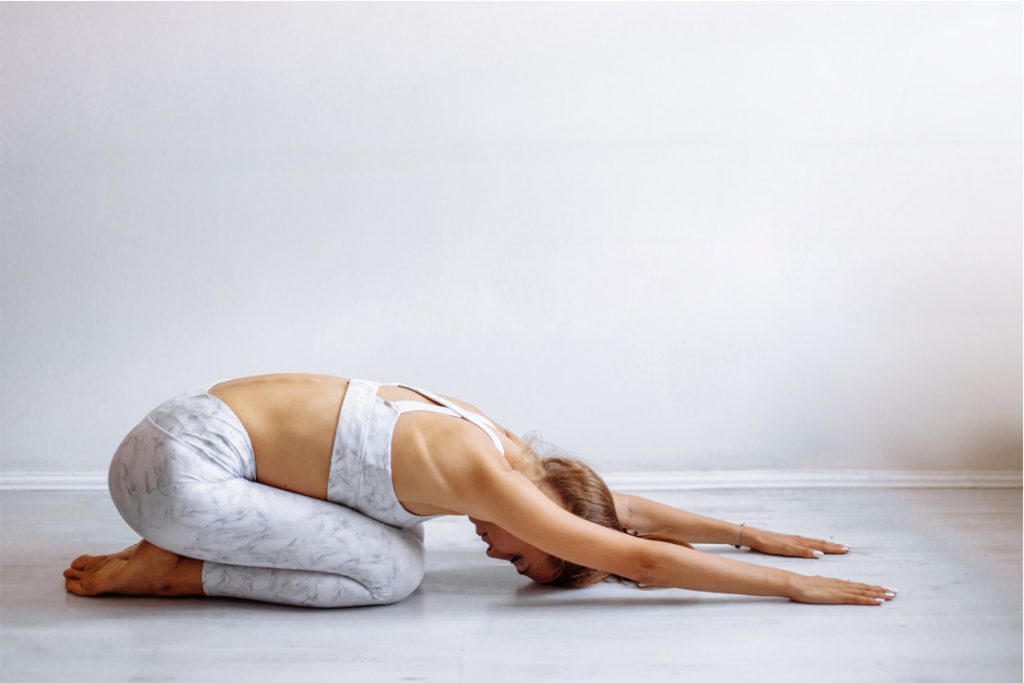
5. Shoelace pose
This is another great pose for opening the hips with special emphasis on the outer hips. It also helps with the stretching of glutes and hip rotators. The forward fold of this pose aids in spinal decompression.
Steps to perform
Take a seat on the yoga mat/blanket with your right leg on top of your left. Pull both the legs on the side so that your knees are almost on top of each other.
Fold forward till your chest touches the thigh of the top leg.
Hold this pose for 2-4 minutes on each leg.
To come out of this pose, gently start straightening your legs and extend them in front of you. Lean back to release your hips.
Tips to perform safely
Take the support of a bolster for your chest and head.
If your upper knee creates an issue, use a blanket or cushion under it.
For tight hips, use a cushion to tilt them forward.
Variations to the pose
If the bottom knee has some discomfort, straighten that leg.
Your hands hold your toes, keep them outstretched or clasped behind the back.
Instead of folding forward, sit upright with your weight on the arms to ease off any discomfort on the knees and hips.
Contraindications
Pregnant ladies should not perform the forward fold after the first trimester.
If you are suffering from severe sciatica, avoid practicing this pose.
For people with medical issues in the lower back or the knees should perform this pose in moderation in consultation with a doctor or avoid it completely.
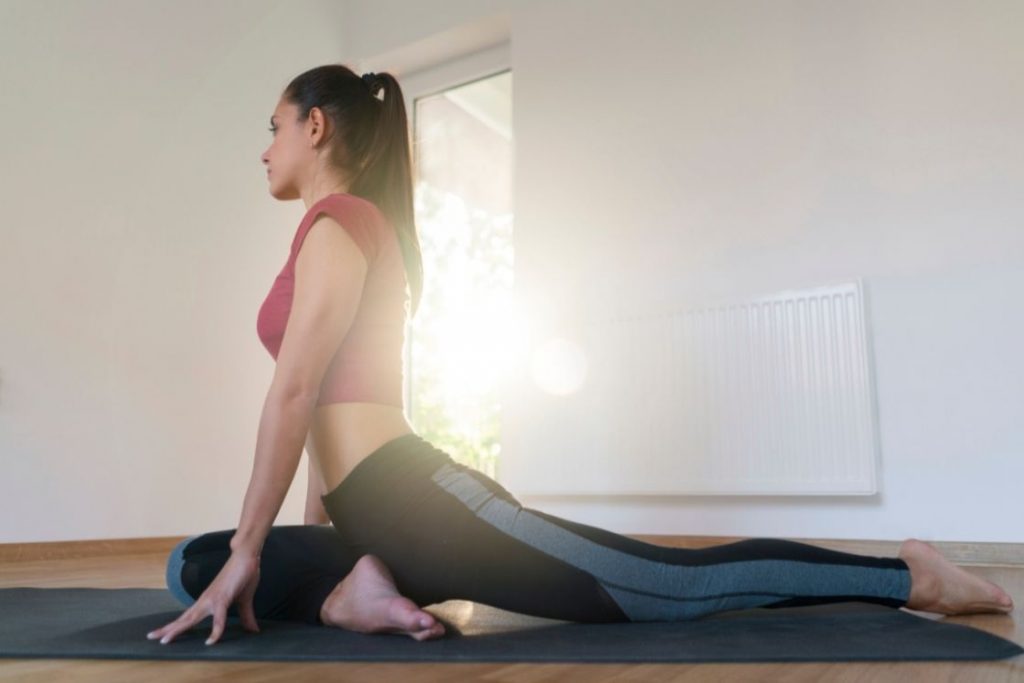
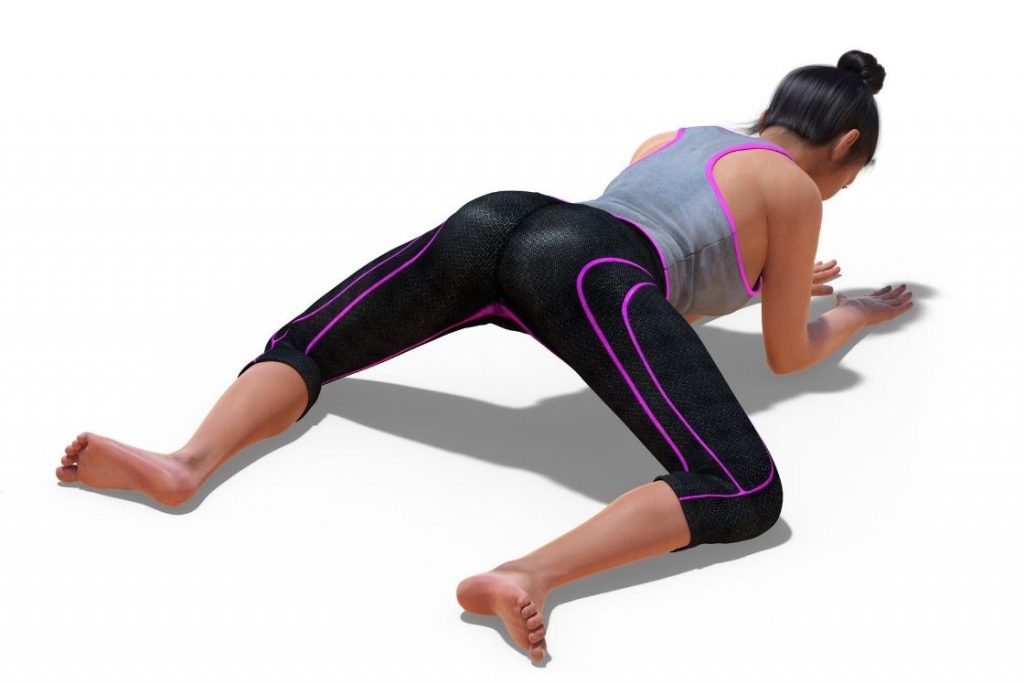
6. Swan/Sleeping Swan Pose
In this pose, you are working with gravity to release the tension from the hips. This pose gives a nice stretch to the quadriceps and hip flexors of the leg that is stretched back. Through this pose, you can give a strong external rotation to the front hip.
By easing and going deeper with the forward fold, you can alter the stretch to the lower back. The Swan pose also helps stimulate your sexual organs by increasing the blood flow.
Steps to perform
From the Shoelace pose, rise up to bring the lower leg to the back. Your front leg should be bent at the knee.
Take some time to feel this position, by keeping your torso upright and putting some of your weight in your hands. If you do not feel any discomfort, slowly lower your hips to the floor.
Once you are comfortable in this pose, start folding and stop when you have reached your edge.
Hold this pose for 3 minutes. Repeat the pose with the other leg by pushing yourself up and coming to the Melting Heart pose.
To ease off this pose, rise up from the fold. Push yourself up slightly to bring forward the back and recline back to release your hips.
Tips to perform safely
Flex the foot of the leg which will be bent in the front to protect your knees.
When lowering your hips, keep most of your weight on your arms and hands.
Keep a bolster in front of you and place your head on top of it to help with the forward fold. Or you could keep the bolster lengthwise under our chest.
Variations to the pose
For an extended stretch and advanced variation, bring your bent knee to the side and lie down with your chest touching your shins.
If your hips are too tight, move your front foot back towards the thighs.
Contraindications
People having troubles with their knees, hips, pelvis, lower back, or shoulders should avoid doing this pose or do it in consultation with their doctor and instructor.
Pregnant women should practice this pose in moderation, especially after the 1st trimester.
Conclusion
The above sequence can be altered with poses of your preference as you keep practicing. Try modifying the pose to obtain a deeper or softer stretch. Use props wherever you need support or ease out of the pose completely if you experience any strain.
Remember that you are not performing these poses to strengthen your muscles or cause sweat. You need to be soft and gentle to your body and mind, just like you would in a meditative practice. Let go of all your worries by opening your hips through Yin Yoga.

")
: Steps, Variations, Benefits, & Precautions")

