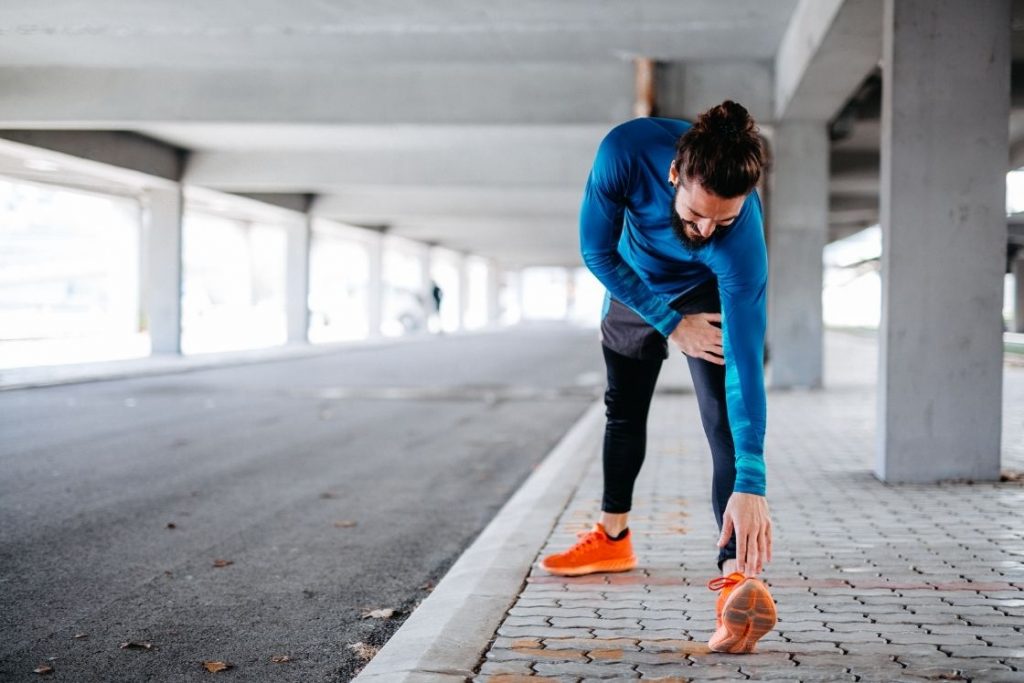
- Causes of Tightness
- Symptoms
- Psoas Stretching Pose
- Low lunge
- Warrior I Pose
- Tree Pose
- Half Knee to Chest
- Boat Pose
- Standing Big Toe Pose
- Bridge Pose
- Butterfly Pose
When we talk about opening our hips with stretches and yoga poses, we talk about stimulating, stretching, and strengthening the hip joints and the muscles in and around the hip. Many such muscles join various areas such as the back, pelvis, thighs, and even the knee.
One such muscle is the Psoas (pronounced as so-az).
The Psoas muscle lies majorly in the pelvis region and it connects the lower back to the upper thigh.
Technically speaking, the muscle starts from the lower vertebrae of the spine, passes through the pelvis, and attaches itself to the femur (thigh bone). This is the only muscle that connects the spine and the leg in a continuation.
The psoas muscles are present on both sides and are often the cause of pains, cramps, strain, or other ailments.
What causes the psoas muscles tightness?
Easy everyday movement such as walking, bending, or sitting is made possible due to psoas muscle. And since this muscle connects your spine and legs, standing upright is also one of the most important functions carried out by this muscle.
Even when your run, squat, or perform any exercise, the psoas muscle is activated in giving your spine and legs the support and the movement of going back and forth.
However, when we complain of lower back pain, strain in the thighs, or pelvic pain, we do not know that it is majorly the psoas muscle that is the cause of these pains.
Here are some major causes of stress and tightness in the psoas muscles:
1. Tightness due to sitting for long hours
The unique aspect of this muscle is that it contracts or the fibers in the muscles shorten when you sit and remain in that way till the time you stand up.
So if you’re sitting for a long hour, it is bound to cause tightness and accumulate stress. This tightness can lead to back pain, hip pain, and reduced mobility.
2. Compressing the nerves in the psoas muscles
Another reason is that there are multiple large nerves that come from the spine and go through the psoas muscles to the legs. When there is stress on the muscles, these nerves get compressed. As a result, it can lead to back pain, issues related to bladder and digestion, leg, hip, and pelvic pains.
3. Accumulation of stressful energy
You must have often heard that stress from emotional trauma or any other physical or emotional stress caused in daily life gets stored in the hips. Well, this stressful energy is precisely getting stored in the psoas muscles. And when this energy gets accumulated, it causes tightness and strain which will result in loss of flexibility and mobility.
Symptoms of psoas strain or tightness
The symptoms of unhealthy psoas are often overlooked as most of them overlap with the symptoms of other conditions around the same area. However, if you experience any of the below issues, do consider the psoas muscle for a check-up.
If you experience pain in any of these areas:
- lower back pain,
- when sitting or getting up from a sitting position
- when you try to stand fully upright
- buttocks, groin, or pelvis
Or if you find yourself limping or shuffling while walking, get yourself checked by a doctor before starting to practice any alternative therapy. There may be a chance that these symptoms are an indication of something serious.
Due to the above reasons, it becomes important to pay regular and special attention to this area. Yoga is one of the most effective ways through which your can gently and regularly stretch and strengthen the psoas muscles. You can avoid the onset of the above symptoms with regular yoga practice.
Yoga Poses to Release Tightness in the Psoas Muscles
Practicing hip-opening yoga poses will benefit you greatly in stretching the psoas muscles. These poses focus on the entire hip area by opening and stretching the muscles or the groin, pelvis, hip joints, lower back, and thighs.
But before practicing these yoga poses, be aware of the severity of your pain or injury. If it is severe, it is always recommended to consult a doctor first. In case of injury due to an accident or have undergone surgery in the hip and lower back, it is better to avoid practicing the poses till you have significantly recovered.
Pregnant ladies should also consult their doctors before starting to practice the yoga poses.
Let us look at some yoga poses that can help you with your psoas muscles.
1. Low lunge (Anjaneyasana)
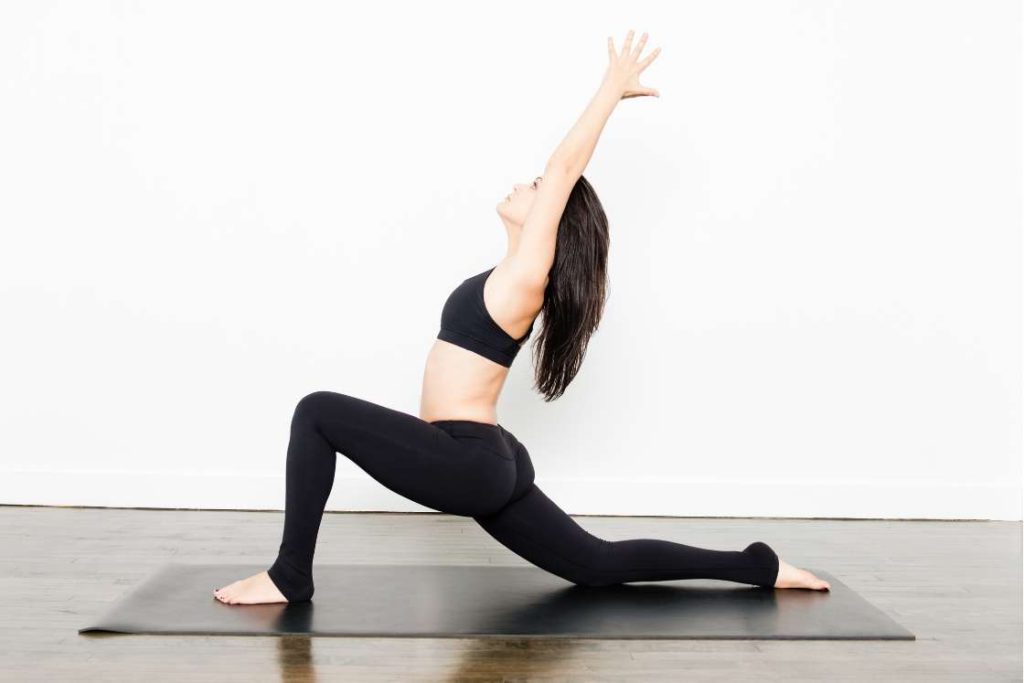
Low Lunge is an easier variation of the high lunge pose where you keep your back leg straight instead of bending the back leg knee to the ground. Practicing a low lunge will help relieve soreness and lengthen the psoas muscles. Practicing a low lunge will help relieve soreness and lengthen the psoas muscles.
- Stand in a Tadasana (Mountain Pose) facing the shorter end of your mat.
- Bring your right leg forward by at least 3 feet. The feet of both your legs should be facing forward.
- Bend the right knee to create a 90-degree angle. Your right knee should be in line with your right ankle and thigh parallel to the mat.
- Keeping your back straight, bend down your left knee to touch the mat.
- You can play around with the placement of your arms in various positions. Extending your arms above your head and joining the palms will make it a good chest opener. If your stretch your arms above, you can also work on the psoas muscle.
- You can also place your hands on the hips, in front of your chest, or in the back while joining your palms.
To deepen the stretch, bend the right knee further till your feel resistance in your hip muscles.
Hold this pose for 5 breathes and repeat with the other leg.
2. Warrior I Pose (Virabhadrasana I)
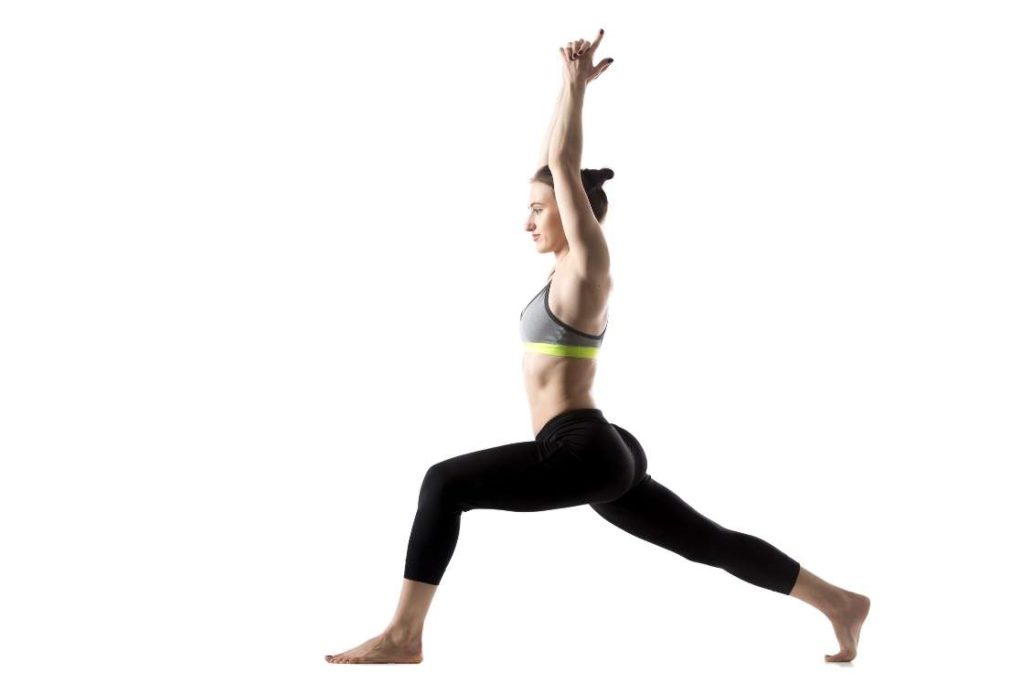
This balancing pose provides a good stretch to the psoas muscles of the leg that is stretched in the back. The forward leg that is bent also works on stretching these muscles on the thigh and groin.
- Start by standing in Tadasana (Mountain Pose), facing the shorter end of the mat.
- Step your left foot to the back, placing your feet firmly on the floor and turning the toes to a 45-degree angle. Your knee should not be locked and the left leg should be straight.
- Bend the right knee to make a 90-degree angle so that your thighs are parallel to the floor and your knee is stacked over the ankle. Make sure your right heel is in line with the left foot arch.
- Stretch your arms upwards and bring your palms together. Open your chest, lengthen the spine and draw in your abdomen while bringing your arms up.
- If you do not have any neck problems, tilt your head upwards to gaze at the fingertips.
- Press down on your left foot to keep your spine straight and keep your shoulders away from your ears.
Hold this pose for 3-5 breaths and repeat the same with the other leg.
3. Tree Pose (Vrksasana)
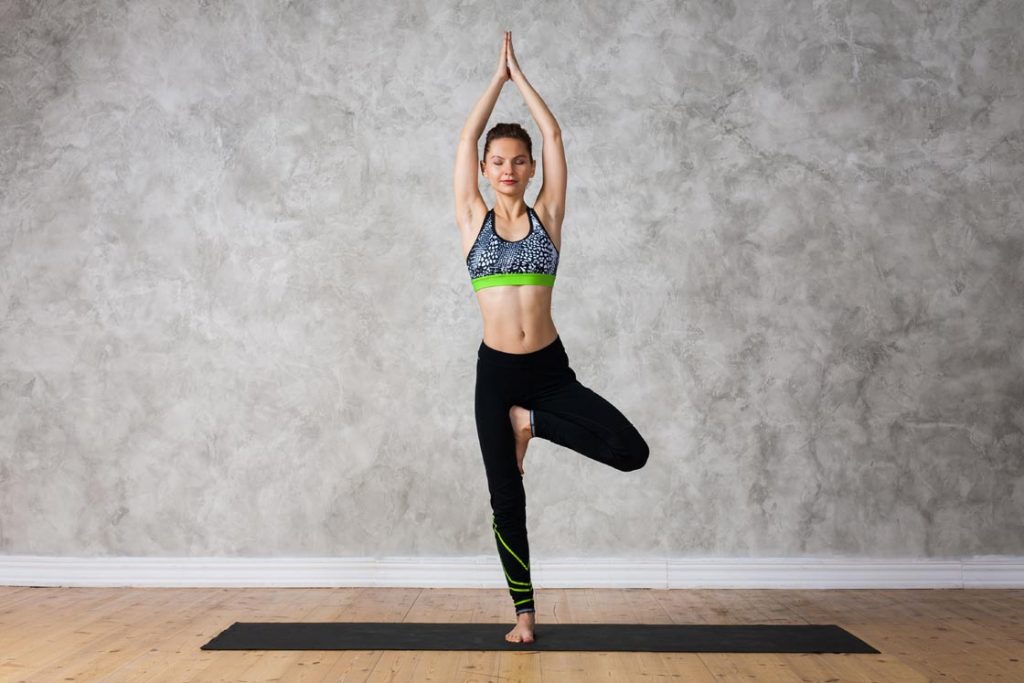
This standing pose will work on the side muscles by stretching, opening, and strengthening the thigh muscles, groin, hips, and core.
- Start by standing in a Tadasana (Mountain Pose). Your feet should be firmly placed on the mat with your bodyweight spread equally on all four corners of the feet.
- Put some weight on your right foot, bend your left foot, and slowly lift the left leg. Make sure that your right leg is relaxed and the knee is locked.
- Turn your left foot to the side and place the sole on the inside of the right thigh. Place equal pressure on the thigh and sole by pressing the sole into the thigh and vice versa.
- Keep your gaze on a focal point in front of you to help you with the balance.
- You can place your hands in the Anjali Mudra or stretch them above your head and join the palms.
Hold this pose for at least 3 breathes and then repeat with the other leg.
4. Half Knee to Chest Pose (Ardha Apanasana)
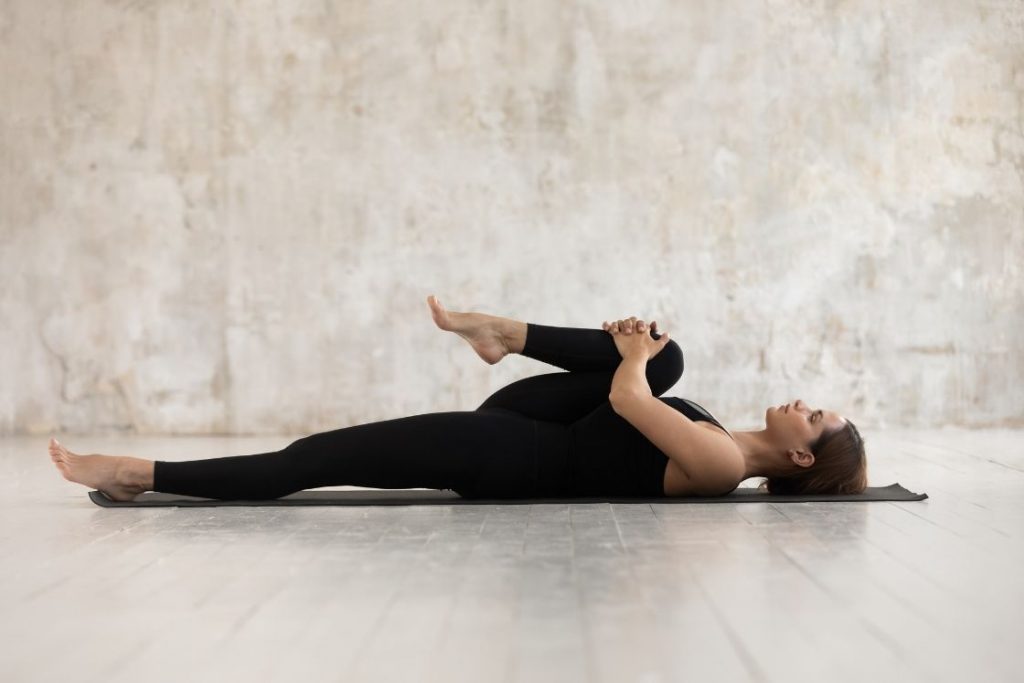
To relax your psoas muscles after a long-distance walk, sitting for a long duration, or excessive running, practicing this pose will greatly benefit in stretching and loosening them.
- Lie in Savasana (Corpse Pose) and bend both your legs from the knee.
- Using your hands, draw your right knee towards your chest. If you feel your lower back touch the mat, loosen your hold on the right knee. The aim is to maintain a natural curve of the spine and a neutral pelvis.
- Stay in this pose for a few breathes and then slowly slide your left leg forward to stretch the left psoas muscle. Be aware of any pain or strain in your hips. The moment you feel any discomfort, pause and try releasing the tension for that area.
- Once you are successful in straightening your left leg, hold this pose for 3-5 breaths.
Repeat the same with the other leg as well.
5. Boat Pose (Navasana)
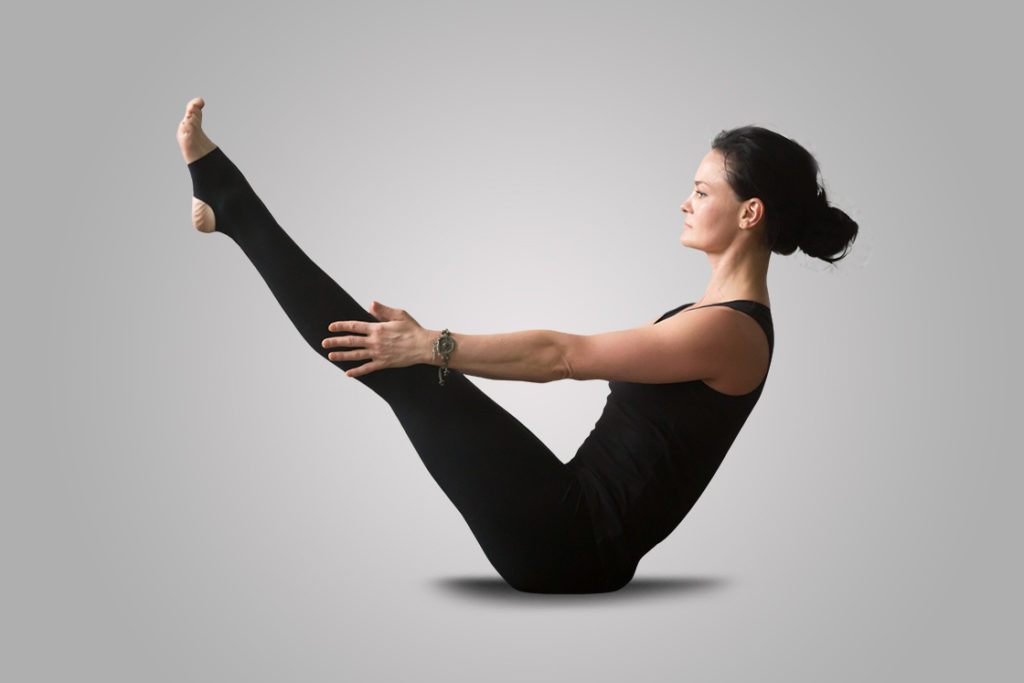
With boat pose, you will be working on elongating your spine and also working on the psoas muscles on both sides, simultaneously. It strengthens the hip muscles and strengthens your core.
You can also use a strap in this pose to keep your spine and legs straight and aid in creating resistance.
- Start by sitting in a Dandasana (Staff Pose). Keep your spine straight and arms at your sides.
- Bend both your legs at the knees with your feet firmly placed on the floor.
- Now slowly lift your feet off the floor, keeping the knee bent. Bring it up till your shins are parallel to the ground. Stay in this pose to find your stability and balance. This pose is also called a Half Boat Pose and if you want you can practice up till here.
- Next, after finding your stability, you need to straighten your legs to a 45-degree angle. Bring your arms in front of you and keep them straight with palms facing each other.
- Lift your chest to keep your spine straight and bring awareness to your stable breathing.
Hold this pose for at least 3 breaths.
6. Standing Big Toe Pose (Utthita Hasta Padangusthasana)
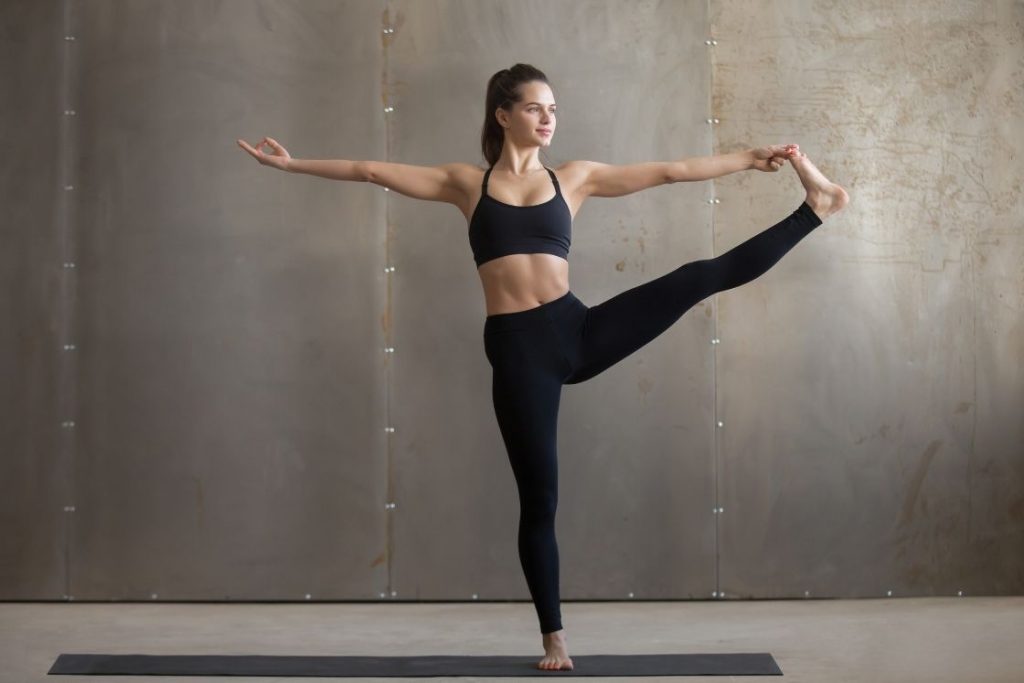
This is one of the poses that focuses on stretching the psoas muscles on all sides along with strengthening the ankles and legs. For more ease in standing big toe pose, you can use a strap to hold your lifted leg, avoid stooping and undue strain to the shoulder.
- Start by standing in a Tadasana (Mountain Pose). Your feet should be firmly placed on the mat with your bodyweight spread equally on all four corners of the feet.
- Put some weight on your right foot, bend your left foot at the knee and bring it close to your belly. Make sure that your right leg is relaxed and the knee is locked.
- Bring your right arm to the inside of the right thigh and hold your big toe with your index and middle fingers. Or loop a strap on the balls of your right foot.
- With your left hand placed on the left hip and left thigh muscle engaged, slowly extend your right leg to the front. Do not lose hold on the big toe or bring your spine forward.
- Stay here for a few seconds to find your balance and then slowly swing your legs to the side.
Hold this pose for a minimum of 3 breaths and repeat with the other leg.
7. Bridge Pose (Setu Bandha Sarvangasana)
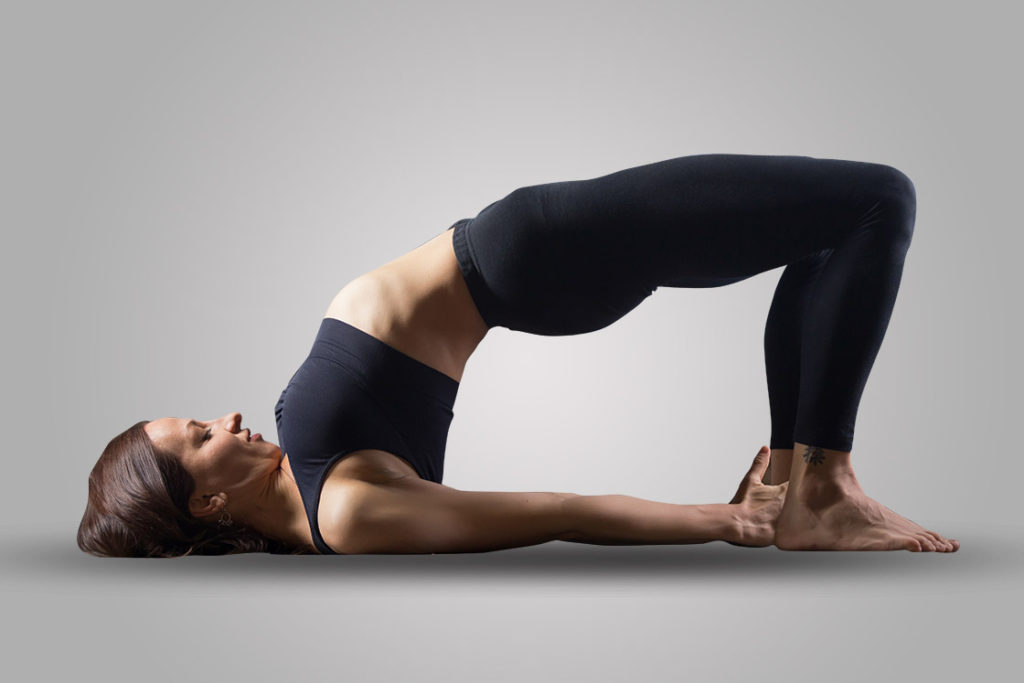
Practicing bridge pose will help in elongating the psoas muscle along with stretching and strengthening it. As both the legs are engaged at the same time, you can be assured that psoas muscles on both sides are being stimulated.
- Lie down on your mat with your legs bent at the knees. Spread them hip-width apart and press your soles firmly on the mat.
- Your lower legs should be parallel to each other with your knees in line with your ankles.
- Place your arms beside you, palms facing down. Stretch your hands so that the fingers slightly touch your heels. However, if you cannot touch your heels there is no harm.
- Engage your core and soles of the feet to lift your hips off the mat. Also, use the support of your arms here.
- Keep pressing down your soles and lift your thighs, hips, lower back, and upper back. At this stage, your shoulder blades and head should be on the mat.
Hold this position for 3-5 breaths.
8. Butterfly Pose (Baddha Konasana)
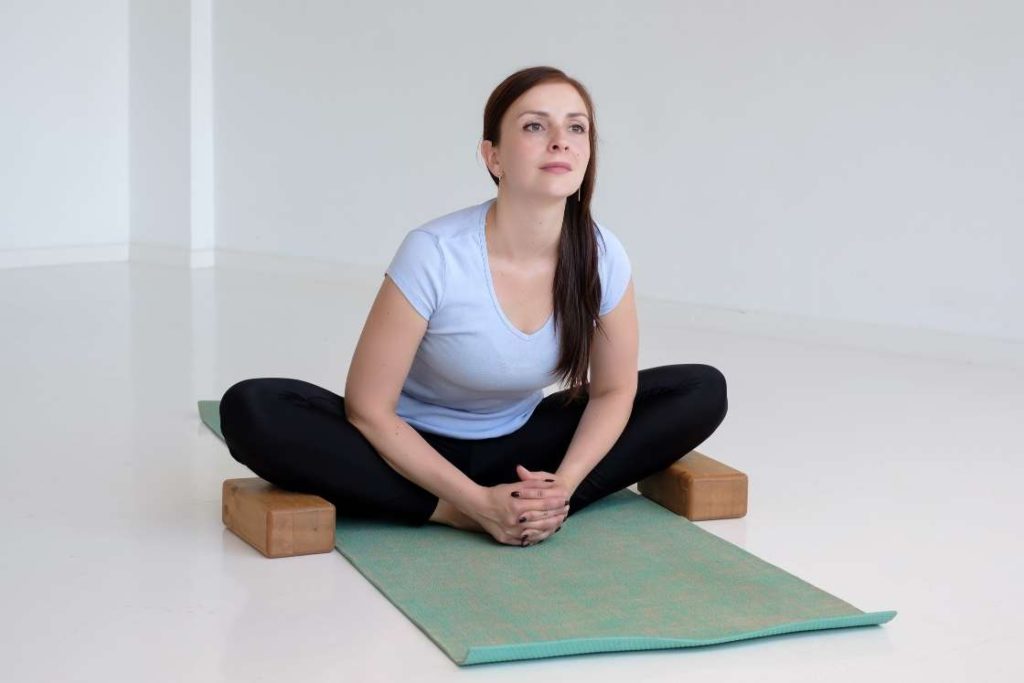
It promotes stretching of the inner thighs, hips, and lower back. This pose will help you in increasing flexibility, mobility, and reducing tightness.
- Start by sitting in Dandasana (Staff pose) with a straight spine.
- Start to bend your knees with the soles of both feet turned towards each other. As you bring it closer, join the soles like you would when joining your hands for Anjali Mudra.
- Bring your feet as close to your groin as possible, depending on your hip tightness and flexibility. Make sure you are not experiencing any strain or discomfort in your thighs, groin, hips, and lower back. In case of any discomfort, increase the distance between the feet and groin to ease the pain and work towards decreasing that gap gradually.
- Keep your legs relaxed so that your knees are close to the ground, if possible. If you feel a strain, keep a block or cushion under each knee for support.
- Hold your feet with your hands at your toes. Your spine should not curve/bend while holding your feet.
- To deepen the stretch for the psoas muscles at the lower back, bend forward while keeping your back straight.
Stay in this pose for 3-5 breathes.
Conclusion
Our mood and behavior change when one of our body parts or systems doesn’t work properly. And the psoas muscle is one such important body part that is used continuously without our conscious awareness.
Releasing tightness and excess stress from the psoas muscles will make you feel physically and mentally light, free, and stress-free as well. The above-mentioned poses may not give your instant relief however, you need patience and endurance to achieve that goal.
: Steps, Benefits, Variations")
: Steps, Benefits & More")
: How to Do, Benefits, and Modifications")

